


Hello, Crafters.
We are looking forward to today being the hottest day so far this year. YAY....bring it on, I love the heat - probably because we don't have much of it here in the UK!
Today's video shows how to make a really cute tealight holder using the Curvy Keepsake Box Thinlits. The idea started on Friday evening when I realised my proposed 3D project for my classes the next day was not going to work! Panic! There was something wrong with the template. I had two other people check it out for me to make sure I wasn't just missing something. But they both agreed with me.
Anyway, I came up with a quick idea for the tealight holder and then over the weekend, I had time to have a good look at my idea and how I could enhance it...........that's today's video! This is the link: Curvy Keepsake Tealight Holder
 Yesterday's week 4 challenge card is a 6"x6" card, which is an unusual size for me to make. I knew that I wanted to put the butterfly in a circle with this Designer Series paper behind it. The problem was that it wouldn't fit on to my normal sized card without looking too big. The DSP is from the Cherry On Top paper stack.
 I stamped the first butterfly onto Whisper White cardstock. It's the same three-step stamp I used for card no. 1 so I stamped step 1 with Early Espresso ink, step 2 with Tip Top Taupe ink and step 3, Early Espresso ink that I had stamped off once. I cut it out with the Bold Butterfly Framelit and then sponged the edges with using Tip Top Taupe to hide all the white cardstock.
For the second butterfly, I stamped a piece of Tip Top Taupe cardstock using Tip Top Taupe ink and the spotty stamp from Gorgeous Grunge and then die-cut it using the die from Butterflies Thinlits. I folded the wings up of both butterflies and adhered together with Tombow Glue.
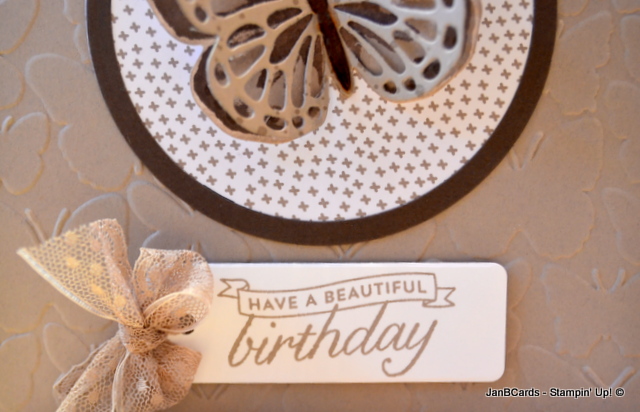 I die-cut a circle frame of Early Espresso cardstock using circles 8 and 9 of the Circles Collection Framelits. I also die cut a circle of the DSP using circle no. 9.
 I embossed a piece of Tip Top Taupe cardstock using the Fluttering Embossing Folder and adhered it to the card base.
 I adhered the circle frame to the DSP and
 adhered to the card front towards the top. I adhered the butterflies and put a thin layer of Crystal Effects along the butterfly's body.
I stamped the sentiment from Birthday Blossoms Stamp Set and die-cut using the long narrow die in the Chalk Talk Framelits. I punched a hole in the decorative end and threaded some of our beautiful Tip Top Taupe 1" Dotted Lace Trim through and tied in a bow. I adhered this to the card using Dimensionals.
Now that my weekly challenges have become a regular feature here, would you like to see me make videos showing how I made my challenge cards, in addition to giving written instructions here or are you happy just receiving these instructions? If I don't receive any feedback, I'll assume you're happy with things the way they are - as the saying goes, if it isn't broke, don't fix it! ☺
In the meantime, until tomorrow, happy crafting.
JanB.
Oh yes please! The idea of video's for the challenge cards would be most welcome Jan. I really love your beautiful butterfly cards on this post, for example, but would really prefer to SEE how you put them together. I hope others will comment favourably in the affirmative!! Thanks for asking! Just beautiful! Geraldine
ReplyDeleteWell, that's a very definite response, Geraldine, thank you. I'll see what I can do and will keep you posted. ☺ Best wishes, JanB.
ReplyDelete