Showing posts with label Stamp Set - Oh So Eclectic. Show all posts

Friday, 22 June 2018

White Heat-Embossed Vellum Flowers

Hello, Crafters.

What a fabulous week it's been for me! I'm still on Cloud 9! 
My card today is definitely what I call a Topsy card i.e. it just grew
 (Uncle Tom's Cabin). And because my card grew, I finished up 
using four stamp sets, which I always consider to be a bit excessive. 
 It would have been three sets if my first choice of flowers had
 followed through, but hey ho, these things happen! My original 
flower choices were the two outline flowers in the Oh So Eclectic 
Stamp Set. I stamped the open flower image onto my top layer
 of Blushing Bride Cardstock (CS) using Blushing Bride Ink.
I stamped three images of each flower in Versamark on Vellum CS
 and then heat-embossed them using Whisper White Embossing 
Powder. I painted the backs of each flower using my Light 
Rich Razzleberry Stampin Blend'.

 I die-cut the flowers using dies from the Eclectic Layers Thinlits 
Dies, but whichever way I tried to arrange the flowers on my 
smaller piece of Blushing Bride CS, they were just too big! I decided
 to try the two outline flower designs in the Cake Soiree Stamp Set. 
Next I created three Whisper White heat-embossed flowers 
of both designs on vellum, but left them unpainted!
After I'd die-cut them using the Sweet Cake Framelits, I found I had 
plenty of options as to which way I could arrange them. I used the stem
 image from the Touches of Textures Stamp Set, and stamped three
 images at various heights, using Granny Apple Green Ink. 

I adhered one large, and two smaller flowers on top pf the stems using
 Dimensionals, and I was really pleased with theresult! Before I adhered
 the image to the card, I wrapped a piece of our gorgeous 3/8" Mini 
Ruffled Ribbon in Powder Pink around the image. To keep things simple,
 I tied the ribbon into a knot!
 I struggled to find a sentiment I liked to fit in the small space just above
 the flowers so settled for JUST FOR YOU which is from the Rooted 
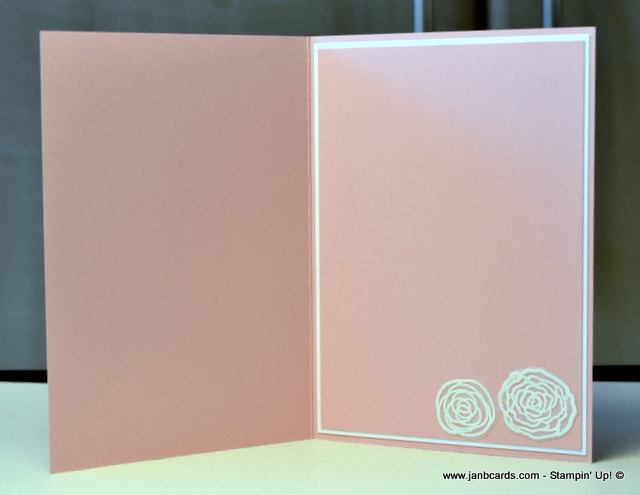
in Nature Stamp Set.Inside the card I added a layer of Whisper White CS 
and then a top layer of Blushing Bride CS. One of the large 
heat-embossed flowers disappeared - and I still haven't found it! - so
 I adhered the remaining two flowers in the bottom right-hand corner.

 At this stage I think I lost concentration for a while because I normally
 have a Whisper White CS layer on top inside my cards. Although
 it wasn't  planned, I think the card looks really nice with a Blushing
 Bride inside, and it's cetainly light enough to stamp and/or 
write a sentiment on! 

That's it from me today, and until tomnorrow, happy crafting.

JanB.

Saturday, 23 September 2017

September Thank You Cards

Hello, Crafters.

Yesterday morning I was busy catchng up with emails, texts and private messages on Facebook. 

I came up for air, and lunch at about two o'clock, and
after lunch I moved into my studio. Ahhhhh! But where to start!

The first job I dealt with was putting the Paper and Ribbon shares together ready for posting this morning. 

On Sunday I'm going to Natalie's training with one of the ladies from my team, so this means making swaps! 

We only need to do sixteen, so I'm going to make the coffee cup boxes that featured in one of my videos recently. 

I already have three that I made for the video, so it shouldn't take too long today to make the remaining thirteen boxes. 

Yesterday, as the end of the month is looming quite quickly, I decided I'd make this month's Customer Thank You Cards. 

The design is very similar to previous Thank You cards, but this time I've used Dimensionals to give the flowers a bit of height. 

It's very unusual for me to do something like this on Thank You cards as I normally keep them quite simple.

I used our Notecards and Envelopes which come in packs of twenty. Using Tranquil Tide Ink, I stamped the THANKS sentiment from the You Move Me Stamp Set.  

Apparently, it's making cards like this that make the Misti come into its own, but I still do my freehand!

I use my Grid Paper to line up where I need to stamp my sentiment, always using the centre dark vertical line as my starting point.

The cards arrive scored but not folded, so I looked at my card and stamped the THANKS where I wanted it to go. 
 
Then I placed it on my Grid Paper, and
lined the base up with the "ruler" that's on the bottom of the Grid paper. 

Then I eyeballed the beginning of the THANKS, and lined it up with my dark vertcal line. 

Next I line up the base of the letters with the half inch horizontal line. 

From here I note where the left hand side edge of my card is on my ruler - I think it was 3.75". 

I stamped all the cards I needed, placing them in the correct position on my Grid Paper, and then went through the same process to decide where I wanted to stamp the leaves.

The leaves and the flowers are from the Oh So Eclectic Stamp Set.

When these were all done, I moved onto the flowers which have been stamped with Berry Burst Ink. 

I stamped off once to colour the backgrounds of the flowers, and then die cut them using the Eclectic Layers Thinlits Dies. 

Before adhering the flowers to the cards, I folded all the cards on the score line, and gave the edges a good crease using the bone folder. 

I adhered the flowers towards the bottom of the leaves using three Mini Dimensionals on each. 

For the centre of the flowers I decided to use Lemon Lime Twist Ink, and tried using the "background" stamp,with the ink stamped off once.

However, I think you need to choose which stamp you want to use for the centre of the flower, rather than using both because both stamps have details on them. 

I tried lining them up, but it didn't appear to be the right thing to do, so I gave it a miss - see photograph 3A! 

I was happy with just one first generation stamp - see photographs 1A, 2A, and 4A.

After stamping and die cutting the required amount of flower centres, I adhered one inside each flower using Tombow Glue.

Today's my day for a bit of pampering - I'm off to get my nails manicured shortly. 

I was recently contacted by dotcomgiftshop asking me if they could feature one of my cards on a blog they were working on called "16 ways to say it with a greetings card". I don't think they chose one of my best cards, but the card they did choose helped demonstrate the point they were making. You can check it out here - twelfth card I think:- Dot Com Gift Shop Blog. The card underneath mine is by another Stampin' Up! demonstrator, Linda Parker.

I hope you have a great weekend. Until tomorrow, happy crafting!

JanB.

Tuesday, 22 August 2017

Oh So Eclectic

Hello, Crafters.

Yesterday I had a play wth the Oh So Eclectic Stamp Set and the Eclectic Layers Thinlits. 

It was quite funny how my card turned out! 

I chose this set because I wanted an intricate die I could use with the Multpurpose Adhesive Sheets (MAS). 

Part of my concern was that I thought there may be a lot of stringy glue where all the small pieces come out of the die. 

As it happened there weren't any, and the die cut was totally "string-free" and so very easy to handle. 
 
I highly recommend using this product as long as you don't want to use Dimensionals for your die cuts. 

The funny thing about my card was that I liked the look of all the "diamond" waste bits that came out of the die cut that I adhered them back in place on my die cut! LOL!

I'll try and have another play today and hope the waste really is waste!

I started my card wiith a base of Whisper White Cardstock (CS), then a layer of Soft Sky CS and a top layer of a design from the Naturally Eclectic Designer Series Paper (DSP). 

I cut a piece of Soft Sky CS that would fit on the DSP layer with an equal border all round.

Then I attached a piece of MAS to the CS that was the same measurement (attach it as I demonstrated in my video no. 305).

I ran it through my Big Shot with the lattice-type die from the Eclectic Layers Thinlits Dies.

Most of the diamond shapes just fell out, and the others were very easy to push out, all very cleanly and without any string!

The die cut also came away from the MAS backing exactly the same as the waste i.e. very cleanly, and without any string. 

The only challenge I had was trying to get the die cut straight before I put it onto the DSP!

It wasn't quite straight, and I wasn't able to lift it for a second chance like Tombow would hav given me! LOL!

Using Berry Burst Ink and Whisper White CS, I stamped two single flowers with a stem, and then I stamped the overall colour flower, stamped off once, over the stamped outline flowers. 

I repeated this with the single large open flower, stamping two of them, the outline and the overall colour stamp.

Then I used Emerald Envy Ink to stamp the cross-patterned leaves stamp, stamped off once. 

Then I took the co-ordinating all over leaf stamp, stamped off once, and stamped over the cross-patterned leaves. 

I don't think the cross-pattern adds much to the leaves and I probably won't bother using it again in future!

I used the Eclectic Layers Thinlits to die cut the flowers and the leaves, without using MAS because I wanted to use Dimensionals on them.

Using Emerald Envy Ink and Whisper White CS I stamped the sentiment which is from the Flirty Flowers Stamp Set. 

I die cut it using the smallest circle from the Stitched Shape Framelits.

Using a selection of Dimensionals and Mini Dimensionals, I arranged the flowers, leaves and sentiment on the front of my card. 

At one stage, I had to lift the large flower at the top because I'd positioned one of the Dimensionals in such a way I couldn't get the sentiment to go under the flower! 

As I lifted the flower and the Dimensional, it pulled up three of the "diamonds". 

When I'd originally adhered them back in position, I didn't press too hard because I didn't want to flatten the smaller "embossed" diamond on top!
 
As the gap the loose diamonds had left behind wouldn't be visible when the flower was back in place, I didn't worry about replacing the diamonds!

To finish my card, I adhered inside the card a layer each of Soft Sky and Whisper White CS.

I adhered the remaining flower with Tombow and then the three waste diamonds from the front of the card around the stem!

I think they helped to tie the inside with the front of the card together very nicely!

That's about it for today. Until tomorrow, happy crafting.

JanB.

Tuesday, 13 June 2017

Oh, So Eclectic

Hello, Crafters.

In preparation for having the whole house re-carpeted sometime in the near future, I started having a mammoth re-organistion in my studio yesterday. 

This is the room that's going to be a nightmare to clear for the carpet fitters! 

The plan is to clear my cupboards i.e. ex-wardrobes, to see how much stock and equipment I currently have out on shelves at the moment, that can go into my cupboards. 
 
At long last, I'm clearing out lots of my non-Stampin' Up equipment and consumables!

Today's card was my first play with the Oh, So Eclectic Stamp set and co-ordinating Eclectic Layers Thinlits. 

The first thing I did was to test the stamps on a scrap of paper. 

The main two flowers and the stem of leaves are two-step stamping although it doesn't say that on the box.

I stamped the outlines first, and then guessed where the background stamp should go. 

I soon realised the background stamp should be stamped off once before stamping on the outline, or use a lighter colour. 

All three background stamps are much larger than the outline stamps, which is good from two points of views. 

First is that you have to be way off not to get the stamp on the lined image and second, as the colour goes over all the edges, there are no white edge left on the die cuts, unless your stamping was way out. 

If this less than perfect stamping style doesn't suit you, it would be a good idea to use a Stamp-a-gig!

I started my card with a base of Emerald Envy Cardstock (CS), then a layer of Sweet Sugarplum CS and a top layer of Whisper White CS.

I dry embossed the top layer with the Petal Burst Embossing Folder. 

I adhered all the layers together with Tombow. 

Using Sweet Sugarplum and Emerald Envy Inks, both on Whisper White CS, I stamped two full flowers, two half flowers and two stems of leaves. 

I did the background stamps for all images remembering to stamp off first. 

Then I die cut them all, and also three squares as follows: Stitched Shape Square die no 4 using the now-retired Sweet Sugarplum Designer Series Paper (DSP) Stack; Layering Square Die, scallop die no 9 using Whisper White CS; Layering Square Die, scallop die no 10 using Emerald Envy CS.

I adhered the layers together using Tombow, and then used Tombow to glue the stems of leaves on the front of the square. 

I adhered one full and two half flowers onto the square using Dimensionals, and then I adhered the image square as a diamond on the card front, again using Tombow.

I chose the sentiment from the Birthday Blossoms Stamp Set, and stamped it in Emerald Envy Ink, onto Whisper White CS.

I layered it onto a strip of Sweet Sugaplum CS, then a layer of Emerald Envy CS. 

For the inside of my card I added a layer of Sweet Sugarplum CS, then a layer of Whisper White CS which I decorated with a die cut large flower the same as on the front of the card. 

Although it's now retired, I painted the centres of the two flowers using the Gold Wink of Stella Glitter Pen.

That's about it for today. 

Until tomorrow, happy crafting.

JanB.