Following
on from yesterday's post, I played with creating a One Sheet Wonder
using a 6"x6" sheet of Designer Series Paper (DSP).
I used out Notecards
& Envelopes, and made six cards from one sheet.
The first DSP I
used was from the Serene Scenery DSP Stack, but I felt the designs were
too bland for a One Sheet Wonder.
Once I'd made all six cards, I felt
they needed extra embellishments e.g. flowers, butterflies, etc.
The
other problem was that I chose a design that had the sky on one side
which resulted in having some pieces adhered vertically instead of
horizontally.
I certainly recommend avoiding directional patterns when
using this technique, because it adds another factor to the
equation
when working out where to make the cuts! I
chose a Mint Macaroon sheet from the Blooms & Bliss DSP, and I cut
all the shapes, and stamped all the sentiments.
Then I adhered
everything to the appropriate layer.
For the video, I chose a Blushing
Bride sheet from the Blooms & Bliss DSP, prepared all the Blushing
Bride Cardstock (CS) layers, and the Whisper White CS for the
sentiments. I
prepared everything this way so I could show the process of cutting the
DSP but without having to make my subscribers sit and watch me glue
twelve pieces of DSP to their CS layers!
After I'd finished the video, I
started downloading it to YouTube. While I was waiting for this to
happen, I went back to
the Blushing Bride DSP and CS, and finished
making those cards.
Now I've successfully made a video showing a 6"x6" One Sheet Wonder, I'll go back and see if I can make one using a 12" x 12" sheet.
My biggest concern is how long it would actually make the video as I made ten out of my first 12x12 attempt!
This style of card is definitely best suited to a fairly busy design on the DSP.
I feel it stands on its own much better than the DSP as shown in photographs 3 and 6, but could take extra embellishments if desired!
I hope you've enjoyed seeing my experiments with One Sheet Wonders. I'd love to hear your feedback whether you feel this is a technique worth trying, or if you're like my hubby, you don't see the point! LOL!
I wish you a happy Mother's Day if you're in a part of the world that's celebrating today. Until tomorrow, happy crafting.
Yesterday I was working on a
One Sheet Wonder, using a 12" x 12" sheet of Pop of Pink Designer
Series Paper (DSP).
I was hoping that I'd be able to make it into a
video! Unfortunately, because I put lots of layers on my cards, it
would take far to long. I've decided to share it here on my blog
instead.
I don't think it'll be more than two or three posts to show all
ten cards I achieved! It would have been more if I'd used our Notecards
& Envelopes! I've made all mine as Thank You
cards, and they would make a lovely gift for someone if they were in a
co-ordinating box!
They would make great cards for other occasions if
they were embellished with flowers, butterflies, bows, etc. As
far as a video is concerned, I'm now working on a similar idea but using a
sheet of 6" x 6" DSP. I think for this I might use our Notecards
& Ennvelopes so I can more out of the sheet!
The
first two cards I'm sharing are the only cards that don't have squares
or oblongs!
The black and white diamonds and the pink and white dots are
back to back on the same sheet.
I cut the DSP to the regular size for a
top layer - 5 1/2" x 3 7/8" - and cut it in half diagonally.
I layered
them on a piece of Whisper White Cardstock (CS) that I'd cut to the
regular size I use for the middle layer - 5 5/8" x 4" - and cut it in
half diagonally.
If you choose to do this design, you'll need to do two. Once you cut the sheet in half diagonally, when you turn one half over,
it'll be the same triangle as the first one. The
sentiment is from the Thankful Thoughts Stamp Set. I used this on one
of my recent cards and I explained how I'd cut my stamp in half. See the
Thank You cards I posted on Tuesday, 9th May 2017.
I
stamped one sentiment using Melon Mambo Ink and the other one using
Basic Black Archival Ink.
I die cut the sentiment using the no. 3 die
from the circles Stitched Shapes Framelits, and adhered it to a no. 6
scalloped Layering Circle Framelits Die in Basic Black CS. Then I layered it onto
a no. 7 straight cut circle die from the same die set.
I finished it
off by adding a strip of three Basic Pearls under the YOU.
Inside the
card I inserted a layer of Whisper White CS and decorated it with two
strips of the same DSP that I found in my folder of scraps.
This meant I
went over the One Sheet Wonder but I could have stamped an image
instead! I think I can be excused this little bit of cheating! LOL! I hope you have a great weekend. Until tomorrow, happy crafting. JanB.
This
is another stamp set I'm pleased to see is being carried forward to the
new catalogue - Wild About Flowers!
Out of the three different two-step
flower stamps there are in this set, my favourite is the Cornflower,
which means I have somewhat overlooked the other two!
I'm not sure what
this flower is, except to say it's very pretty in Blushing Bride! I used
Pear Pizzazz for the stems and leaves. Although I've made mine a Thank
You Card, it would be ideal as a birthday card, Mother's Day Card, as
well as a Get Well Soon Card, too! I decided to use our Shimmery White
Cardstock (CS) for my card as the Doilies are very slightly off-white in
colour and I felt they blended better than they did with Whisper White CS.
Before I decided on Shimmery
White CS, I checked the Doilies against Very Vanilla CS and found them to
be far too white! I
chose Blushing Bride CS for the first layer, and then a top layer of
Shimmery White CS. I repeated this for the layers inside the card, too. To
create the image, I die cut a circle using the No. 3 circle die from
the Stitched Shapes Framelits.
The Wild About Flowers Stamp Set is
photopolymer, so it made positioning the first stems and leaves stamp a
breeze.
I followed through with a second stamp, making sure I didn't
overlap with the previous image. Then I stamped the flowers using
Blushing Bride Ink.
I was so pleased with the result, I moved straight
onto stamping the flowers on the top layer inside the card.
I
allowed myself to get somewhat carried away with the amount of flowers I stamped
on the inside of the card! I
stamped the first stems and leaves image on the right-hand side, then I
stamped the second stamp on the left-hand side of this first image but lower, and
then the third one on the left-hand side of the second image!
This left
quite a large area of white to the right-hand side of the first image,
so I stamped the fourth and final stems and leaves image to fill this
in.
I finished off by stamping all the flowers in position.
I
adhered the flower image onto two Doilies - I couldn't separate them -
using Tombow, and then adhered the Doilies to the card front.
Using
Blushing Bride Ink, I stamped the sentiment about 3/4" up from the edge
of the top white layer.
I added three Basic Pearls underneath the
sentiment which is from the Thankful Thoughts Stamp Set, which is also being carried forward into the new catalogue.
After adhering
all the layers together, my final touch was to add small pearls to flowers on the card front.
Yesterday
I received a lovely surprise in the post from Stampin' Up! It was my Five Year
Anniversary Pin.
I've photographed the pin by the Stampin' Mist bottle to give an idea how big the pin is, which is the same as the base diameter!
It really doesn't feel like I've been
with Stampin' Up! that long - time has gone so quickly!
Here's to the
next five years and further!
That's it for today. Until tomorrow, happy crafting.
Sponging
has never been a technique that I've liked but every now and again, a
project just calls out for it!
Today's card is one of them.
As I was
working on this project, I remembered a video I made and called it Velvety Flowers.
I chose that name because I'd sponged
the edges of the flower petals and it really did make them look like velvet!
For
today's card I've sponged the edges of the two layers for the flowers,
the main two layers, the sentiment layer and the two coloured layers
inside the card. I
chose the single flower stamp from the Artistically Asian Stamp Set and
painted it with Marker Pens.
For the two flower heads I used Sweet
Sugarplum and for the stems and leaves I used Emerald Envy - both
colours are from the 2016 - 2018 InColours.
Before I stamped the image
onto a piece of Whisper White Cardstock (CS), I huffed onto the stamp to
make sure it was all still nice and moist.
Then I repeated the process
and stamped the second image off to the right but lower than the first
one. The
sentiment is from theThankful Thoughts Stamp Set.
Initially, I heat
embossed it in black on the flowers, hence the cover up! Yes, I made
such a mess of it!
I also heat embossed the bee from the Touches of
Texture Stamp Set.
I coloured the body using my Crushed Curry Marker
Pen, the Smokey Slate Marker Pen for the wings and then painted all over
using my Clear Wink of Stella Glitter Pen.
Finally I fussy cut
the bee, although if I did this card again, I'd do the bee straight onto the Whisper White Cardstock!
After having made a mess with the sentiment, I wasn't taking any chances with the bee! I
dry embossed the Emerald Envy top layer using the beautiful Petal Burst
Embossing Folder.
I finished the card with two Whisper White and
one Emerald Green strips of ribbon wrapped around the lower half of the
card.
I experimented with adding some bows but decided against them,
less is more!
Inside the card I added a layer of Sweet Sugaplum, Emerald Envy and Whisper White Cardstock, but I didn't add any stamping.
All three stamp sets used are for this card are being carried forward into
the new catalogue! Looking at the finished card now, if I remade it, another change I'd make is to put the sentiment across the three strips of ribbon, not on the flowers!
That's it for today. Until tomorrow, happy crafting. JanB.
Yesterday I finished
making my thank you gifts for my April customers, and then started on my
Thank You cards. Today I'll be ready to get all the happy mail packages prepared for
posting on Wednesday. ☺
As usual, I've used our
Notecards & Envelopes because I think they are an ideal size for Thank You
cards. When the new catalogue goes live, these notecards will be available in Very Vanilla as well as Whisper White, but Crumb Cake Notecards are retiring on 31st May 2017.
For my colour scheme I chose to use Cucumber Crush, which is one of the
five 2015 - 2017 InColours, all of which will be retiring on 31st. May 2017, and to
complement the green, I chose Sahara Sand.
I based the design of my
card on the Kitty on a Chair card I shared yesterday! The sentiment is from the
Thankful Thoughts Stamp Set.
The stamp should read THANK YOU SO MUCH but
I cut the SO MUCH off because I knew I'd get a lot more use out of the stamp as
a straight forward THANK YOU. I can always put both pieces together on a block
if I want to use both parts together.
Please note that, by
cutting my stamp in half, I've rendered my guarantee with Stampin' Up! null and
void. As I have total confidence in the quality of SU products, I don't
consider this to be an issue!
Frequently when I make
my Thank You cards, I stamp directly onto the card front, and needless to say, I
inevitably make mistakes! When this happens, I save the backs of
these cards and any decent-sized pieces I can rescue from the front. These
pieces are what I use when I make cards like today's card.
I started my card by
stamping the sentiment in Cucumber Crush Ink onto white cardstock. Then I die
cut the sentiment using a Stitched Shapes Framelits die.
I inked the
flowery stamp from the Timeless Textures Stamp Set in Sahara Sand Ink. I
stamped off twice, and then stamped the third generation on the die cut oval. Both the stamp sets I've used today are being carried forward in the new catalogue! ☺
I used a scalloped oval
die from the Layering Ovals Framelits to die cut a layer of Cucumber Crush
Cardstock. I adhered the two layers using Tombow, and then onto the centre of
the card.
I played around with various embellishments for a while but evetually decided
to leave well alone - clean and simple!
On Friday, I shared some
photographs of my new Stampin' Up! Punch Storage Units. I bought them on Ebay
from a company called Lasersmith, and paid £15.95 each, ready assembled, post
free.
They are also available from the company website www.lasersmith.co.uk for
£12.95 ready assembled, plus shipping. I have emailed the company to find out
if they ship outside the UK and am still waiting for a reply.
That's about it for
today. Until tomorrow, happy crafting.
I
went to bed for a few hours and woke feeling so much better.
I decided
to try a bit of gentle crafting and these are the results. The three cards are the same designs but different coloured Cardstock (CS) and Designers Series Paper (DSP).
I already had four of these dragonfly "trail" die cuts but used only three of them! ☺ Card 1 - Delightful Dijon and Very Vanilla (CS), and Serene Scenery (DSP) Stack.
The dragonflies had been die cut using Gold Foil.
I chose the sentiment from the Thankful Thoughts Stamp Set and heat embossed it using Gold Embossing Powder.
I die cut the sentiment using the second smallest Stitched Shape Oval Die. On the inside of the card, I heat embossed the little dragonfly from the Touches of Texture Stamp Set, using gold.
Card 2 - Rose Red and Very Vanilla Cardstock (CS), and Falling In Love Designer Series Paper (DSP).
The dragonflies had been die cut using Rose Red CS. I chose the sentiment from the Thankful Thoughts Stamp Set and heat embossed it using Rose Red Ink and Clear Embossing Powder.
I die cut the sentiment using the second smallest Stitched Shape Oval Die.
On the inside of the card, I heat embosed the little dragonfly from the Touches of Texture Stamp Set, using in Rose Red. Card 3 - Mint Macaroon and Very Vanilla Cardstock (CS), and By The Shore Designer Series Paper (DSP).
The dragonflies had been die cut using Silver Foil CS. I chose the sentiment from the Thankful Thoughts Stamp Set and heat embossed it using Silver Embossing Powder.
I die cut the sentiment using the second smallest Stitched Shape Oval Die.
On the inside of the card, I heat embossed the little dragonfly from the Touches of Texture Stamp Set, using Silver Embossing Powder. I'm pleased to say that most of the products I've used here, are being carried forward to the new catalogue. The exceptions are all three DSP's and the Mint Macaroon and Delightful Dijon CS!
I will always try to stay on top of what's staying and what's going, but I may not always be 100% on top of it!
Hello, Crafters. Just
over 24 hours left and we say goodbye to Sale-a-bration (SAB) for another
year!
It's been a great time and the gifts this year have one
of the best selections we've ever had!
While I'm disappointed to see SAB go, I'm a perenniel optimist
so I always think that when one door closes, another one opens and Stampin' Up! is never short on surprises! I
surprised myself yesterday working on my swaps - I've made a total of
67 so far!
Two or three more days and I should be there, including the
extras I'm making for my customers!
I'm planning a video to show how I
made my swaps, and if I have time, I'm going to make a stepped-up
version to share with you.
I've already made part of it, I just
need to finish it off!
The swap video should be uploaded on Sunday 9th April.
If
you feel a sense of déja vu with today's card, you'll be right - it's based
it on a card I shared here on 29th December 2014!
Back then the card
was my take on a make-n-take we made when we went to the Stampin' Up!
2015 Sale-a-bration Roadshow in Basingstoke in December 2014.
The
SAB stamp set I used back then was called Lotus Blossom, and today's SAB
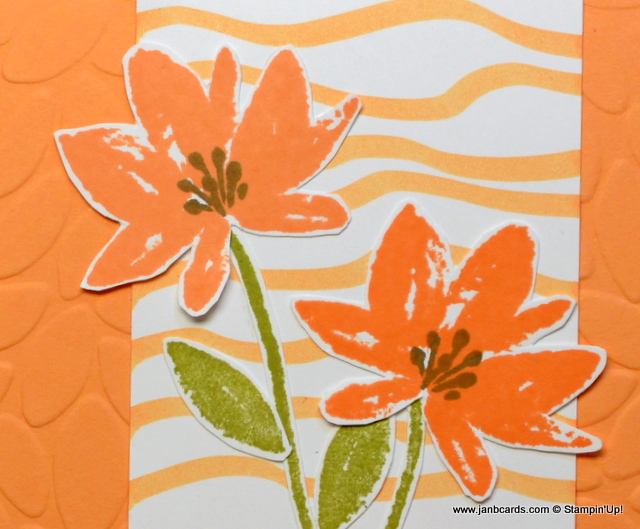
stamp set is Avant Garden.
Like the 2015 stamp set, today's flowers had
to be fussy cut but they were quite straightforward!
I
started my card with a base of Peekaboo Peach Cardstock (CS), with a
layer of Whisper White CS and a top layer of Peekaboo Peach CS, which I
dry-embossed using the Petal Burst Embossing Folder.
I adhered all three
layers together using Tombow.
I took a 2¼" strip of Whisper White CS
and, using the brush end of my Peekaboo Peach Marker Pen, "drew" some
squiggle lines from side to side!
To
create the flowers I stamped two stems and four leaves onto Whisper
White CS using Old Olive Ink.
Then I stamped two flowers using Peekaboo
Peach Ink, and then again on top of each other!
This is relatively easy to do because they're photopolymer stamps.
The
double stamping can be omitted; I did it because I wanted my flower
heads to be darker than the rest of the Peekaboo Peach colours.
The
stamp set in 2015 was two step stamping so it was easy to achieve the
darker colour.
Finally, I stamped the stamens inside the flower heads
using Soft Suede Ink.
Once I'd finished cutting out all the shapes, Iadhered in place
on the stripe Whisper White paper I'd created.
I used some Peekaboo
Peach Ruched Ribbon and tied a bow around near the base, and then I adhered the strip
to the card front using Tombow.
I
took a strip of Whisper White CS that was 7/8" wide and stamped THANKS
in Soft Suede Ink from the Thankful Thoughts Stamp Set.
The design of
this card would be suitable for most events e.g. birthdays, get well, etc.
I added three butterflies
from the In the Meadow Stamp Set in Peekaboo Peach Ink.
I fishtailed
the right hand side, rounded the left hand side, and then adhered it
to the card front using Dimensionals.
My
finishing touch was to add a piece of Whisper White CS inside the card
and I stamped a flower head in the same colours as on the front of the
card!
That's it for today! I'm off to my studio now to make the next batch of swaps! Until tomorrow, happy crafting!

 Hello, Crafters.


 equation
when working out where to make the cuts!
 After I'd finished the video, I
started downloading it to YouTube. While I was waiting for this to
happen, I went back to
 My biggest concern is how long it would actually make the video as I made ten out of my first 12x12 attempt!
 I hope you've enjoyed seeing my experiments with One Sheet Wonders. I'd love to hear your feedback whether you feel this is a technique worth trying, or if you're like my hubby, you don't see the point! LOL!