Yesterday morning I was driving along a
fairly quiet surburban road, near where I live, and I was faced with a
woman driving a white four by four heading straight for me.
I tooted and
swerved to get out of her way!
The sound of me tooting brought her to
her senses, and she also swerved.
Needless to say I felt really shaken, and pulled over to phone hubby.
After chatting for a few minutes, I
decided I was OK to carry on to church.
When I arrived, I realised I
wasn't doing as well as I thought I was, so I phoned Vicki to come out
to see me in the car park.
We spent several minutes chatting, and then she took me
to a quiet area in the church to get me a cup of very sweet tea.
Church is always a
good place to be, but especially good when you've just had the fright of
your life!
There
wasn't any Sunday School for the children yesterday, as they were included
in our service.
It was delightful to see them on the stage singing, and
then helping the preacher by holding up very large pictures he was using
to explain the story of Christmas.
It was just what I needed!
In
the evening our son LD came round for dinner with his delightful
girlfriend Sasha.
Conversation flowed, and time went far too quickly! In what
seemed to be next to no time, they had to make tracks home! I
made today's card yesterday afternoon but I wasn't feeling very
inspired, until I came to thinking about a "skirt" for the Christmas
tree!
I wanted to create a Christmas tree and decorate it would lots of
multi-coloured baubles.
As you can see that idea didn't work, so I
changed to Red Glimmer Paper Stars.
I started my card with a base of Whisper White Cardstock (CS), then a layer
of Red Glimmer Paper, and a top layer of Whisper White CS.
I dry embossed the top layer using the Oh My Stars Embossing Folder.
As I showed on yesterday's video, I
adhered the Whisper White layers to the Red Glimmer layers using
Tombow, and then laid them under my self-healing mat while I continued
working
on the other parts.
Tombow is great for adhering to the Glimmer Paper
but it does need some pressure and some time to get a good grip!
I
took another piece of Whisper White CS, and stamped the Christmas tree
from the Ready for Christmas Stamp Set using Wild Wasabi Ink.
I used the Christmas
tree die from the Christmas Staircase Thinlits Dies to cut the tree
out, and I also used the star die to die cut nine Red Glimmer stars.
For the star on
top of the tree, I used Gold Glimmer Paper and cut one small and one medium star from the Starlight Thinlits Dies.
As
I was preparing all these pieces I was thinking about the base of the
tree, and how was I going to finish it off!
In my mind it was an indoor
tree - real or artificial? It didn't matter! - so I needed a tub to put the tree in!
I
decided to go through my file of dies to see what I could use, and as usual there were several options!
There
were a few possibilities, but as soon as I saw the Up and Away Thinlits
Dies, I knew I had to use the "funnel" die upside down.
I feel it takes
my tree from ordinary to something a bit special!
I finished the front
of the card with the sentiment from the Star of Light Stamp Set, stamped
in Wild Wasabi, and I topped the tree with the larger Gold Glimmer
star.
I die cut one more small and one more medium stars, and adhered them at the bottom of the Whisper White layer inside the card! Another
of my highs yesterday was that my two-hour video was very well received
by my YouTube subscribers.
I'll certainly consider doing it again, the only
real change I'd make is that I'd plan doing it from the beginning
rather than tumbling into the idea like I did this time! Footnote: when I arrived
back home yesterday, after church, hubby downloaded the film from my dash cam to view the
near-miss I'd had on the way to church earlier!
The film showed what happened, very clearly, including the number plate on the other car!
If all cars were fitted with dash cams, it wouldn't take the police long to work out what happened in the horrific six-vehicle smash in the early hours of yesterday morning, in Birmingham, which claimed six lives!
They're not
very expensive, and I think like SatNav, it's only a question of time
before everyone has one! If it's too late to put on your Christmas
wishlist, treat yourself! That's it from me today. Until tomorrow, happy crafting! JanB.
PS Stampin' Up! have put more items in the Clearance Rack! Some of the retiring products have been reduced by 70%! Do pop over to my shop www.janbcards.stampinup.net to grab a bargain or two. But don't delay, once they've gone, they've gone for good! ☺
I
thrilled to say my new printer arrived yesterday, albeit at 9.30 pm!
We
started tracking our parcel yesterday afternoon, and the courier had 105
deliveries in front of ours!
How hard these couriers work to make sure
we all receive our parcels before Christmas - I hope they are well
rewarded by their employers! Yesterday
I was playing with The Year of Cheer Washi Tape, and I have to confess I
used nearly the whole roll of this mottled copper tape to achieve this
card.
My original design still didn't work after my third attempt, so I
gave up and moved onto today's card! I
started with a card base of Very Vanilla Cardstock (CS).
The next layer was a
piece of Copper Foil, which I anchored onto my Grid Paper using some
removable tape.
Leaving the first half an inch free, I adhered a strip
of washi tape at every alternate half inch line on the grid paper.
The
alternative way this effect could be achieved is to use any piece of
cardstock for the base and start with a strip of the plain copper washi
tape that comes in the Year of Cheer Washi Tape Pack.
Then alternate
with strips of the mottled design.
I preferred to go for the easy option
because with this alternative method means you have to line one strip
of tape alongside the previous strip perfectly - no margin for error! I
adhered the completed panel to the front of my card, and die cut a
Stitched Shape Square, and a larger size Sitched Shape Square in Very
Vanilla CS.
I adhered the two together using Tombow. Using
Very Vanilla CS and the Starlight Thinlits Dies, I die cut three of the
smallest fancy stars, and five each of the plain medium and small sized
stars.
I used the first star full size, and the second one I cut off
the pointed bits above the last oval.
On the last star I cut off
everything and left a Maltese Cross-like shape in the centre with one
oval in-between each part of the coss.
Sorry, but I can't think of another
way to descibe it!
I painted each star with my Clear Wink of Stella
Glitter Pen, and adhered all three together using Dimensionals.
Then I
adhered it onto the diamond-shaped squares by using Tombow on the bottom
part of the star.
I
heat embosed the sentiment , which is from the Star of Light Stamp
Set, and adhered it to the card front using Dimensionals.
I painted the
medium and small stars I'd die cut earlier, with my Clear Wink of Stella
Pen, and layered one of each size together with a dimensional.
I stacked
two Mini Dimensionals together and used them to adhere the star to the
card base so it came above the sentiment.
To
decorate the inside of the card, I rescued a panel that matches the
front panel, and adhered it on the right-had side leaving the same gap around three edges that I'd
left around the panel on the front of the card.
I adhered five of the
remaining stamps over this panel.
For the final touch on my card, I
added a large Basic Pearl to the main star on the front of my card.
In
a few minutes I'm off to have my nails done, and this afternoon, I'm
off to Church for their special service for people who have been
bereaved.
That's it from me today. I hope you have a great weekend. Until tomorrow - and my special project - happy crafting.
As promised, I
uploaded my video this morning which shows how I made the Five Bells
card I shared here last Saturday.
When I orignally showed my card, I
hadn't decorated the inside of it, but I'd remedied that by the time I'd made
my video.
I kept it simple by just adding four of the holly die cuts that I
had adhered onto the outside of the card.
Except they weren't die cuts; I actually stamped them, which I would have done on the video but I used pre-prepared die cuts to save time.
As
I knew this would be quite a long video, I had all the bells and holly
ready beforehand, and then demonstrated how I did them, one of each, on camera. Another
advantage of having everything ready beforehand was that I was able to
demonstrate the bleach on a different colour from the one I needed for
my project.
I chose to use Real Red - I didn't think I could chose
anything more different! LOL!
One of the reasons I love this technique is because you just never know what colour result you're going to get!
I
think the only change I made to my card from the card I shared on Saturday is that I used Jute Twine instead of our Copper Trim.
As much
as I prefer the Copper Trim, I thought the Jute was more appropriate.
Today I'm looking forward to a call from my UPS man with my latest Stampin' Up! delivery!
Every now and again
there are occasions - like today - when my modesty goes straight out of
the window!
Please forgive me, but I'm so pleased how today's card has
turned out!
I'm planning this for my Wednesday video, although it'll
take some forward planning.
I
started my card by heat embossing four - the plan being three for the
front and one for the inside of the card - of the bells from the
Seasonal Bells Stamp Set using White Embossing Powder on Elegant
Eggplant Cardstock (CS).
Then I used normal household bleach and painted inside
the bell.
While I was waiting for the bleach to work its magic, I
stamped another four using Silver Embossing Powder on Basic Grey CS, and
then painted them with bleach.
By
this time my plan had changed to five bells as seen in my finished
card, and I knew I wanted a darker outline for the bells.
Seeing the
developing results on the first two sets of bells, I chose Smokey Slate
CS with Copper Embossing Powder, and created five bells.
I should have
done six, so I had one for the inside of the card!
I
punched the bells out using the Bell Punch, but I didn't like the
outside of cardstock showing, so I fussy cut around the edge of the heat
embossing. I
inked the Sheet Music Background Stamp with Sahara Sand Ink, and stamped
off once.
Then I took a layer of Whisper White CS and laid it on top of
the stamp, making sure I positioned it straight.
I took a scrap of
paper, placed it over the cardstock, and gently rubbed all over.
Using
Tombow, I adhered this layer onto a layer of Copper Foil, and then onto a
Whisper White CS card base.
I should have waited before adhering to the
card base so I could have adhered the top of the 1/4" Copper Trim at the back
of the Copper Foil! DOH!
Never mind, I successfully anchored the top of
the trim down using Glue Dots. I
punched holes in the top of each bell using my 1/8" Handheld Punch, and
threaded the Copper Trim through all the bells.
I adhered the bells to the card front using
Dimensionals.
At this stage I decided I needed a pop of colour and chose the holly and berries
stamp from the Carols of Christmas Stamp Set.
I painted them using
Garden Green and Real Red Marker Pens, making a total of nine
altogether.
I die cut them using the Card Front Builder Thinlits Dies. I
heat embossed the sentiment from the Star of Light Stamp Set, onto a
piece of Very Vanilla CS, and adhered it to a layer of Copper Foil.
This
was then adhered to the card front using Tombow.
Finally I added the
holly using Glue Dots on the five bells, and Tombow in each of the four corners. By
the time I reached this stage, it was getting quite late and I was
beginning to feel quite tired...............but I still hadn't decorated
inside my card!
This is just the second occasion since I started
decorating the insides of my cards on 01.01.17 that I haven't done it!
I
adhered a layer of Whisper White CS onto a layer of Copper Foil, and
adhered that inside my card, and left it! At least this way I can go back to my card
and finish it off properly at any time, rather than forcing myself to do
something and run the risk of spoiling my card! The
penultimate photograph shows the results of the other two bells I
bleached!
Originally I photographed the "pink" bell on a sheet of Blushing Bride
CS, and the "yellow" bell on a sheet of So Saffron CS.
The idea was that I thought
it would give you a good idea of the true colours!
However, being the
lousy photographer I am, while the Blushing Bride didn't look too bad, the So Saffron
looked more like Daffodil Delight see the last photograph!
I don't have any immediate plans for thes other bells, but as the saying goes, watch this space! I hope you have a great weekend. Until tomorrow, happy crafting. JanB.
I had a doctor's
appointment yesterday morning, and because our cleaning lady was in and
hubby would rather not be around at the same time, he decided to come down with me!
After my flu jab and blood tests had been done, we decided
to leave the car where we had parked it, and walk into town.
The
weather was gorgeous, and it was just a ten minute walk.
After a very
leisurely meander around the shops getting the few bits and pieces we
needed, I surprised hubby with lunch at our favourite Singaporian
restaurant!
I hadn't planned it, it just happened!
We had an excellent
lunch, followed by a slow stroll back to the car and then the short drive back
home.
Most of the time, I enjoy the anticipation of looking forward to
events we've planned, but yesterday's spontaneity was superb! Yesterday
afternoon I started planning the projects for this weekend's classes. For the 3D project, we'll be decorating one of the Acetate Card Boxes on
page 13 of the Christmas Catalogue, and then we'll make two cards to
co-ordinate with the box.
One of the cards will be based on today's
Eskimo card.
At the moment I have various ideas buzzing around in my
head, and until they settle down I won't be sure exactly what we will be
doing! Today's card is based on an idea I have for a Christmas decoration, but I'm saving that for another day.
I
started with a top layer of Whisper White Cardstock (CS) which I dry
embossed using theHolly Embossing Folder.
I stamped two images of the
Eskimo from the Cookie Cutter Christmas Stamp Set, and coloured him/her
(?) in using Soft Sky and Bermuda Bay Marker Pens.
I painted all the fur
trims using my Clear Wink of Stella Glitter Pen.
Using the Cookie
Cutter Builder Punch, I punched out both images.
I adhered the embossed
Whisper White CS layer to a layer of Silver Foil, and then adhered this
to a Whisper White card base. I
punched a Whisper White CS circle using the 2.25" Circle Punch, and
adhered it in the centre, on the back of a Silver Foil Snowflake.
I'm
still undecided whether it is worth doing this, so I'd appreciate any
feedback!
The reasons I did this are: a). to provide an even background
for the Eskimo to rest on and to adhere to, b). to give the image a
clearer background i.e. just the snowflake, instead of the snowflake and
the dry embossing that can be seen through the snowflake cut outs, c).
to give the snowflake an easy background to adhere to the embossed
layer.
The
sentiment is from the Star of Light Stamp Set, and has been stamped
onto a piece of Whisper White CS using Smokey Slate Ink. I layered it
onto a piece of silver foil.
After I'd adhered everything together, I finished
off by adding a small silver bow, adhering it with a Glue Dot, at the
top of the snowflake.
Inside
the card I adhered a layer of Silver Foil and a top layer of Whisper
White CS.
I adhered the second Eskimo in the bottom right hand corner.
Today
I'll be working on another card for the weekend's classes and designing
how we'll be decorating the Acetate Boxes!
This
morning I uploaded my video which I've called Christmas Stepper Card.
It was
inspired by a card I received from Angela Oxer, who's a lady who comes
to my classes. Many thanks, Angela, it's reallly beautiful!
You can't see the real beauty of
this card in photographs but in real life, the stepper adds so much dimension.
I could have done with some larger reindeer but the next size
Stampin' Up! have on offer at the moment is far too large - or at least
I think so.
If you make this card and use the reindeer in Santa's
Sleigh Stamp Set, please share it with me by email janb@janbcards.com or
on my FB page www.facebook.com/JanBCards. Many thanks. ☺
Photograph
6: this is my first take on this stepper card and as you can see, if I'd try to make a
video of this, it would have been about two hours long.
The product I
used for this card is the Outdoor Adventure Framelits.
I die cut two mountain
images and cut the second one down to fit across the width of the card.
I also retrieved the
negative strips that had created gaps between the mountains and adhered
them back in place using Tombow. I used Wild Wasabi cardstock to die cut
the trees - I cut about eight strips of them and have some left over,
ready for another project!
The dies for the mountains and the trees,
don't have a base cutting edge, so you can have the mountains as tall as
suits your project.
Equally, you can have as much "grass" below the
trees that you'd like. It was this card that made me decide to make the
little support for the inside of my card that presents it from doing the
"splits" when it's sitting on the mantelpiece! Photograph 7: this is Angela's card. She didn't use Stampin' Up!
products which made my card a bigger challenge to put together!
Unfortunately, one of the reindeer went walkabouts in my office
somewhere but I think the card still looks stunning.
Did
you see my previous video - Matispa Gift Box?
I delivered the boxes to
Sharon yesterday, and took the Gorgeous Grunge and First Sight designed boxes with
me as well, so she could see the design options!
Well, what do I know?
LOL!
In the video, I said Sharon wouldn't like the First Sight design as
she'd dismiss it as "too flowery"!
She love's all three designs and
started with an order of four boxes in each of the three designs!
That'll keep me busy for a little while! I wish you all a happy Sunday, and until tomorrow, happy crafting!. JanB.
This is the last weekend before Christmas - are you ready? I'm pleased to say I am, sort of!! I
received a Christmas card from one of the ladies who comes to my
classes, and just fell in love with it!
I contacted Angela, and asked if she minded if I
copied it, and also made a video, too. Unfortunately,
Angela hasn't used Stampin' Up! products, so it has been quite a challenge!
The first card I made, I allowed myself to get somewhat carried away with it and
finished up with a card, whilst I liked it, there was no way I was
going to be able to make it into a video! It was too complicated and would have taken way, way too long!
I'll share a photograph of it
on Sunday, along with a photograph of Angela's card.
I started my second card, and that was a lot more video-friendly. Unfortunately, by this time, it
was getting really quite late, and I hadn't made a card for today - so I went for the easy option! Today's card is based on the card I'm working on for the video but, as
I don't want to give too much away about Sunday's video, I won't say
any more! To
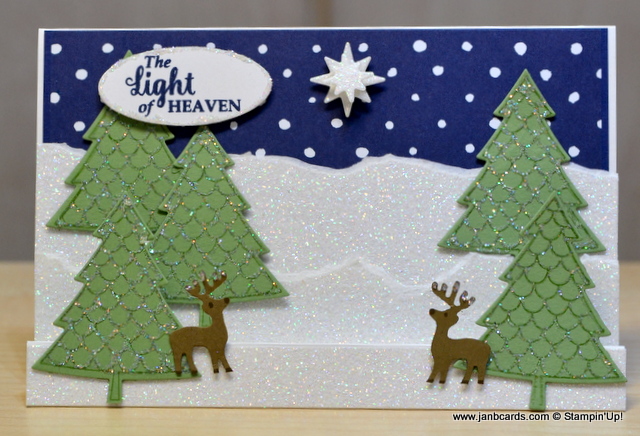
make today's card I started with a Night of Navy Cardstock (CS) base,
with a layer of Shimmery White CS.I used the spotted design from the
Floral Boutique Designer Series Paper (DSP) for the top layer.
I took two strips of
Dazzling Diamonds Glimmer paper and tore the top edge of each piece, and adhered them, using Tombow, one above the other to look like snow banks.
For the trees, I chose Wild Wasabi CS and
stamped the largest tree from the Peaceful Pines Stamp Set, three times
in Wild Wasabi Ink.I die cut them using the co-ordinating die in the
Perfect Pines Framelits Dies.
Using my now-retired two way glue pen, I
painted glue along the stamped lines on the trees and dipped them into
my box of Dazzling Diamonds Glitter.
I adhered the trees onto the card
front using Dimensionals but I added Glue Dots to the Dimensionals
that would be going onto the Glimmer Paper.
The stars are more die cuts I
found in my Dazzling Diamonds Glimmer Paper Ziplock bag! I adhered them
on top of each other using Dimensionals - plus a Glue Dot on the top one
- and adhered then at the top of the card.
I
used some regular Scotch Tape to cover the three dots that are on the sentiment stamp
from the Star of Light Stamp Set.
Using Night of Navy Ink, I inked the
stamp, removed the tape and stamped the image on to a piece of Shimmery
White CS.
Using the smallest oval straight cut die from the Layering
Ovals Framelits Dies, I die cut the sentiment. I put wet glue around the outside of the die cut and
dipped it in the box of Dazzling Diamonds Glitter.
The final touch was
to adhere the sentiment to the snow banks using Dimensionals with Glue
Dots!
Tomorrow, I shall be out most of the day until the afternoon, so I really don't have much time to make a video, upload it, and edit it ready for 7 am Sunday morning! LOL! I hope you have a great weekend. Until tomorrow, happy crafting. JanB.

 Hello, Crafters.
 Yesterday morning I was driving along a
fairly quiet surburban road, near where I live, and I was faced with a
woman driving a white four by four heading straight for me.
Yesterday morning I was driving along a
fairly quiet surburban road, near where I live, and I was faced with a
woman driving a white four by four heading straight for me. 
 I wanted to create a Christmas tree and decorate it would lots of
multi-coloured baubles.
I wanted to create a Christmas tree and decorate it would lots of
multi-coloured baubles.  As you can see that idea didn't work, so I
changed to Red Glimmer Paper Stars.
As you can see that idea didn't work, so I
changed to Red Glimmer Paper Stars.  Tombow is great for adhering to the Glimmer Paper
but it does need some pressure and some time to get a good grip!
Tombow is great for adhering to the Glimmer Paper
but it does need some pressure and some time to get a good grip!  I used the Christmas
tree die from the Christmas Staircase Thinlits Dies to cut the tree
out, and I also used the star die to die cut nine Red Glimmer stars.
I used the Christmas
tree die from the Christmas Staircase Thinlits Dies to cut the tree
out, and I also used the star die to die cut nine Red Glimmer stars.  There
were a few possibilities, but as soon as I saw the Up and Away Thinlits
Dies, I knew I had to use the "funnel" die upside down.
There
were a few possibilities, but as soon as I saw the Up and Away Thinlits
Dies, I knew I had to use the "funnel" die upside down. Another
of my highs yesterday was that my two-hour video was very well received
by my YouTube subscribers.
Another
of my highs yesterday was that my two-hour video was very well received
by my YouTube subscribers.  If all cars were fitted with dash cams, it wouldn't take the police long to work out what happened in the horrific six-vehicle smash in the early hours of yesterday morning, in Birmingham, which claimed six lives!