 Hello, Crafters.
On Tuesday evening hubby realised that both our cooler box and our collapsible cooler bag had also been stolen from our garage. We checked on the internet to find the replacement cost for each item and I emailed the insurance company so they'd get it first thing yesterday morning.
By the time I arrived home from work yesterday at 3.30pm, they had already paid the money into my bank account! Our insurance policy is with Marks & Spencer Home Insurance and the insurance company is AXA - a big thank you to you both on such amazing, first class service!
I had a very successful day working for my daughter yesterday and have now finished until next year - boy, that does sound strange!
 I also had a successful afternoon in my studio and made three projects for my Corrugated Kraft challenge! An excellent day all round!
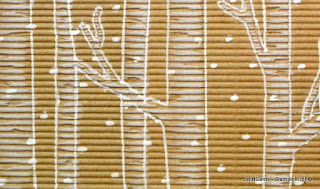
Unfortunately, my photographs today really don't show what I've done to create this card but it looks lovely in real-life!
I dry-embossed a sheet of the Corrugated Paper using the Woodland Embossing Folder. The only part of the embossing you can really see in the photographs are the little horizontal marks on the tree trunks.
I used a white gel pen and drew white lines down the sides of all the embossed lines.
 I used a Dauber with White Craft Ink and sponged all the branches. I tilted the Dauber to sponge the narrow trunks and I used a cotton bud to do the narrow branches.
I coloured little circles to represent falling snow. As I was doing this, I was paying attention to stay on the raised lines as much as possible.
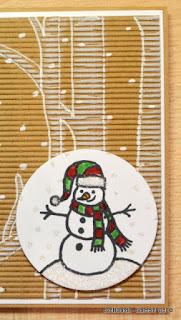
The card base is our Kraft Card Stock with a layer of Whisper white.
 I used Tip Top Taupe ink on Whisper White Card Stock for the sentiment which is from the Oh, What Fun Stamp Set. I added a double bow I'd made using two strands of our Linen Thread.
The snowman is from the Sparkly Seasons Stamp Set. His scarf and hat have been coloured with the Real Red and Cucumber Crush Marker Pens, and his nose was coloured with Pumpkin Pie Marker Pen.
I added Dazzling Diamonds to the cuff around his hat, the pom pom and the mound of snow he's standing on.
I have hubby at home with me today so today is our "getting ready for Christmas" day! We're shopping for Christmas food, presents, writing and posting our Christmas cards and wrapping presents. Hopefully by the end of the day, we'll be delightfully well organised and ready for Christmas................which will be a first!! LOL! Last year I was still making Christmas cards on 23rd December!!
Until tomorrow, happy crafting.
JanB.


 Hello, Crafters.
I hope you've had a fabulous weekend.
I had a brilliant time yesterday at Natalie's Craft Day. I call it that but it was actually organised by three demos; as well as Natalie there was Gill Moore and Cary Buckham. The day was split into three 2-hour classes with lunch after the first one. Part of my reason for wanting to attend an event that was aimed at customers, rather than demos, was to see how a craft day is organised with a view to me offering it to my customers. After seeing how much work the three of them put into the day, I know that there is no way I could offer three 2-hour classes in a day on my own! I think I would offer two 2.5 hour classes with lunch in between.
Now the fun part! Gill took the first class and we were given everything we needed to make three super Christmas cards that you'd make for those special people in your life. We were also given brief instructions on how to make the cards with all three demos on hand to help out and offer advice. For my craft day, I would supply instruction sheets in the same format as supply for my monthly classes. They're step-by-step so that the projects are easy to replicate when the attendees are at home. I didn't complete any of my cards during this class! I chose what I thought would be the hardest one, a stunning peek-a-boo card - unfortunately, I was right. I should have moved onto the next card but I was chatting - as one does! - to the lady sitting next to me, Lesley. She completed the second card, which was also stunning, but found the final step a bit tricky. Gill helped her and the card looked fabulous! Lesley is keeping her card as a template so she can replicate it again at home. She very kindly let me draw the template in my notebook so I would also be able to do it at home. By this time, I knew I wouldn't have time to complete a card before the two hours were up, so I decided to tidy up my work area ready for the next class.
 There was a wonderful lunch laid on including home-made soup, sandwiches, nibbles and far too many cakes - means I gave into temptation big time! Thank you Natalie, Gill and Cary - you really excelled yourselves! ☺
 Today's photographs are the cards I made from Cary's class. They were designed as Christmas cards and made using Whisper White and Crumb Cake Note Cards. Personally I don't send Christmas cards any smaller than A6 but love this size for thank you cards, so I changed the sentiment. We were given packs with all the card stock cut-to-size, so all we had to do was the stamping and assembling everything. I made five during the class but omitted the sentiments so I could add them later at home. I finished all ten cards before bed time last night!
The final session was making ten gift tags, a square pillow box, as well as decorating two bags- one vellum and one craft stock. I made four and bought the rest home to finish off.
 Before we started the third class we had a raffle and I was thrilled to win one of the prizes. I was even more thrilled when I found it was a pack of our corrugated paper and a roll of burlap, neither of which I have in my stash! Having used the corrugated paper in the second class, I absolutely love it! It's quite fine and no where near as thick as I had imagined it to be.
The last two photographs show better detail of two of the cards that used the corrugated Card Stock.
Until tomorrow, happy crafting.
JanB.
 Hello, Crafters.
As promised I have just uploaded my video showing how to make yesterday's Snowman Shaker Card.
I have another card to show you that is another snow globe card. It was actually the first one I made but I had a problem with it.
I put it on one side until I had time to correct! Unfortunately, I didn't take a photograph of what went wrong! DOH! So I will have to explain!
 Everything you see about this card, with the exception of the snowman image,is what my card looked liked.
If you compare this card with the first snow globe card I posted last week (see photograph no. 3), you'll see the layout and colours (although reversed) are the same.
Underneath the snowman I had stamped the reindeer from the White Christmas Stamp Set using Soft Suede Ink. On top of the reindeer and the globe area, I applied Crystal Effects and allowed it to dry.
I forgot that the ink I'd used was water-based and applying the Crystal Effects caused the ink to run very slightly causing a hazy outline!
I kept looking at the image wondering if it looked like an effect that may have been created to look like that on purpose!
 Unfortunately, my best critic, hubby, was at work. At the end of the day, I knew it was wrong so it had to be covered up!
If you look at the right hand edge, you can see where the new image curves round slightly.
I couldn't use this as a challenge card because there isn't a feature that makes it a special card........except for the fact that there's a hazy looking reindeer lurking underneath the snowman! LOL!
Until tomorrow, happy crafting.
JanB.
 Hello, crafters.
Happy weekend to you.
I've just arrived back from the Medical Centre where I had my 'flu vaccination. I don't normally have this but "they" are expecting an epidemic of a new strain of the 'flu virus this winter! Time will tell!
This is the final card in my Snow Globe challenge................and, of course, it had to be a shaker card!
 Once I had finished making this card - this is the third version! - I made a video showing how I made it which I'm planning to upload tomorrow.
I'll go through the basic steps of how I made this card here but please see the video for the full step-by-step instructions.
 I started with a card base of Cherry Cobbler Card Stock, followed by a layer of Whisper White. I embossed the top Cherry Cobbler layer using the Softly Falling Embossing Folder.
Using Memento Tuxedo Black Ink on Whisper White Card Stock, I stamped the snowman image from the Sparkly Seasons Stamp Set. I used Cherry Cobbler, Cucumber Crush and Pumpkin Pie Marker Pens to colour him in.
 Then I added Dazzling Diamonds Glitter to the cuff on his hat, the pom-pom, the snow mound he's standing on and falling snow.
I die cut him using the circle die in the Seasonal Frame Thinlits Dies. Using the no. 5 die from the Circle Collection Framelits Dies, I die cut a circle of Acetate. Then using dies no. 4 and 5 from the Circles Collection, I die cut a frame from Silver Foil Card Stock.
I adhered the Acetate to the frame using Glue Dots. Then I cut long thin strips of Dimensionals from the outside of the sheet and adhered around the outside of the Acetate, making sure it stays hidden behind the frame.
I used my Confetti Stars Border punch to get some Silver Glimmer Card Stock stars for the shaker. I placed them on the snowman's tummy and put the acetate window on top. I adhered the snowman to the card front using Tombow.
 I stamped the globe base from Sparkly Seasons Stamp Set on to Silver Foil Card Stock using Jet Black StazOn ink, which I then cut this out by hand. I used double layer Dimensionals on the bottom half of the base and adhered at the bottom of the shaker.
I die cut JOY from the Wonderful Wreath Framelits Dies using Silver Glimmer Card Stock and adhered to the card front using Tombow.
The last photograph shows the second card I made yesterday. On this one, I adhered the embossed Cherry Cobbler layer upside down! Do you think there is a right way and a wrong way for this embossing folder? Obviously, I've now changed my mind! LOL!
Until tomorrow, happy crafting.
JanB.
 Hello, Crafters.
When I went into my studio yesterday, before I started working on my next project, I decided to sort out my somewhat overflowing "to do box" that I keep on my table!
The box is the bottom half of an A4 plastic box that I use to put odds and ends in. I sorted everything out into various piles. Coloured card stock off-cuts were filed in the correct folders straight away; die cuts, stamped images, etc., were put into one of two cello bags: Christmas and non-Christmas - both bags went back into the box; half-completed projects stayed on my desk.
 I worked on the half-completed projects and ended up with seven completed Curvy Keepsake Boxes - three Christmas and four non-Christmas; five packets of Thank You cards; and I finally made an envelope for an undersized birthday card I'd made a few weeks ago. An excellent morning's work!
After lunch I started on yesterday's snow globe challenge. My card is an extremely unusual for me as there is no dimension and no sparkle or bling. Everything I did, I did directly onto my top layer............ and I'm really pleased with the result.
 I was led into the direction of white and red because I found the Whisper White Card Stock base with the Real Red layer in my to do box! It was an easy decision to use the soldier in the snow globe because I wanted to carry the colour of red.
 On my top Whisper White layer, I stamped with Tuxedo Black ink the snow globe, the base and the soldier. I used my Real Red, Cucumber Crush, Blossom Blush (retired colour) and Basic Grey Marker Pens to colour in the soldier and the gifts, which is the same colour scheme Stampin' Up! used on their image in the Christmas catalogue.
 I stamped another image of the soldier onto a Post-it note making his feet on the reverse side of the sticky strip. This was fussy cut out and adhered to the soldier on my layer. I also used the mask I'd used at the beginning of the week to cover the area outside the globe. Using Soft Sky Ink, I sponged round the edge of the globe getting light as I moved towards the centre. Before I moved either of the masks, I used Whisper White Craft Ink and stamped the falling snow onto the globe. I took care while I worked o the rest of the card as this takes quite a little while to dry.
Then I stamped both sentiments using Tuxedo Black Memento Ink with the help of my Stamp-a-ma jig! All stamps used are from the Sparkly Seasons Stamp Set with the exception of the Merry Christmas Which is from Sassy Salutations. Once I was happy that the White Craft Ink was dry, I went over some of the snow flakes to make them a little bit more definite!
Do you think this card has worked well without dimension, bling and sparkle? I think some dazzling diamonds would enhance it but I don't think it actually "needs" it. Let me know what you think.
Until tomorrow, happy crafting.
JanB.
 Hello, Crafters.
 I have just uploaded today's video which I've called Beaded Tassels: Beaded Tassels for Christmas Baubles. A little while ago I posted a video showing how to make a Dazzling Diamonds Bauble which had a tassel of beads hanging from underneath.
A subscriber asked if I'd make a video showing how I made the tassel. As I said yesterday, if one person asks for something, there'll be others who'll be interested in it, too! So it's my pleasure to post it today.
I had a lovely day in my studio yesterday. It was one of those days when I started something that led onto something else which led on to something else, and so on! Which meant, although I'm really pleased with the jobs I did, they weren't actually on yesterday's list! Today's a new day!
On Sunday and Monday evenings, I was busy doing up parcels for some of my retired Stampin' Up! products I'd sold on EBay. I like to put a Thank You card in each parcel but ran out of them very quickly. I even took the cards out of a gift box I had wrapped up and ready to give!
 So my first job yesterday was to make more Thank You cards. I used my Stamp-a-ma-jig for three parts of the design. As I was working away, I thought about Veronica's email I told you about in my blog yesterday morning.
One of her suggestions, in a nutshell, was tutorials/videos on using Stampin' Up! tools to get the best out of them. So I decided to make a video showing how I made good use of my Stamp-a-ma-jig to make my thank you cards.
I used it for three purposes i.e. to get the sentiment straight, to get some leaves behind the stamped flower image (masking) and to stamp an image in a precise position but in the top right hand corner - therefore the Stamp-a-ma-jig would be upside down!
 I finished off making 25 Thank You cards and then made the video. I'm planning to post it on Sunday. As I said yesterday, many thanks, Veronica. ☺
 For yesterdays challenge card I've used Versamark and Iridescent Ice for the glittery effect on the snow globe. My colour scheme is Basic Black, Very Vanilla and Soft Sky Card Stock. The top Very Vanilla layer of my card has been embossed using the Softly Falling Embossing Folder.
I stamped the snow globe onto Soft Blue Card Stock using Tuxedo Black Memento Ink. I used Mossy Meadow Ink to stamp the fir trees from the Happy Scenes Stamp Set inside the globe. I used a white gel pen to put snow on the trees, the falling snow and the snow that has settled on the ground.
I cut the globe out, covered it with Versamark, then with Iridescent Ice and heat set it. I used the same card stock and ink and stamped the globe base. Then I heat embossed it with Clear Embossing Powder and heat set it. I cut it out and adhered the base and the globe to the card front using Dimensionals.
Again, using the same black ink and Very Vanilla Card Stock , I stamped the sentiment from the Reason For The Season Stamp Set and heat embossed it with Clear Embossing Powder. This was then layered onto Basic Black Card Stock. Using my white gel pen, I drew some falling snow on a piece of Soft Sky Card Stock for the layer behind the sentiment. This was then heat set with clear embossing powder as before.
Quite a lot from me today! But I think that's about it , so until tomorrow, happy crafting.
JanB.
 Hello, Crafters.
Yesterday I received an email from one of my blog followers, who put forward six ideas for challenges/video tutorials.
Some of the suggestions are actually multi-choice ideas so there are many more than six ideas altogether.
As I said in my blog yesterday, I think if one person asks to see something, others would like to see it, too! Many thanks, Veronica, your suggestions will be very useful!☺
 It's now "make your mind up time" for me! Ever since I finished last week's challenge, I've been thinking about making this week's challenge: can I make 5 different projects using the snow globe in the Sparkly Seasons Stamp Set.
I hesitate because I'm not sure if I can come up with five different ideas for one item rather than a complete stamp set.
Because it's a challenge, I've decided to go for it! To be successful in this challenge I have to find five different ways of decorating the globe.
For the first card I've used Dazzling Diamonds Glimmer Paper for Rudolph the Reindeer to stand on with white snow falling around him.
 This comes from another stamp in the Sparkly Seasons set and has been stamped in Whisper White Craft Ink.
I started the card with a base of Soft Sky Card Stock, with a layer of Whisper White Card Stock and a top layer of Sky Blue.
I started stamping the globe base using Tuxedo Black Memento Ink on a scrap of Sky Blue, which I fussy cut leaving a thin blue frame around the edge.
I laid this onto my top blue layer and positioned where I wanted the globe to go. I stamped the globe and then the falling snow using Whisper White Craft Ink - it's a photopolymer stamp set so positioning is easy! I put that to one side to allow it to dry.
 In the meantime, I stamped Peace and At Christmas from the Peaceful Wreath Stamp Set, onto scraps of Whisper White, using Crumb Cake Ink, and layered them onto Crumb Cake Card Stock.
I stamped Rudolph from the White Christmas Stamp Set onto a scrap of Crumb Cake Card Stock and fussy cut it out but not the antlers, I cut them off! I stamped another Rudolph inside the globe more or less in the middle.
 I cut the Glimmer Paper to shape and adhered in place using Tombow. Then I adhered Rudolph, the two sentiments and the globe base in place, all using Dimensionals.
I stamped the bow from the Peaceful Wreaths Stamp Set onto Soft Sky Card Stock using Tuxedo Black Memento Ink. Then I die cut it using the die from the Wonderful Wreath Framelits Dies.
The final step was to paint the tip of Rudolf's nose red using a Real Red Marker. Finally, I added a tiny spot of Crystal Effects to it to make it 3D and shiny!
That's one project completed, four more to go! Here's hoping I can meet this week's challenge! In the meantime, until tomorrow, happy crafting.
JanB.
 Hello, Crafters.
I hope you've had a really super weekend. Training yesterday was a great event as usual.
It's a great place to get new ideas, inspiration and business advice. Yesterday included some help regarding keeping the taxman informed of our activities.
Tomorrow, I will start to show you some of the projects that were on display and/or the swaps I received - so much to share at the moment!
 This morning I'm doing a workshop for a craft club in Epsom. I have everything prepped, I just need to get packed and off - I have about 3/4 hour before I have to leave. Plenty of time to explain about my swaps.
You'll see that I based them on yesterday's video. While I was filming, I had a light bulb moment when I thought that instead of just putting a plain Marina Mist Tag behind my stamped image, I'd try and make it glimmer paper..............and it worked!
I decided that I'd share this with the other demonstrators at training and the photographs show what I made and how many!
 I started by stamping the image on a piece of Whisper White Card Stock and coloured it in using Lost Lagoon, Mint Macaroon and Pumpkin Pie marker pens. I then used my Two-way Glue Pen to apply glue on the mound of snow the snowman is standing on and random dots for falling snow.
I punched the image out using the Note Tag Punch. Then I punch out one in Lost Lagoon and one in Mint Macaroon. I covered both of these with glue from my Two-way Glue Pen and covered both with Dazzling Diamonds. The result is beautiful.
One word of advice if you do this. I don't recommend that you do 40 tags - as I did for my swaps - it isn't what these Glue Pens were designed for. I damaged the tip of one of my pens and two dried up.
 I layered the three tags together and punched a hole in the top
e using my 1/8" Handheld Punch. I threaded some white Baker's Twine through. I used Glue Dots to splay the layers out - sometimes I had to layer one Glue Dot on top of another because the first one picked up too much loose glitter!
When I was at training yesterday, someone gave a tip about "splashing" the background of a card. The process was to put down a small amount of Tombow onto a Silicone Mat or Clear Block and add a drop of water. I will give this method a try and let you know how I get on!
In the meantime, until tomorrow, happy crafting.
JanB.
 Hello, Crafters.
I have two classes today, team training tomorrow (I still need to make the swaps) and a workshop on Monday (I still need to prep for this). So a busy weekend for me!
No, I'm not complaining - how can I complain when I'm doing what I love doing? I hope you can also say this weekend is going to be full of the things you love, too!
 This is my final card for this week's challenge. I played around with using various colours and settled on black, although I'm still not convinced that black is OK for Christmas. What do you think?
 I started with a card base of Whisper White Card Stock, followed by a layer of Basic Black Card Stock.
My top layer is Whisper White which I embossed with the softly Falling Embossing Folder.
I used the Sleigh and Horse Edgelit for my die-cut in Whisper White Card Stock. I adhered it to some Basic Black using Tombow.
I used the Oval Framelits no. 3 to cut it out and then no. 4 to cut out an oval I the Silver Glimmer Paper.
 I adhered the image to the glimmer paper using Glue Dots and then adhered the complete piece to the card front using Tombow.
I stamped the sentiment using our new Basic Black Archival Ink on to a piece of Whisper White. The Let It Snow sentiment is from the Sparkly Season Stamp Set.
I layered it, using Glue Dots, onto a piece of Silver Glimmer Paper which I'd punched out using the Washi Tape Punch. I adhered it to the card base using Tombow.
 The final touch was to carefully add Crystal Effects to the entire area of the sleigh and Horse die-cut.
I don't have any idea how long it takes to dry - whatever time of day I used Crystal Effects on a card, I always leave it to dry overnight!
That brings us to the end of this week's challenge - I hope you've enjoyed the different projects I've shown you and I hope you have a great weekend.
Until tomorrow, happy crafting.
JanB.


 Hello, Crafters.
 I also had a successful afternoon in my studio and made three projects for my Corrugated Kraft challenge! An excellent day all round!
 I used a Dauber with White Craft Ink and sponged all the branches. I tilted the Dauber to sponge the narrow trunks and I used a cotton bud to do the narrow branches.
 I used Tip Top Taupe ink on Whisper White Card Stock for the sentiment which is from the Oh, What Fun Stamp Set. I added a double bow I'd made using two strands of our Linen Thread.


