Today, Stampin Up! released the Year-End Closeouts:-
It's always liberating to have a good clear-out at the end of the
year, don't you find? It creates room for creativity and new things to
come, and you can make other people happy with the things you're
throwing out. Stampin’ Up! has been doing its own little year-end
cleaning, and we’ve got some great deals to offer you!
Our
Year-End Closeouts will include autumn/winter catalogue retiring
products, Clearance Rack items, and current high-inventory annual
catalogue products.
Please headover to my 24/7 Online Stampin' Up! Shop
for a complete list. If you're one of customers, or would like to be,
I'm very happy to send you a copy of the list as an EXCEL sortable file.
Please email me if you would like a copy!
The new Hostess Code for December is AKEM2BKZ. Don’t forget this is for orders up to £150.00 only. If your order is over £150.00, and you quote the Hostess Code, you will lose the Stampin’ Rewards you will have earned on your order. Today's
card uses one of last year's stamp sets, Reason for the Season. I love
this 3/4" Real Red Stitched Edge Ribbonribbon but I think this is the first time I've used it! I
started my card with a base of Whisper White Cardstock (CS), with a
layer of Real Red CS, and a top layer of Whisper White CS.
Once again,
when I went to my DVD box called Layers 2, I chose to use one of the layers
that has already been dry embossed - this one has been embossed with
the Softly Falling Embossing Folder and I've used the debossed side.
Using Tombow I adhered this layer to Real Red layer.
I cut a length of
the ribbon and put SNAIL on the back of it so it adhered to the top
layer as well as the back where I tucked it under.
Then I adhered these
two layers to the card base.
Using
Real Red ink, I stamped the sentiment on to a piece of Whisper White
CS and die cut it using a straight cut Layering Squares Framelits
Die.
I then die cut a Real Red scalloped square using another die from
the same set.
I adhered the two layers together and adhered it in the top
right hand corner using Dimensionals.
I
stamped the three step stamping poinsettia on a piece of Whisper White
CS three times - first in Basic Black Archival Ink, the leaves in Pear
Pizzaz Ink stamped off once, and then the actual flower using Real Read
Ink.
For the first layer, I fussy cut the complete flower, including the green leaves.
Then I cut the
second image which was all the red flower and the third image was the
centre seven red petals, five small and two large.
Using Dimensionals, I
adhered the three layers together and then onto the card base, making
sure that I didn't allow any Dimensionals to adhere on to the ribbon.
Another simple card, but it I love it! Although
it was -4° yesterday, it was a beautiful sunny day, so after my
hospital
appointment, I decided to pop into Croydon to do some shopping. I used
to be a shopaholic but now I'm a crafter, when I have to go shopping, I get as much done in one go as
possible.
As I was wrapped up well against the cold, I decided to leave my car
where I had parked it and walked into the shopping centre. I had my list
and I knew exactly what I was after.
All went well until I went into
Poundland, which is like the Dollar Store in the US. I found my hair conditioner, shampoo, tissues, muesli bars and crisps - all my
regular brands, so I stocked up!
I also found eleven of the display
folders with the clear covers that I use for my new recruits - I send
them a hardcopy of the Compensation Plan - so I bought those, too! It
wasn't until I was outside the shop that I realised my car wasn't in
it's usual place!
So I had to grin and bear it and carry my three bags
of shopping back to my car! As I still had more shopping to do, I drove my
car to the normal "shopping" car park so I could complete this chore I
had started!
By
the way, before I go, one funny note about my shopping yesterday! I
popped into my two favourite high street clothes shops - Next and Marks
& Spencers - and found myself checking the sleeves on the sweaters
and jumpers, wonderering what they'd look like in my videos! LOL!
On
that light note, after lunch today, I'm off to the Pavilion Cafe in
Beddington Park, for my last Christmas Fair for this year.
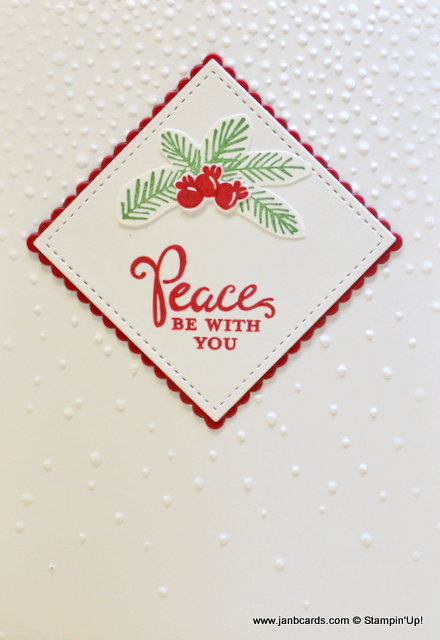
Hello, Crafters. I’m so surprised to be
sharing Peace This Christmas card number 4 with you. It definitely wasn't
part of a plan – it really just happened! Yesterday, after I’d finished tidying
up after recording Sunday’s video, it was time for me to plan today’s card. I saw the little pot on my
desk that still had several pieces that I’d fussy cut out last Sunday when I made
the first three cards in this series. I tipped them onto my grid paper to see
exactly what I had and the rudiments of another design came to mind! I started my card with a
base of Whisper White Cardstock (CS) with a layer of Cherry Cobbler CS. I
adhered the two pieces together with Tombow. It was a bit of a struggle as my bottle
was nearly empty – I’d already had two bottles I had to throw away during the
day and it looked as if there was going to be a third! I looked in my DVD box
called Layers 2 to get a Whisper White top layer and saw a layer that had already
been dry-embossed with the Softly Falling Embossing Folder. As I was planning a
plain looking image, I decided a patterned layer would be a good idea, so adhered it on top of the Cherry Cobbler layer! My plan was to have a
sentiment and some of my fussy cut pieces on a Whisper White Square, turned at
an angle. I die cut a square of Whisper White CS using a Stitched Shape Square Framelits die and
also a slightly larger Cherry Cobbler square, die cut with a scalloped square
from the Layering Square Framelits Dies. Using my Grid Pad as a
guide, I laid the stitched die cut as a diamond. I chose the sentiment from the
Reason for the Season Stamp Set and inked it in Cherry Cobbler Ink. As it’s a
photopolymer stamp set, it was easy to position the sentiment straight in the
bottom point of the diamond. I played with a few arrangements of the die cuts
and settled on the clean and simple layout you see here! I adhered the two die
cuts in place with Tombow and then adhered the Whisper White square onto the
Cherry Cobbler Square. I used Tombow to adhere the image directly onto the top
layer of the cardbase. I still have more die cuts leftover - will there be number 5 tomorrow? I certainly don't have any plans for one at the moment! Next year is promising to be an exciting year for me already! Yesterday afternoon, one of the ladies in my team asked if I'd do a Craft Retreat with her next year. Do I breathe? Of course, I'd love to do one, so we've started our planning! We were on the telphone for almost an hour yesterday afternoon covering the basics of what we both expect from a retreat, projects, hotels, and a million other topics that cropped up. It's going to be quite a challenge as we live a long way away from each other - about a four hour drive! The two main decisions have been pencilled in for the event i.e. it will be held in September 2017 and somewhere in the Derbyshire/Cheshire area. This is going to be so exciting - do watch out for developements as they happen! That's about it for today! Until tomorrow, happy crafting. JanB.
When you visit this website, you'll be able to download a PDF that gives
metric measurements. I tried hard to convert metric
measurements to inches, but really struggled to get a good fit.
As I knew a metric PDF was easily available, I gave up trying to convert and concentrated on working out the measurements in inches.
My finished box was a tad taller than the metric box but apart from that, they're the same!
I
experimented with my own sizes and it was when I changed to using coloured cardstock (CS) instead
of Whisper White CS that I really achieved success. I added an extra layer to my Designer Series Paper (DSP), partly because I do like my three layers and partly because it gives extra support to the box.
When I punched the little finger tabs on the side of the box, I made sure I punched the on the side I'd adhered the box tabs. I did this because, the glued tabs give extra support to that side, which was an important consideration as this is where the box would be pulled opened and closed.
I did consider putting a window sheet under the "window" because I think it'd make the box look more professional.
In the end I decided against it because the window could become "dirty" looking if any loose wax came into contact with it.
The last photograph is the box Linda gave me.
The metric sizes worked out brilliantly with Whisper White CS.
Please note the inside design inside Linda's box!
The sentiment is Wishing You A Season Filled with WARMTH & Cheer.
Then she has positioned the two mittens as if they are warming themselves around the candles!
Over the next three days, I'll share the Convention with you and will be able to share some super swaps with
you once I get back! Today's card is all white except for some minimal gold embossing.
I
started my card with a base of Whisper White Cardstock (CS), with two
layers of Whisper White CS.
When we use our really thick Cable Knit
Embossing Folder, we're advised to give it a light spray with water. I
wondered what would happen if I did that for a regular embossing folder.
As there's only one way to find out the answer to questions like this, I
picked up the bottle and sprayed.
The CS started to bubble!
I'd sprayed
it with my stamp cleaner spray!
It was interesting to see but I really
didn't need to know that's what would happen! LOL!
I took another piece of Whisper White CS
and sprayed twice, lightly with water!
Then I ran it through my Big Shot
using the Holly Ebossing Folder.
It came out beautifully but I'm not
sure it's any better than it would have been had it not been sprayed.
I
then took a smaller piece of Whisper White CS and wiped over it with my
Embossing Buddy.
I used the Nativity stamp from the Joyful Nativity
Stamp Set and stamped it with Versamark.
Then I stamped the PEACE BE
WITH YOU stamp from the Reason for the Season Stamp set in Versamark,
too.
I covered both images with Gold Embossing Powder and heat set using
my Heat Tool.
I
don't know why but I was left with a small straight line near the bottom
of the ground where Mary is kneeling.
I used my Gold Wink of Stella
Glitter Pen and very carefully painted over the white area.
The glitter
sits on top of heat embossed surfaces, so I removed it very carefully
using a piece of kitchen towel.
It hasn't totally concealed the blemish
but it is a lot less obvious! I
attached the first layer to the card base using Dimensionals and then I
used Glue Dots to attach the dry embossed layer.
I also used Glue Dots
to attach the image to the Whisper White layer and then attached it to
the card front using Dimensionals.
A
very striking, quick and easy card to make.
That's about it for today.
I'm off to do my packing now.
What a way to start a day! We have a burst water pipe under the floorboards, just inside the front door.
Fortunately, we have insurance cover for problems like this but it still means the inconvenience of having the water turned off!
I made sure I filled up the kettle and water filter first, though! The positive side is that it makes me count my blessings and think about all the millions of people around the world who don't have the luxury of clean running water!
There's a very nice young man named Anthony, working on the problem as I write - I wonder who'll finish first! LOL!
Earlier this morning I uploaded my video which shows how I made the card I shared here on Friday, 21st November 2016, which had been inspired by a blouse I'd bought. I changed the colour scheme for the video card from Cherry Cobbler and Garden Green to Real Red and Crumb Cake.
This meant I also needed to change the Designer Series Paper (DSP) from This Christmas DSP to Candy Cane Lane DSP. Along with Presents & Pinecones, I love the Christmas DSP that's on offer from Stampin' Up! this year!
Do I have a favourite - no, not really, I think they're all great!
Before I made the video, I made two Real Red Bells with Crumb Cake bands, as well as two Crumb Cake bells with Real Red bands.
I also die cut two sets of scalloped layers for the sentiment.
I'm so pleased I did that because it made deciding which colours to use so very much easier!
It also means I have enough spare parts for another project! LOL!
I think I prefer the Real Red card as it's brighter than Cherry Cobbler!
One of my viewers has also told me that the ringer in the bell is called a clapper - many thanks, Carol - I really should have known that! Also in the video, I was able to show how much sparkle there was on the bells from painting them with Wink of Stella Clear Glitter Pen. It's absolutely amazing, particularly on the Cherry Cobbler card - so intense!
I hope you enjoy today's video.
Until tomorrow, happy crafting.
JanB.
PS Oh dear! Anthony and I finished at the same time but unfortunately he's a plumber and our leak is caused by a problem outside the house.
We now have to wait for a water engineer to call as they need to dig outside the house!
I can't see this being sorted today - I hope I'm wrong!
Well, there's only one thing for it then!
Get a cup of tea and into my studio to work on my swaps for Telford on Saturday week! Happy crafting!
Yesterday, I received a delivery of clothes I'd bought online!
I took them out of their bags, put them on hangers and hung them around the bedroom, wherever I could!
There was one blouse that struck me immediately as a great idea for a card.
It was three colours and had wavy lines joining each section, hence the design on today's card! I started with a card base of Cherry Cobbler Cardstock (CS), then a layer of Very Vanilla CS and a top layer of Whisper White which was the result of an experiment that didn't quite work out.
As I was planning to cover the whole sheet, this wasn't a problem!
I adhered the Very Vanilla CS layer to the card base, using Tombow. I took three strips of patterned paper from the This Christms Specialty Designer Series Paper (DSP).
The top and bottom designs covered half of the top layer each, meeting in the centre.
This didn't need to be too precise as it was going to be covered up with the third strip, so I adhered them onto the top layer using Tombow. The third strip was about 1.5" longer than it needed to be because I was planning on adhering it at an angle.
I took a pair of scissors and cut a line of gentle curves, of different sizes.
Then I turned the paper round and did the same on the opposite side!
I adhered this at an angle on top of the top and bottom designs.
Using Cherry Cobbler Ink and Very Vanilla CS, I stamped the sentiment from the Reason for the Season Stamp Set.
I die cut it using a straight cut oval from the Layering Ovals Framelits dies, then I used two different sized scalloped ovals from the same set and die cut one in Cherry Cobbler and one in Garden Green.
I adhered all three together using Tombow.
Using Basic Black Archival Ink, I stamped two bells from the Seasonal Bells Stamp Set onto Cherry Cobbler CS and two onto Garden Green CS. I punched the two green bells out using the Bell Punch and hand cut the four black striped bands on the red bells.
I adhered these to the green bells using Tombow.
I painted over the four red stripes using my Clear Wink of Stella Glitter Pen.
I adhered the bells to the card front using Dimensionals and then did the same to the sentiment.
I added a small bow I'd made using the Cherry Cobbler Ribbon that comes in the Combo Pack, with Garden Green, on page 20 of the Christmas catalogue.
That's about it for today. Until tomorrow, happy crafting.
I hope you've enjoyed a great Christmas. We had another great day yesterday with all our family over. It was a very relaxing fun day, which, like Christmas Day, all went far too quickly! After we'd eaten we played Charades and UNO. Because the age range went from grandchildren to grandparents, there were songs and films from the younger ones that the older ones didn't recognise and visa versa. But that added to the fun! This morning I uploaded a video to show how I made this great card! This is the link: Elf Pop Up Slider Card. I made this video on Christmas Eve when I was feeling very Christmassy. The elf images I had were leftovers from the Magic Elf Card video I made, that gave me so much grief! Rather than waste them I decided to use them for this card. So that's my first two Christmas cards made for next year! Although I made this as a Christmas card, it'll be really easy to change the image to make it a birthday card, or anniversary card, any occasion at all really. I showed the card to my two grandchildren (aged 13 and 11 years) and they were both totally bowled over by it. I think this style of card will be really appreciated by children of all ages............. ...........and adults, too! The two main colours I've used here are Real Red and Pear Pizzazz. The Elf is from the Christmas Cuties Stamp Set and the bells are from the Cozy Christmas Stamp set. The two sentiments are from the Reason For The Season Stamp Set. There aren't many retired products I use in my projects - the two exceptions are ribbons and Paper Piercing Packs. I find that each roll of ribbon has so much ribbon on the reel, I can't ever use it all before it retires, especially when I try to have some ribbon for each of the colours available. I keep the Paper Piercing Packs because I love the effect you can achieve with these and it's relatively easy to do it freehand in the absence of the templates. Today I'll be preparing the new Spring catalogues and the Sale-a-bration catalogues to be posted to all my customers. If you're in the EU, don't have a Stampin' Up! demonstrator and would like copies of the new catalogues, please email me: janb@janbcards.com
My perseverance finally paid off. I was successful in making the video showing how to make a magic card! I've uploaded it here: Magic Elf Card. I was inspired to make this by a swap I received at the OnStage Convention in Brussels last month. It was given to me by Robin Beatrice - see the last two photographs. I had to watch lots and lots of different videos on YouTube before I could pull together all the relevant details I needed to make a successful magic card! The swap had the acetate on the outside and I wanted to make a card that had it enclosed. The red card here one - photographs 3 and 4 - was inspired by a Dawn Griffith video that worked really well. Unfortunately, I couldn't find a Christmas image small enough. I felt the poinsettia was rather over powering for the window and a lot of it was lost when the coloured section was exposed. The poinsettia is from the Reason Of The Season stamp set and looks beautiful when it's coloured in.
My first attempt at making a magic card is the one in photographs 5 and 6. I based it on the swap I 'd received and was really pleased with the result. It worked beautifully but it wasn't what I was after. One of the things I found about a lot of the videos I watched is that I felt important details were missed out. Therefore, I've tried really hard to avoid making the same mistake in my video.
Today, I'm trying a pop-up slider card - fingers crossed! Until tomorrow, happy crafting. JanB

 Hello, Crafters.

 I
started my card with a base of Whisper White Cardstock (CS), with a
layer of Real Red CS, and a top layer of Whisper White CS.
I
started my card with a base of Whisper White Cardstock (CS), with a
layer of Real Red CS, and a top layer of Whisper White CS.  I adhered the two layers together and adhered it in the top
right hand corner using Dimensionals.
I adhered the two layers together and adhered it in the top
right hand corner using Dimensionals.
 All went well until I went into
Poundland, which is like the Dollar Store in the US. I found my hair conditioner, shampoo, tissues, muesli bars and crisps - all my
regular brands, so I stocked up!
All went well until I went into
Poundland, which is like the Dollar Store in the US. I found my hair conditioner, shampoo, tissues, muesli bars and crisps - all my
regular brands, so I stocked up!