Hello, Crafters. Oh,
boy! What a slow start I've had to my day! For some reason, it took an
excessive amount of time to upload my video onto YouTube yesterday
evening. By the time it was completed and I'd edited it, it was 1.10am!
I
slept in a bit later than normal this morning, but I don't like doing this because it
upsets my routine! On
the bright side, my Bendi Card video is up and it's a great project. It's easy, and really does have the WOW factor.
There are just so many
ways to decorate this for a Christmas card, and can also be used for any
other occasion.
On
the two designs I show in my video, I have used non-Christmas Designer
Series Paper (DSP) i.e. Floral Boutique and A Little Foxy. This year, I
have allowed most of my Christmas DSP to run down really low which
meant I had to look for suitable alternatives! I was very pleasantly surprised by the
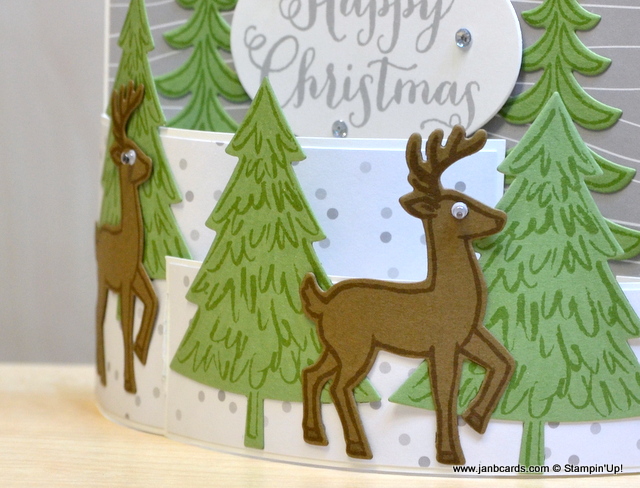
amount of options I could to choose from. The designs on the Night of Navy card and the Smokey Slate are more or less the same. I made the blue card first and the only part of it I didn't really like is the reindeer by the sentiment. It's one of those "it's OK but I would have rather....."
I also think the reindeer look rather snooty with their head cocked slightly in the air and their eye closed! LOL! I normally just draw the eye into a complete circle which gives a totally, more friendly look. Since I bought the googly eyes - at the beginning of November, I seem to be using them on so many "living" images!
This is the last video before Christmas and you may have noticed, so far, I haven't used any of the new products that'll be available when the new Spring Catalogue goes live on 4th. January 2017. Also, I haven't shared with you the goodies I've bought. Christmas is such a special time of the year, I wanted to make the most of it; and I have, and I've loved every minute of it. ☺ My next video is due on Christmas Day and my question is, would you like to see a video of my new goodies, or a project using one of my new goodies? One of the ladies in my team, Denise, was in Berlin last weekend, with her husband, celebrating his birthday. Fortunately, they had left the Christmas Market at 3.30 pm the afternoon of the terrorist attack that happened later that day.
Finally, my new, free replacement integrated washing machine (WM) was delivered and fitted by a great team from a company named Kaboodle! Don't you just love that name! The bad news is that when we had our kitchen refitted, about seven years ago, we didn't realise they had been too economical with the work surface that runs above the WM, the dishwasher (DW), the sink and then to the end wall.
Apparently, it's 600mm wide and should be 650mm - the difference is about 2"! The problem this has caused is that there is no space for the pipes to go from the WM, behind the DW to the sink without pulling the DW out first! This explains why our WM, never went back properly since the first repair, when the machine had to be pulled out! The nice man from Kaboodle said he'd pull the DW out so he could get the WM back properly.
Unfortunately, he found the centre back foot (don't ask!) on the DW was on its last legs - sorry about the pun! - and would break as soon as he tried moving it. I told him there wasn't much point doing it anyway, because we'll be back to square one as soon as the WM needs to be repaired, and is pulled out again!!
Hubby is now on a mission! He's trying to see if we can have a new work surface, of the correct depth, so the pipes will go from the WM, behind the DW, to the sink without having to move the DW! We also need to get the centre back foot replaced before it breaks! While all this is going on, hubby is also trying to see if we can have a new integrated cupboard to our wall-mounted boiler! We didn't realise until several months after the kitchen had been finished, that hubby has to dismantled the entire cupboard for the gas company to come and service the boiler! The fitters hadn't left enough room for the front cover to be removed! By the time we realised we had this problem, the company had gone under!!Lesson learned? Next new kitchen will be from one of the big companies! At least we'd be in with a chance to get problems sorted out! I can't believe it's lunchtime already! Hubby is taking me out for dinner tonight - a little bit of us time! So until, tomorrow, happy crafting.
This is the last weekend before Christmas - are you ready? I'm pleased to say I am, sort of!! I
received a Christmas card from one of the ladies who comes to my
classes, and just fell in love with it!
I contacted Angela, and asked if she minded if I
copied it, and also made a video, too. Unfortunately,
Angela hasn't used Stampin' Up! products, so it has been quite a challenge!
The first card I made, I allowed myself to get somewhat carried away with it and
finished up with a card, whilst I liked it, there was no way I was
going to be able to make it into a video! It was too complicated and would have taken way, way too long!
I'll share a photograph of it
on Sunday, along with a photograph of Angela's card.
I started my second card, and that was a lot more video-friendly. Unfortunately, by this time, it
was getting really quite late, and I hadn't made a card for today - so I went for the easy option! Today's card is based on the card I'm working on for the video but, as
I don't want to give too much away about Sunday's video, I won't say
any more! To
make today's card I started with a Night of Navy Cardstock (CS) base,
with a layer of Shimmery White CS.I used the spotted design from the
Floral Boutique Designer Series Paper (DSP) for the top layer.
I took two strips of
Dazzling Diamonds Glimmer paper and tore the top edge of each piece, and adhered them, using Tombow, one above the other to look like snow banks.
For the trees, I chose Wild Wasabi CS and
stamped the largest tree from the Peaceful Pines Stamp Set, three times
in Wild Wasabi Ink.I die cut them using the co-ordinating die in the
Perfect Pines Framelits Dies.
Using my now-retired two way glue pen, I
painted glue along the stamped lines on the trees and dipped them into
my box of Dazzling Diamonds Glitter.
I adhered the trees onto the card
front using Dimensionals but I added Glue Dots to the Dimensionals
that would be going onto the Glimmer Paper.
The stars are more die cuts I
found in my Dazzling Diamonds Glimmer Paper Ziplock bag! I adhered them
on top of each other using Dimensionals - plus a Glue Dot on the top one
- and adhered then at the top of the card.
I
used some regular Scotch Tape to cover the three dots that are on the sentiment stamp
from the Star of Light Stamp Set.
Using Night of Navy Ink, I inked the
stamp, removed the tape and stamped the image on to a piece of Shimmery
White CS.
Using the smallest oval straight cut die from the Layering
Ovals Framelits Dies, I die cut the sentiment. I put wet glue around the outside of the die cut and
dipped it in the box of Dazzling Diamonds Glitter.
The final touch was
to adhere the sentiment to the snow banks using Dimensionals with Glue
Dots!
Tomorrow, I shall be out most of the day until the afternoon, so I really don't have much time to make a video, upload it, and edit it ready for 7 am Sunday morning! LOL! I hope you have a great weekend. Until tomorrow, happy crafting. JanB.
I hope you had a great weekend. Today's card is an unusually busy card for me but it couldn't be anything else really with Santa, his sleigh, presents and reindeer. So no waffling today, I'll get straight on with it! LOL! I started with a card base of Whisper White Cardstock (CS), then a layer of Red Foil and a top layer of Soft Sky CS, which I dry embossed using the Softly Falling Embossing Folder. I took two strips of Dazzling Diamonds Glimmer Paper and created two torn edges by tearing a strip off the top towards me so the torn edge would be visible on my card. Using Tombow, I adhered one piece along the bottom and inserted the second piece at an angle behind it so it looked like a hill. I had to work quickly with this to make sure I'd inserted the second piece before the first piece had dried!
Using Always Artichoke Ink and Garden Green CS, I stamped three Christmas trees from the Peaceful Pines Stamp Set, which was brought forward from last year's catalogue. I die cut them using the Perfect Pines Framelits. I used my white gel pen and drew snow on the end of all the branches. I adhered the trees in place, at different heights, using Tombow.
Using Early Espresso Ink and Crumb Cake CS, I stamped two reindeer from Santa's Sleigh Stamp Set and die cut them using the Santa's Sleigh Framelits. Although it's not very visible, I used my Real Red Marker Pen to paint the front reindeer's nose red! I adhered the first reindeer to the card front using Tombow and the second reindeer using Dimensionals and positioned him slightly in front of the first reindeer. I used some of the Kraft Rope Trim for the reins!
Using Early Espresso ink, I stamped a teddy on Crumb Cake CS and a stocking on Whisper White CS, both images being from Santa's Sleigh Stamp Set. I added a Garden Green Baker's Twine bow to the teddy and I painted the stocking using my Real Red and Crumb Cake Marker Pens. I die cut both images using dies from Santa's Sleigh Framelits. I also stamped the three different parcels from the stamp set onto various scraps from This Christmas, Presents & Pinecones and Candy Cane Lane Designer Series Paper (DSP). I added the parcels using Tombow and then the teddy and the stocking, using Glue Dots. I die cut a sleigh in Silver Foil and then a top layer using Red Foil. I adhered them together using Tombow and then attached them behind the reindeers using Dimensionals. I rolled three Glue Dots up to put in different positions to support the sleigh's "runners". Then I used Basic Black Archival Ink to stamp the Santa from the Cookie Cutter Stamp Set and punched him out using the coordinating punch. I coloured him with Real Red and Basic Grey Marker Pens. I added Dazzling Diamonds to his hat, pompom, beard, moustache, jacket, sleeve and trouser cuffs. I attached him to the sleigh using glue dots! Finally I stamped the sentiment from Santa's Sleigh using Early Espresso Ink onto a piece of Whisper White CS. I attached it to my card using Dimensionals! Phew!! Now I'm off to the hairdressers! Have a great day and until tomorrow, happy crafting. JanB.
I'm
sorry that occasionally you receive a blank post from me - twice this
week!
This happens because I enter the title and press enter, and then
enter again.
Unfortunately by doing that the cursor moves across to
Publish!
I wish Blogger would change this - it'd be easier than me
remembering not to do it! LOL!! Anyway, I'm off to the Gingham Goose Craft Market at the Hayes Village Hall shortly - full details below in yesterday's post. Yesterday
I used the Cosy Critters Stamp Set for today's card.
I started wikh a
card base of Very Vanilla Cardstock (CS) then a layer of Basic Grey CS
and a top layer of a snowflake design from This Chistmas Specialty
Designer Series Paper (DSP).
I
stamped two owls on Very Vanilla CS using Basic Grey Archival Ink and
punched them out using the Owl Builder Punch.
I stamped the owls again,
once in Cherry Cobbler Ink and once in Garden Green Ink.
I fussy cut
both scarves and adhered to the owls using Tombow.
I dry embossed a
layer of Very Vanilla using the Cable Knit Dynamic Embossing Folder and
layered it onto a piece of Basic Grey Cardstock.
Using my Basic Grey and
Garden Green Marker Pens, I painted the branch stamp from the Best
Birds Stamp Set. I tried doing this to the branch in Cosy Critters but
it didn't work very well because the branch and leaves are solid images. I
chose the Tis the Season sentiment from last year's Peaceful Pines
Stamp Set that has been brought forward.
I die cut it using the Layering
Circle Punches and layered it on a slightly larger scalloped circle I
had die cut using a scallop die from the same stamp set.
I adhered the
DSP onto the Basic Grey CS layer using Tombow and wrapped a piece of
Cherry Cobbler ribbon around the centre.
Then I adhered the embossed
Vary Vanilla CS and adhered it to the smaller Basic Grey CS layer.
Then I
adhered this to the card front using Tombow. Using Glue Dots, I adhered
the branch to the embossed layer and then I added the the owls using
Dimensionals.
I also added the sentiment using Dimensionals.
Well, I'd better shoot off now, otherwise I'll be late. Some things never change! I hope you have a great weekend.
Hello, Crafters. I have an early start this morning as the appointment for my MRI scan is at 8.50 am! The journey to the hospital normally takes about 40 minutes but at this time of day - rush hour and the school run - it's going to take ages! I really should have asked for a later appointment - oh well, never mind, I'll cope! After showing you project 3 yesterday and comparing it with thumping, I decided to make thumping no 4. It took me a few goes before I learned the dos and don'ts of successful thumping! What I could remember from the demonstration I saw a few years ago was that the chosen stamp should be inked via an ink pad with the lightest colour. Then the medium colour was "thumped" on via the brush end of a marker in a random manner over the image. Then the darkest colour was "thumped" over the image. Then the stamp was huffed on to re-moisten it, then stamped. My first attempt can best be described as pathetic! LOL! I used the tall fir tree stamp from Lovely As A Tree Stamp Set and it looked amazingly sparse, almost bald even! I tried it again but with more thumping and the overall result was better but the lower centre resembled a splodge! For my third attempt, I decided not to stamp the lightest colour via the ink pad, instead, I used the marker pen to paint all over the tree. Then I thumped with the medium and darker colours which gave me a greatly improved image i.e. the tree looked fuller and healthier but there wasn't much definition in the colours......at last, I was making progress! On to attempt no. 4 I painted the lightest colour, Pear Pizzazz all over the tree. Then with the medium colour, Garden Green, I thumped all over the tree but sparsely. Finally, with the darkest colour, Always Artichoke, I thumped all over the tree but again, sparsely. I huffed on the stamp and stamped onto a piece of Whisper White card stock. Success! By the way, I used Early Espresso down the trunk and across the ground before huffing and stamping. I was happy with the result, which is the tree I've used for the card you can see here! I think maybe I should make a video of this technique to share what I learned yesterday. When I showed hubby this card, his first reaction was that the tree looks as if it's coming out at you, very 3D! I can't see it but it must be the three different colours used for the branches, although the changes in the colours are quite subtle. I'm not going through how I made this card except to say the sentiment is from the Peaceful Pines Stamp Set and stamped in Pear Pizzazz. I punched it out using the Extra Large Oval Punch and then decorated around the edge with the holly stamp from the Oh What Fun Stamp Set.
Now that I've tried both techniques, each of them is better in its own way, for different results. With Dauber Dancing it is easier to control where the colour goes and thumping is far more random. Going forward, I'll definitely be using both techniques in my work. I hope you've enjoyed the comparison I've made and that you'll give both techniques a try - I don't think you'll be disappointed! Until tomorrow, happy crafting. JanB.
Hello, Crafters. This is yesterday's project using the fancy foil vellum, a Christmas Card I based on a birthday card I made in January this year. For that card, I'd used our Fancy Foil Designer Vellum (which is available in gold and silver) as the background for my stamped flowers - see the last two photographs. To make today's card I began with a card base of Whisper White Card Stock and added a layer of Cucumber Crush Card Stock. For the top layer, I took a piece of the green trees design sheet from the Holidays Fancy Foil Designer Vellum and layered it on a piece of the same size Whisper White Card Stock. All the layers were adhered together with Tombow. For the vellum layer, I just applied small dots of Tombow on the back of some of the actual trees, rather than spreading it all over like I did on the other layers. I took care how I applied it because nearly all glues - possibly all (?) - will show though vellum which would definitely spoil the look of the finished project! For the centre image, I took a piece of Cucumber Crush Card Stock and layered a slightly smaller piece of Whisper White on top, adhering it with Tombow. Then I adhered it to the card front at an angle so the top left hand corner and the bottom right hand corner both, more or less, touched the respective outsides of the top layer. I stamped the Christmas tree from the Peaceful Pines Stamp Set, onto a piece of Cucumber Crush using co-ordinating ink. I used another stamp from the same set, to stamp on top using the White Craft Ink. I set it aside for a while to allow it time to dry. While it was drying, I used my Confetti Stars Border Punch to punch some Silver and Red Glimmer Paper stars to decorate the tree with. This meant I also finished up with two star-studded glimmer strips for a future project! I stamped the bottom of the Whisper White Card Stock, using the Happy Christmas from the Oh, What Fun stamp set. If you watched the video I posted to YouTube today, you've probably guessed - correctly! - that I used my Stamp-a-ma-jig to get my sentiment beautifully straight! When I was happy the white craft ink was perfectly dry, I die cut the Christmas tree out using the no. 3 die from the Perfect Pines Framelits Dies. Then I adhered some Red and Silver Glimmer Stars to the tree with a larger silver one on the top. Finally, I attached the tree to the card using Dimensionals. I'm happy with the result and think the design worked just as well for this Christmas card as it did at the beginning of the year with the Spring flowers! That's about it for today, until tomorrow, happy crafting! JanB.
Boy, am I having problems updating my Videos page! In an ideal world, I'd do it as I go along but I tend to forget! Last night I sat here and loaded the latest 11 videos together with the link, photograph and list of products and measurements for each of them. I clicked Preview, the cogs turned - as normal - then a page which tells me the link is broken, appears. After trying, this, that and anything else I could think of, without success, I called hubby, who was lying in bed very comfortably, thank you very much, reading the newspaper!! Fortunately, he's a very patient man and came to my aid! So he suggested trying this, that and anything else he could think of! He had partial success - 6 videos posted, 5 still waiting! So please bear with me while I try to get my videos page sorted out! ☺ I have just posted today's video to YouTube - this is the link: Black & Gold Bauble Card. This was one of last week's challenge cards and I'd received requests for a video. I'm always happy to make a video for any of the projects I show you, just let me know you'd like one. ☺ Yesterday's challenge card shows a variation of a theme, which I saw demonstrated recently on a video made by Jeannette Cobb - brilliant idea, thank you, Jeannette. Following Jeannette's instructions, I started with a piece of computer paper the same size as the top layer of my card and drew round an oval die and folded the paper in half vertically. I used number 4 die of the Ovals Collection. I've made five cards using this technique, some shown here, and varied between drawing round the outside of the die and the inside. Then I carefully tore around the pencil line. I adhered the outside piece using temporary adhesive to my card stock and sponged around the edge using Pear Pizzazz ink. The idea is to give a tattered oval shape to frame the central image. I used the Peaceful Pines Photopolymer Stamp Set for the central image, again using Pear Pizzazz ink. When I'd finished the sponging, I stamped the Christmas tree and removed the template. Then I used temporary adhesive to stick the oval over the stamped and sponged area. I used the smallest two snowflakes from the Flurry of Wishes Photopolymer Stamp Set and stamped randomly around the outside, using Pool Party ink. I then used the snowflake stamp from the A Little Something Stamp Set using Lost Lagoon Ink. I varied the places I applied Dazzling Diamonds Glitter on each card. For the star on the tree, I punched it out using the star punch from the Itty Bitty Accent Punch Pack, covered it with my Two-way Glue Pen and dipped it into my container of Dazzling Diamonds. The sentiment is from Flurry of Wishes. Rather a lot from me today, I hope you've enjoyed reading it! Until tomorrow, happy crafting. JanB.
Hello, Crafters Here it is! The card that did something this week that left me confused! Yep, that's me, Confused of Coulsdon! LOL! In the first photograph I have shown the wrong and right cards, side by side. Although both poinsettias were coloured in Real Red, the left hand side card dried decidedly orange! I have two theories of what could have gone wrong with the first card. First, it could be that I put near a lamp to speed up the drying. Second, I used ink from my ink pad which I'd squeezed into the lid and painted using a Blender Pen. Interestingly, I learned something new this morning when I was watching another demonstrator's video tutorial on YouTube. The demonstrator did some painting the same way as I had done and she advised that the pens should be stored horizontally, which is what I do with all my pens anyway. But the interesting comment she made was that, the reason you should do this, is so the chemical in the pen reaches both ends of the pen. I was told it was just water in the pen, not a chemical. I've made a note of this to check with Support when I phone them later today. Anyway, I digress. Whether it's a chemical or just water in the Blender Pen, I wonder if there was a reaction with the Crystal Effects that caused the colour change. I'd be very interested to hear if anyone has experienced the same problem or knows why this happened. That's the saga of the card that reacted differently to the way I expected it to! I decided to try again! So, I re-created my card but coloured it using our Real Red Marker Pen - the card in the top photograph on the right hand side - and it worked beautifully! This is how I made my card. I started with a card base of Whisper White with a layer of Real Red card stock. The top Whisper White layer was dry embossed using the Decorative Dots Embossing Folder. I used a template I'd made so the centre of my card didn't get embossed. I've made a video showing how I made this card as well as how I made the embossing template. I stamped the poinsettia image using Stazon in the centre of the card stock where it hadn't been embossed. I don't think you should use Stazon on photopolymer stamps. I made sure I cleaned it immediately with Stazon Cleaner and than with our Stampin' Mist. I coloured the petals with the Real Red Marker Pen and the leaves with the Old Olive Marker Pen. I left it to dry thoroughly while I stamped the image. I use Real Red ink on Whisper White card stock. The sentiment is from the same stamp set - Reason for the Season. I punched it out with a 1.25" Circle punch and layered it onto a 1.5" Real Red Circle. I adhered it in the bottom right hand corner using Dimensionals. I adhered this layer to my card base and very carefully covered the whole poinsettia with Crystal Effects, using the nozzle to push it into the points of the petals and leaves. I left it to dry for a few hours and added the final touch of some Gold Glitz Dazzling Detail to the centre of the flower. The saga of the "orange" poinsettia continued when I put the card together. It was originally on a Whisper White card base but now it's on an Old Olive base! Can you guess what I did?? Yes! I adhered the image upside down! DOH!! To remedy this, I cut the card in half and made a larger base in Old Olive and attached it to the new base! Ah well, all's well that ends well! Until tomorrow, happy crafting. JanB.


 On
the two designs I show in my video, I have used non-Christmas Designer
Series Paper (DSP) i.e. Floral Boutique and A Little Foxy. This year, I
have allowed most of my Christmas DSP to run down really low which
meant I had to look for suitable alternatives! I was very pleasantly surprised by the
amount of options I could to choose from. The designs on the Night of Navy card and the Smokey Slate are more or less the same. I made the blue card first and the only part of it I didn't really like is the reindeer by the sentiment.
 It's one of those "it's OK but I would have rather....."
 Since I bought the googly eyes - at the beginning of November, I seem to be using them on so many "living" images!
 Also, I haven't shared with you the goodies I've bought. Christmas is such a special time of the year, I wanted to make the most of it; and I have, and I've loved every minute of it. ☺
 Finally, my new, free replacement integrated washing machine (WM) was delivered and fitted by a great team from a company named Kaboodle! Don't you just love that name! The bad news is that when we had our kitchen refitted, about seven years ago, we didn't realise they had been too economical with the work surface that runs above the WM, the dishwasher (DW), the sink and then to the end wall.
 The problem this has caused is that there is no space for the pipes to go from the WM, behind the DW to the sink without pulling the DW out first! This explains why our WM, never went back properly since the first repair, when the machine had to be pulled out! The nice man from Kaboodle said he'd pull the DW out so he could get the WM back properly.
 Hubby is now on a mission! He's trying to see if we can have a new work surface, of the correct depth, so the pipes will go from the WM, behind the DW, to the sink without having to move the DW! We also need to get the centre back foot replaced before it breaks! While all this is going on, hubby is also trying to see if we can have a new integrated cupboard to our wall-mounted boiler! We didn't realise until several months after the kitchen had been finished, that hubby has to dismantled the entire cupboard for the gas company to come and service the boiler! The fitters hadn't left enough room for the front cover to be removed! By the time we realised we had this problem, the company had gone under!!Lesson learned? Next new kitchen will be from one of the big companies! At least we'd be in with a chance to get problems sorted out!


