I
don't celebrate Halloween but I couldn't resist buying the cat punch on
its own.
Unfortunately, because I didn't buy the stamp set, I don't have
a stamp for the cat's face, hence my hand drawn efforts!
I must practice the nose and mouth as I'm not too happy with them - they look okay if I screw my eyes up a bit when I look at them!
Since I added
the lines inside the ears, I think the cats look pretty good - they act as a distraction from the nose and mouth!
The bow
and bow tie are from the same stamp in the Santa's Sleigh Stamp Set - I
just cut the bow tails off for the boy cat!
I really love how easy it is
to mix and match, and alter Stampin' Up! Stamp Sets - no wonder I have
trouble getting rid of stamp sets when they retire! The
brick wall on my card is the sample I showed in yesterday's photographs
- unfortunately, it isn't obvious from the photographs that this wall
has been created with Embossing Paste!
Thursday was the first time I
played with the paste, and I found it so much easier to use than the non-SU
embossing paste I'd played with a few years ago.
The SU Embossing Paste
is a very light, fluffy, "cream" which is very much like a mousse.
Years
ago the paste was quite a thick paste, and was nowhere near as easy to move and
manipulate as our product is. To
create the wall, I decided how high I wanted the wall to be, and made
it as high as possible, allowing room for two cats to sit on it.
I
used the brick wall mask from the packet of Decorative Masks, and
positioned it onto a piece of Whisper White Cardstock (CS) I'd cut to
size to be a top layer on a card.
Once it was in position, I anchored it
down on all four sides using some retired Washi Tape.
I found it's
really helpful to fold one end of each line of tape back on itself, so
when I was ready to remove the tape, it was so easy to lift one end.
It's
also important to remove the tape by lifting it up, and pulling it away
from your project slowly - if you go too fast, you'll tear your cardstock!
To
apply the Embossing Paste, use whichever Palette Knife you feel most
comfortable with, and carefully spread it over the mask - I used the diamond-shaped knife.
If you're doing
a large area, you will probably find it helpful to hold the mask down
near to the area you're working on.
When you're happy with the area
you've covered, carefully wipe the side of your Palette Knife on its
side, over the mask to remove excess Embossing Paste, paying particular
attention to what is on the actual mask.
As long as the paste hasn't
been exposed to the air too long, put the excess back into the pot.
At
no time during the whole process do you need to press hard, or use a lot
of pressure.
Start by being gentle and gradually increase pressure
until the paste starts doing what you want it to do.
If you're heavy handed, or try
to rush spreading the paste, it's very likely the paste will go under
the mask, which will stop your bricks looking like bricks!
It's
very easy to colour the white Embossing Paste by using our-reinkers.
Put a small amount of paste into a small bowl or pot, add one drop of
your chosen re-inker, and mix well using a Palette Knife.
If the colour
isn't as dark or as intense as you'd like it to be, add another drop and mix again.
Once you've finished, if you have any paste left over, put
it in a small pot that has a lid, and save for future use!
When
using the Embossing Paste, make sure you have a small bowl of warm
water near you, so you can drop your palette knives and masks into water
ASAP to stop the paste drying hard on these items!
As long as you don't
apply the paste too thick, it will dry very quickly, as in minutes!
If
you've been sitting on the fence about trying this product, I really
recommend you give it a go!
Just relax, take your time and go for it!
If
you're reading this, and you have any hints or tips you'd like to share with
us, please leave them in the comment box below. Many thanks.☺
When I made my brick wall, I managed to get some paste where I didn't want it and have hidden beow the Berry Burst Ribbon!
The Soft Suede sentiment is from the Birthday Delivery Stamp Set, which I stamped on a piece of Whisper White CS, and then sponged the edges with Berry Burst Ink.
I adhered tiny pearls on all the Soft Suede dots that are part of this sentiment, as well as three random pearls - one of which is covering up a small amount of Berry Burst Ink! I stamped the cat from the You've Got Style Stamp Set using Basic Black Archival Ink onto a scrap of Berry Burst CS. I made the cat's eyes bigger, to stop her from looking snooty - LOL - and then cut her out, and adhered her inside the card.
I hope you have a great weekend. Until tomorrow, happy crafting.
Yesterday
morning I spent two delightful hours in a coffee shop with my daughter
just chatting, and chatting, and chatting! We will definitely be doing
this again! I
have no idea how I finished up making a Santa Cat Card for today!
On my
blog yesterday, I explained that I have six of the Stampin' Up!
background stamps, three of which I've bought recently.
I was
disappointed when Stampin' Up! retired the Designer Series Paper (DSP)
Stacks that used to be available in all the different family groups of
colours. My plan now is to create my own DSP in any colour I'm working with by
using the background stamps.
Geraldine left a comment on my blog
yesterday and reminded me I can also use the Decorative Masks to create my own DSP.
This
reminded me I'd also bought a pot of the Embossing Paste when I'd bought the masks, but hadn't used I
yet!
I
collected all these products together, plus the Cat Punch, and started
playing with the Embossing Paste first. Photographs 1 - 5:
To make my card, I die cut the cat from photograph 8,
using a round Stitched Shape Framelit.
I layered it onto a Soft Suede
Cardstock (CS) scalloped circle die cut with the Layering Circle Framelits.
I
had a sheet of Whisper White CS left over from Wednesday, that I'd
stamped using the Marbled Background Stamp. I chose the sentiment from
the Snowflake Sentiments Stamp Set, inked it in Versamark, and then Real
Red Ink.
I stamped it near the bottom of the sheet, dipped it in Clear
Embossing Powder, and heat set it.
Then I adhered it to a layer of Real
Red CS, and then onto a Whisper White CS card base.
The cat looked very
bland, so I decided to give him a Santa hat, and a boot (I should have
used two, one on top of each other, slightly overlapped!) - both from
Santa's Suit Stamp Set, and then a bow, which is from Santa's Sleigh
Stamp Set.
Photograph 6:
I took two pieces of acetate and punched out a cat from each of them. I
turned one over so they were facing each other, and then wrote front on both of them. Obviously,
I
didn't need two - I could use one side and flip it over and use the
other side - but having two allows me to create two cats using Embossing
Paste without having to stop, wash and dry the acetate mask before
doing the
next one.
I also found it helpful when I was looking at various layouts
with two cats, because I could sit the cats next to each other, or above, or slightly behind each other, and as close
as I wanted them, and still see them both. Photograph 7 - 8: I created the brown cat by adding one drop of Soft Suede re-inker to some Embossing
Paste and spread paste over the acetate mask.
I did the same with the
white cat but using white Embossing paste. I used Sahara Sand
Cardstock for both cards. Photograph 9: I enjoyed using the Embossing Paste on the cats so I tried it on one of the Decorative Masks.
I chose the brick design as I have an idea to sit the two cats on a brick wall!
Note the mark a little way above the brick wall towards the left hand side! I need to cover that when I ise this piece! Photographs 10: I took two pieces of Whisper White Cardstock, as well as one of the cat acetate masks, and on one piece, I sponged the cat using one of our Daubers and Crumb Cake Ink.
I used a very fine journalling pen to draw the cat's face. Photograph 11: I used the actual acetate cat I'd punched out of one of the acetate sheets, and used it as a reverse mask.
I haven't decided what I'm going to do with him yet.
I feel my blog doesn't run very smoothly this morning; I feel I've been jumping all over the place.
I hope you've been able to follow me, and rest assured, I'lll try not to play with so many different techniques at the same time again!
This
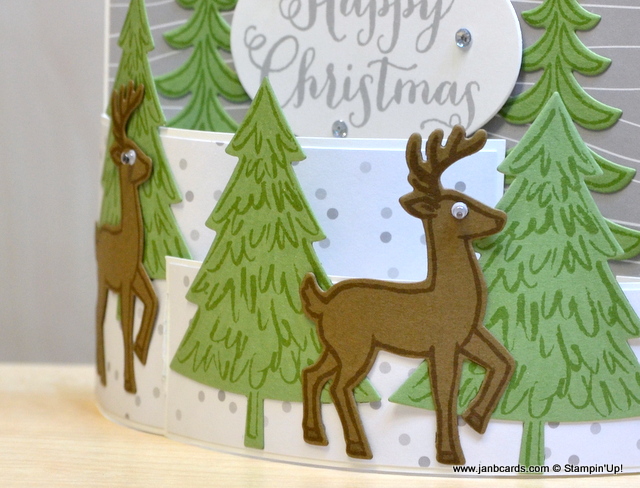
is my last Christmas card for 2016 and I'll be publishing the video at
7pm GMT this evening. I don't know if this card has another name but I'm
calling it a stable door card. It was inspired by the swap I received
from Jeanne Smithwick at the OnStage Local Convention last month in
Telford - many thanks, Jeanne. I shared Jeanne's card - see last
photograph - on my swaps video and I was asked if I'd make a video to
show how it's made. I
decided to make it as a Christmas card, my thoughts flowing on from my
stepper card and my bendi card. I can see this style being used as a
wedding card, using the Seasonal Bells Stamp Set and the Bell Punch.
Given the varying range of stamps we have, I'm sure there must be lots
of different possibilities.
I started my card with a base of Crumb Cake
Cardstock (CS). I scored it halfway and used my trimmer to cut off the
top section, which gave me a stable door that's two inches tall (5cm). Using Tombow, I
adhered the Whisper White CS layer inside the card first, then the piece
on the front, lower half. On top of this I added the Garden Green
design from the This Christmas Designer Series Paper (DSP).
I
started stamping with the the sentiment which is from the Oh, What Fun
Stamp Set. I used Garden Green Ink onto a
piece of Whisper White CS, and die cut with straight die number five
from the Layering Oval Dies Framelits. This was layered onto an oval I
die cut from some Garden Green CS using scalloped die number 5. I
adhered this with Tombow in the centre of the back part of the card so
this could act as a guide to where the images should be placed. Using
Wild Wasabi Ink, I stamped four trees from Santa's Sleigh Stamp Set
onto a piece of Wild Wasabi CS. I used my Clear Wink of Stella Glitter
Pen to paint each moon-shape stamped onto the trees, and then I die cut them using the tree die
from the Santa's Sleigh Thinlits Dies. Using Tombow I adhered one of
them at each end of the stable door, and then adhered the other two back
to back!
Using
Soft Suede Ink, I stamped one reindeer onto Soft Suede CS and die cut
with the appropriate die from the Santa's Sleigh Thinlits Dies. I used
my Project Life 0.1 Journalling Pen to convert the reindeers closed eye
to a happy eye, and painted his nose red! Then I painted him all over
with my Clear Wink of Stella Glitter Pen.
I stamped two Santas and two
pom-poms onto Whisper White CS using Archival Black Ink and coloured the
Santas using my Marker Pens: Real Red for hat, jacket and
trousers; Smokey Slate for his boots, gloves and belt; Blush Bloom
(retired) for the face. I punched the Santas and the pom-poms out using
the Cookie Cutter Builder Punch.
I adhered just one pom-pom to one
Santa, and then painted the pom-pom and all the fur trim with my retired
two-way Glue Pen. Then I dipped Santa into my box of Dazzling Diamonds
Glitter. I lined the second Santa up with the first Santa, back to back,
so I knew where to adhere the pom-pom. Then I repeated the glittering
process with the second Santa. I adhered one Santa on the front of the
Stable door, standing next to the first tree, and then adhered the
second Santa, back to back!
I'm happy with the result, just a bit disappointed that I have to wait until 2017 before I can send it to someone!
This is my last blog for two days and I'd like to wish everyone a very happy and blessed Christmas.☺ JanB.
Hello, Crafters. Oh,
boy! What a slow start I've had to my day! For some reason, it took an
excessive amount of time to upload my video onto YouTube yesterday
evening. By the time it was completed and I'd edited it, it was 1.10am!
I
slept in a bit later than normal this morning, but I don't like doing this because it
upsets my routine! On
the bright side, my Bendi Card video is up and it's a great project. It's easy, and really does have the WOW factor.
There are just so many
ways to decorate this for a Christmas card, and can also be used for any
other occasion.
On
the two designs I show in my video, I have used non-Christmas Designer
Series Paper (DSP) i.e. Floral Boutique and A Little Foxy. This year, I
have allowed most of my Christmas DSP to run down really low which
meant I had to look for suitable alternatives! I was very pleasantly surprised by the
amount of options I could to choose from. The designs on the Night of Navy card and the Smokey Slate are more or less the same. I made the blue card first and the only part of it I didn't really like is the reindeer by the sentiment. It's one of those "it's OK but I would have rather....."
I also think the reindeer look rather snooty with their head cocked slightly in the air and their eye closed! LOL! I normally just draw the eye into a complete circle which gives a totally, more friendly look. Since I bought the googly eyes - at the beginning of November, I seem to be using them on so many "living" images!
This is the last video before Christmas and you may have noticed, so far, I haven't used any of the new products that'll be available when the new Spring Catalogue goes live on 4th. January 2017. Also, I haven't shared with you the goodies I've bought. Christmas is such a special time of the year, I wanted to make the most of it; and I have, and I've loved every minute of it. ☺ My next video is due on Christmas Day and my question is, would you like to see a video of my new goodies, or a project using one of my new goodies? One of the ladies in my team, Denise, was in Berlin last weekend, with her husband, celebrating his birthday. Fortunately, they had left the Christmas Market at 3.30 pm the afternoon of the terrorist attack that happened later that day.
Finally, my new, free replacement integrated washing machine (WM) was delivered and fitted by a great team from a company named Kaboodle! Don't you just love that name! The bad news is that when we had our kitchen refitted, about seven years ago, we didn't realise they had been too economical with the work surface that runs above the WM, the dishwasher (DW), the sink and then to the end wall.
Apparently, it's 600mm wide and should be 650mm - the difference is about 2"! The problem this has caused is that there is no space for the pipes to go from the WM, behind the DW to the sink without pulling the DW out first! This explains why our WM, never went back properly since the first repair, when the machine had to be pulled out! The nice man from Kaboodle said he'd pull the DW out so he could get the WM back properly.
Unfortunately, he found the centre back foot (don't ask!) on the DW was on its last legs - sorry about the pun! - and would break as soon as he tried moving it. I told him there wasn't much point doing it anyway, because we'll be back to square one as soon as the WM needs to be repaired, and is pulled out again!!
Hubby is now on a mission! He's trying to see if we can have a new work surface, of the correct depth, so the pipes will go from the WM, behind the DW, to the sink without having to move the DW! We also need to get the centre back foot replaced before it breaks! While all this is going on, hubby is also trying to see if we can have a new integrated cupboard to our wall-mounted boiler! We didn't realise until several months after the kitchen had been finished, that hubby has to dismantled the entire cupboard for the gas company to come and service the boiler! The fitters hadn't left enough room for the front cover to be removed! By the time we realised we had this problem, the company had gone under!!Lesson learned? Next new kitchen will be from one of the big companies! At least we'd be in with a chance to get problems sorted out! I can't believe it's lunchtime already! Hubby is taking me out for dinner tonight - a little bit of us time! So until, tomorrow, happy crafting.
Something
a little bit different today! This is the first time I've tried
something like this and have to say I really enjoyed it. I'd
bought the frame - and a few others! LOL! - quite some time ago but
never had the inclination to do anything with them. This combined stamp
set and co-ordinating dies, really comes into its own in this type of 3D
frame! I
started with a white background which I cut from the backing cardboard of
a pack of Designer Series Paper (DSP). Then I took a sheet of Dazzling Diamonds
Glimmer Paper and tore it by pulling the top edge towards me so I had
the torn side facing out.
I tore a second piece but only about half the
width of the first one, so I could layer them creating a snow-bank effect.I
took the biggest piece, laid it on the white card in position and then
slide it down by about half an inch so I could lightly draw a line along
the top edge. The pencil line would be adhered behind the Glimmer
Paper and therefore I wouldn't need to erase it. I inked the large stamp from the Lovely
As A Tree Stamp Set with Always Artichoke Ink, and stamped it so the base
of the stamp was approximately level with my pencil mark. I lifted the
stamp and moved it upwards and to the right and stamped again. I moved
along and repeated this process further along but lower down so it fitted in
with the pencil line. Using
Always Artichoke Cardstock (CS) I die cut two two trees from the now
retired Limited Edition Beautiful Branches Thinlits Dies and adhered
them both using Tombow so the trunks disappeared between the two layers
of the snow-banks. Using
Soft Suede CS and Ink, I stamped and die cut two reindeer and the
sleigh. I coloured in the hooves and added a googly eye for the
reindeers - I love how the eye for the back reindeer has stuck looking in reverse! LOL!
Then I used some Gold Thread and a Mini Jingle Bell to adhere to each reindeer. I adhered the reindeer at the back using Dimensionals which I'd put a Glue
Dot on as well. I repeated this for the front reindeer but used two layers of Dimensionals. I also added another snow-bank so the reindeer didn't look as he's walking on air but it's not very visible in the photograph.
I die cut the fancy part of the sleigh using Red Glimmer Paper and adhered it to actual sleigh using Tombow. I stamped the three parcels from the Santa's Sleigh Stamp Set, onto five different desigs of DSP and cut them out by hand. I adhered them behind the sleigh, one by one, so I could place them in a "jumbled" pile.
When I was happy with the arrangement I adhered the sleigh in place using Dimensionals with a glue Dot attached as well! The reason I add a Glue Dot to Dimensionals when I adhere to Glimmer Paper is extra security - I think Dimensionasls will hold but I just like to make sure! That's about it for today. Until tomorrow, happy crafting. JanB.
Yesterday's
Christmas Fair was very disappointing as far as sales were concerned. Unfortunately, the weather was
bitterly cold and I think it kept a lot of people away. If I wasn't a
stallholder, I would have probably stayed indoors in the warm, too! But
it was still the usual happy atmosphere there always is at this event, people were happy to stop and chat, and have a giggle or two!
Kellie, the owner and lady who runs the Pavilion, offered me the use of the hall if I want to do classes, and I also made a useful contact for another craft market organiser, too. Today's
card is quite a busy card for me, but it does make a lovely change! Maybe I should make more like this methinks! The
sentiment is from the Wonderful Year Stamp Set which I received in my
goody bag, when I went to the craft retreat in September. I've found it
to be a really useful set to have. I
started my card with a base of Cherry Cobbler Cardstock (CS), with a
layer of Whisper White and a top layer with one of the designs from the
This Christmas Specialty Designer Series Paper (DSP). I adhered all the
layers together using Tombow. I
inked my stamp with Versamark, then inked it with Cherry Cobbler Ink. I
stamped it onto a piece of Whisper White CS and quickly dipped it into
my box of Clear Embosssing Powder.I
heat set the sentiment using my Heat Tool until it had all gone beautifully shiny!
I layered it onto a piece of Cherry Cobbler CS, and adhered it to my
card front, using Dimensionals, making sure I left a bigger gap at the
bottom for the Christmas Stockings. I
chose three Cherry Cobbler designs DSP from This Christmas. I stamped
the stocking from the Santa's Sleigh Stamp Set, using Basic Black
Archival Ink, once on each of the three designs. Then I used my Cherry
Cobbler Marker Pen and coloured in the smaller stripe on each stocking. I changed to my white gel pen and coloured the top of the stockings.
Then I used my two-way glue pen to paint the top of the stockings, and dipped them into my Dazzling Diamonds Glitter. I did consider using the Mica Flakes but I thought it may be too thick on something so small. Although there is a die for the stocking in the Santa's Sleigh Framelits, I cut the stockings out by hand so my cut lines were right on the very edge of the stockings. As I cut them out, I deliberately cut off the hooks as I was planning to use a Rhinestone to hang the stockings up with.
I attached the stockings with a Dimensional on the bottom part and a Glue Dot at the top where it would be touching the sentiment. My final touch was to add Rhinstones to the tops of the stockings and three randomly on the sentiment.
That's about it for today's card. Until tomorrow, happy crafting.

 Hello, Crafters.
 I
don't celebrate Halloween but I couldn't resist buying the cat punch on
its own.
 Thursday was the first time I
played with the paste, and I found it so much easier to use than the non-SU
embossing paste I'd played with a few years ago.
 To
create the wall, I decided how high I wanted the wall to be, and made
it as high as possible, allowing room for two cats to sit on it.
 I found it's
really helpful to fold one end of each line of tape back on itself, so
when I was ready to remove the tape, it was so easy to lift one end.
 When you're happy with the area
you've covered, carefully wipe the side of your Palette Knife on its
side, over the mask to remove excess Embossing Paste, paying particular
attention to what is on the actual mask.
 Start by being gentle and gradually increase pressure
until the paste starts doing what you want it to do.
 Once you've finished, if you have any paste left over, put
it in a small pot that has a lid, and save for future use!
 If
you've been sitting on the fence about trying this product, I really
recommend you give it a go!
 The Soft Suede sentiment is from the Birthday Delivery Stamp Set, which I stamped on a piece of Whisper White CS, and then sponged the edges with Berry Burst Ink.
 I stamped the cat from the You've Got Style Stamp Set using Basic Black Archival Ink onto a scrap of Berry Burst CS.