Showing posts with label Stamp Set - In The Meadow. Show all posts

Thursday, 30 March 2017

Avant Garden


Hello, Crafters.

Just over 24 hours left and we say goodbye to Sale-a-bration (SAB) for another year! 

It's been a great time and the gifts this year have one of the best selections we've ever had!

While I'm disappointed to see SAB go, I'm a perenniel optimist so I always think that when one door closes, another one opens and Stampin' Up! is never short on surprises! 

I surprised myself yesterday working on my swaps - I've made a total of 67 so far! 

Two or three more days and I should be there, including the extras I'm making for my customers! 

I'm planning a video to show how I made my swaps, and if I have time, I'm going to make a stepped-up version to share with you.

I've already made part of it, I just need to finish it off!

The swap video should be uploaded on Sunday 9th April.

If you feel a sense of déja vu with today's card, you'll be right - it's based it on a card I shared here on 29th December 2014! 
Back then the card was my take on a make-n-take we made when we went to the Stampin' Up! 2015 Sale-a-bration Roadshow in Basingstoke in December 2014. 

The SAB stamp set I used back then was called Lotus Blossom, and today's SAB stamp set is Avant Garden. 

Like the 2015 stamp set, today's flowers had to be fussy cut but they were quite straightforward! 

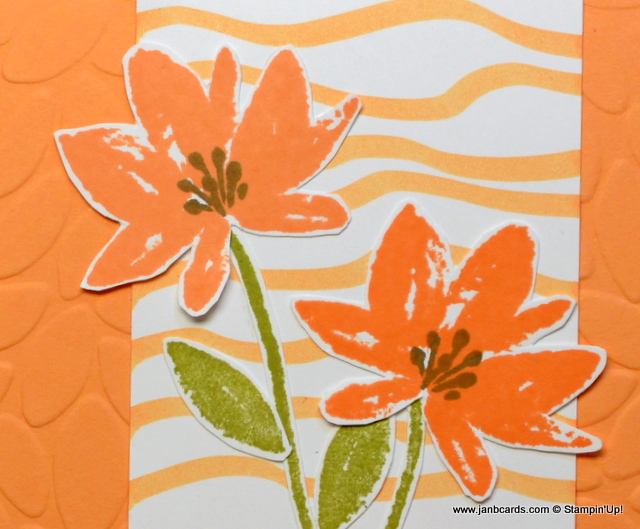
I started my card with a base of Peekaboo Peach Cardstock (CS), with a layer of Whisper White CS and a top layer of Peekaboo Peach CS, which I dry-embossed using the Petal Burst Embossing Folder. 

I adhered all three layers together using Tombow. 

I took a 2¼" strip of Whisper White CS and, using the brush end of my Peekaboo Peach Marker Pen, "drew" some squiggle lines from side to side!

To create the flowers I stamped two stems and four leaves onto Whisper White CS using Old Olive Ink. 

Then I stamped two flowers using Peekaboo Peach Ink, and then again on top of each other! 

This is relatively easy to do because they're photopolymer stamps. 

The double stamping can be omitted; I did it because I wanted my flower heads to be darker than the rest of the Peekaboo Peach colours. 

The stamp set in 2015 was two step stamping so it was easy to achieve the darker colour.

Finally, I stamped the stamens inside the flower heads using Soft Suede Ink. 

Once I'd finished cutting out all the shapes, I adhered in place on the stripe Whisper White paper I'd created. 

I used some Peekaboo Peach Ruched Ribbon and tied a bow around near the base, and then I adhered the strip to the card front using Tombow. 

I took a strip of Whisper White CS that was 7/8" wide and stamped THANKS in Soft Suede Ink from the Thankful Thoughts Stamp Set. 

The design of this card would be suitable for most events e.g. birthdays, get well, etc.

I added three butterflies from the In the Meadow Stamp Set in Peekaboo Peach Ink.

I fishtailed the right hand side, rounded the left hand side, and then adhered it to the card front using Dimensionals.

My finishing touch was to add a piece of Whisper White CS inside the card and I stamped a flower head in the same colours as on the front of the card!

That's it for today! I'm off to my studio now to make the next batch of swaps! Until tomorrow, happy crafting!

JanB.

Wednesday, 28 December 2016

Rebecca's Birdcage Card Video

Hello, Crafters.

I would like to say a big THANK YOU for all your good wishes on my daughter's engagement - we are all feeling very blessed.

I also appreciate your feedback regarding product lists for my projects.

This morning, I uploaded my video called Rebecca's Birdcage Card. 

It was inspired by the fabulous swap I received from Rebecca Willmore, who's always coming up with great ideas.
  
 
Rebecca's website isn't ready at the moment but she can be contacted by email at pinkie1211@willmore.me.uk. in the meantime.
I shared Rebecca's swap in my swap video after Telford on 5th November and I received requests for a video showing how it's made. 
I used an amazing SEVEN stamp sets to create this card: 
 
In the Meadow - grass
Number of Years - Cherry Cobbler flower 
Foxy Friends - the cat's face
Butterfly Basics - sentiment
Badges & Banners - birdcage
Hardwood - wooden background
Ready to Pop - the climbing plant

Another amazing detail, which won't really surprise you, given that you already know my photography skills are somewhat limited: the window frames are Old Olive!
 
The length of the "climbing" plant isn't long enough to go from top tobottm of the card but it wasreally easy to stamp on an "extension".

The reason for stamping the grass was because the length of the Hardwood Stamp leaves a straight line at the bottom where the "wood" ends. Stamping the grass a multiple of times, avoids this being seen!   

That's about it for today. Until tomorrow, happy crafting.

JanB.

Thursday, 11 August 2016

Jar of Love

Hello, Crafters.

Yesterday was my first play with the Jar of Love Stamp set and coordinating dies! I have seen so many ideas from other demos, I wasn't sure that I could come up with something original but I think I might have succeeded!

I haven't seen anyone put the ladybirds from the Hostess Love You Lots Stamp Set in a jar yet but I wouldn't be surprised to find out it has already been done.

I was going to make this as a new home card but I don't have any new home sentiments! I'll have to have a really thorough look through the catalogue to see if we do actually have one!
 
I started with a card base of Real Red Cardstock, a layer of Whisper White and a top layer of the script design in Real Red from the Brights Collection Designer Series Paper (DSP) Stack. I stamped the jar and the ladybirds using Versamark and the heat embossed using Basic Black Embossing Powder.

Unfortunately, we don't sell this anymore but if you ink your stamps in Versamark and then in Basic Black Ink, you can stamp your image, then pour Clear Embossing Powder onto the image/s and heat set!

I coloured the ladybirds using my Real Red Marker Pen.  If I ever get in a mess with ink, it's always red and yesterday was no exception! I smudged the red ink to the left hand side of the ladybirds! 

To disguise this as much as possible, I created some masks using PostIt Notes. I positioned the hollowed-out jar mask in place and stamped the grass from the In The Meadow Stamp Sets, using Pear Pizzazz Ink, along the bottom. Then I used my dauber to colour in the gaps and worked my way up to the height of the ladybirds. Then I used another Dauber to sponge the rest of the jar in Soft Sky. 

Looking at the card now, I should have added some birds in the sky! I die cut the jar and wrapped some Read Red Baker's Twine around the neck of the jar and adhered it at the back with Fast Fuse. Then I took a longer piece, cut it into two equal length pieces and tied a bow at each end. I adhered these at either side of the jar. 

NOTE: the Real Red Baker's Twine will be availble in the Christmas catalogue as a pack of two. The second roll is Real Red Sparkle and Whisper White. Watch out for the Candy Cane Lane Baker's Twine #141983.

I adhered the layers together with Tombow and then I adhered two doilies towards the bottom of the card front. I like to use two doilies so they look more white. I added a little bit of tombow to the back of each and stuck them to the card. Then I used my SNAIL just to add a little bit under each solid "circle" around the edge. That's when I found out I was using three doilies! LOL! At least they look a brilliant white! (I'm using the retired Doilies as I have so many left over!) 

I adhered the jar with Dimensionals. For the sentiment I chose two from Jar of Love and lined them up on one block and stamped them is Real Red Ink on a piece of Whisper White. 

I added a red heart I found in the Real Red wallet. I used the Triple Banner Punch to fish tail the end and adhered it to the card with Tombow.

That's about it for today. I'm off to play in my studio now, so until tomorrow, happy crafting. ☺

JanB.

Tuesday, 9 August 2016

Pretty Kitties!

Hello Crafters.

To create today's card, I used an amazing FIVE stamp sets!

When I began this card, I knew the scene I wanted was these two kitties sitting on a brick wall.

I started my card with a Whisper White Cardstock base, with a layer of Tip Top Taupe, then a layer of Soft Sky with a half layer of Tip Top Taupe. 

I took this half layer and stamped the flowers from the In the Meadow Stamp Set using Always Artichoke Ink. I stamped four images at different heights and then used the grass stamp all along the bottom, several times, to fill in the gaps. Then I ran this piece through the Big Shot with the Brick Wall Embossing Folder. I thought about colouring the flowers but decided against it because I wasn't sure if, whichever colours I chose, they might look odd colours on coloured cardstock

For the background behind the wall, I used the triple tree stamp from the Limited Edition Thoughtful Branches Stamp Set. This stamp set is only available during August 2016 or while stocks last, whichever comes first! I inked the stamp in Always Artichoke Ink, then gently stamped it off once and then stamped onto the Soft Sky Cardstock. I did this three times. I considered stamping the tree tops on the trees but decided against it because I thought it would make the card look too busy.

I adhered all the layers in place using Tombow. 

I stamped the two kitties from the Pretty Kitty Stamp Set using Archival Basic Black Ink on Smokey Slate Cardstock. Then I very patiently fussy cut them both out! I used my Flirty Flamingo Marker pen to colour the bow on the sitting down kitty and my Marina Mist Marker Pen for the singing kitty. I adhered them on the wall using Dimensionals.

I chose the top sentiment from the Picture Perfect Stamp set and stamped it between the two cats using Archival Basic Black Ink. Then I chose the Happy Birthday sentiment from the Confetti Celebration Stamp Set. 

Using Archival Basic Black Ink again, I stamped it on a piece of Tip Top Taupe Cardstock. I punched it out using the Classic Label Punch and adhered it to the brick wall using Dimensionals....and that was it!
 
REMINDER to ALL Stampin' Up! customers: don't forget yo use the Bonus Days Coupon/s you earned during July. They are only valid until 31st August 2016 - use them or lose them! If you know you're not going to be using them, you can pass them onto friends!
 
That's about it for today. I'm off to work now, so until tomorrow, happy crafting.

JanB.

Thursday, 7 July 2016

Touches of Textures

Hello, Crafters.

I had a telephone call from the Metropolitan Police yesterday with an update about our burglary last December!

They recently apprehended the suspect who already had a warrant out for his arrest on a totally unrelated case. He went to Court on Tuesday, was found guilty of the burglary, sentenced to three months' imprisonment, suspended for two years, and ordered to pay us compensation of £150.00.

The lady who phoned said that as far as the police are concerned, the case is now closed unless further evidence against the other two suspects come to light! Hopefully, this is the last you'll here about that unpleasant episode!

On a much happier note, today hubby and I are off out for the day to a place called Tenterden, which is in Kent. I've never been before but hubby has and he remembers it as a delightful "olde worlde" village. I'll let you know all about it tomorrow.

To create today's card I used the new stamp set called Touches of Textures. I tend to bypass this type of  grungey set but it's one of the sets Natalie used for our team training a couple of weeks ago - of course, I was hooked!

I started with a card base of Whisper White Cardstock, with a layer of Peekaboo Peach and a top layer of Whisper White.

Using Sahara Sand Ink, I used my Stampa-ma-jig to stamp the long grungey stamp four times, vertically, across the top layer.

I changed to our Archival Basic Grey Ink and stamped the bunch of flowers in the centre. I chose grey instead of black because I wanted to go for a softer look. I coloured the flowers using Peekaboo Peach, Delightful Dijon, and Emerald Envy Marker Pens.

Then I used my Stamp-a-ma-jig again and stamped the two sentiments from the In The Meadow Stamp Set using Archival Basic Grey Ink. I adhered the top two layers together using Tombow.

Still using the Archival Basic Grey, I stamped three bees and fussy cut them. I coloured their bodies using my Delight Dijon Marker Pen. Although it's not visible in the photographs, I went over the wings using my Clear Wink of Stella Glitter Pen. 

I cut a length of ribbon and used my bow maker to made a bow towards one end. I used Fast Fuse to adhere the ends to the back of the card. Making sure I put some Tombow on the ribbon ends, I adhered the card front to the card base. Note to Stampin' Up! please can we have a bow maker in the catalogue?

I used Dimensionals to adhere two bees flying around and one sitting on a flower.

That's it for today. Until tomorrow, happy crafting.

JanB.

Tuesday, 10 May 2016

Barnyard Babies - Cow

Hello, Crafters.

Yesterday I had so much catching up to do after my week in Barcelona, I felt I was treading water at times. I persevered and caught up with the most important jobs and will work on the rest gradually during the week.

When I finally made it into my studio I decided to have a play with the Barnyard Babies Stamp Set. It's not one of the new stamp sets but it's new to me. I must confess, I struggled to get my mojo going.  So much so that I now have a pile of fussy cut ducks, goats, pigs and cows sitting on my desk!

I eventually settled on the cow as I like the sentiment "have an award winning day!" My idea was that the image would look like a framed photograph of an award-winning cow but I think I lost the plot somewhere along the line!

To make this card I started with a card base of Smokey Slate Card Stock with a layer of Whisper White and a top layer of Smokey Slate. Using Smokey Slate Ink, stamped off once, I stamped the splatter stamp from the Gorgeous Grunge Stamp Set on the top three fifths of the top Smokey Grey layer. I punched out a 2" hole in a central position on this stamped section. I then punched a 2" circle from a piece of Silver Foil Card Stock and then punched around this with the 2 3/8" Scalloped Circle Punch, thereby creating a scalloped frame. If I had used squares or oblongs, the image would have looked more like a photograph than using circles! I pierced holes in each of the scallops.

To create the image, I stamped it on a piece of Whisper White Card Stock using Basic Black Archival Ink. To colour the body patches, the hooves, tail and top of his ears, I used a Smokey Slate Marker Pen. For the inner part of the ears and the nose, I used the retired Blush Blossoms Marker Pen. This is a great colour for skin tones and I really wish Stampin' Up! would keep it as a core product. The leaves were coloured with Cucumber Crush.

I made a mask of the cow using a Post It Note so I could stamp some grass around him. There is a grass stamp in the stamp set but I chose to use the grass stamp that's in the In the Meadow Stamp Set. I stamped sufficient grass so that there wasn't any visible white area around the bottom half of the image. I also used the butterflies from that stamp set and coloured them using pink and purple. Finally I stamped the rosette from Barnyard Babies and coloured it with Watermelon Wonder Marker pen before fussy cutting it.

I adhered the image in position behind the punched 2" circle using a little bit of Tombow to hold it in place. Then I adhered the whole layer onto the Whisper White layer. I adhered some silver writing design Designer Series Paper (DSP) from the Neutrals DSP Stack.

In my studio I have a plastic box which measures approximately 6" x 7" x 9" that I keep my ribbon offcuts in - see last photograph. When I need just a small piece of ribbon, I check this box first. I knew I had some scraps of our 1/8" Silver Ribbon in there and I thought I'd take a couple of pieces and adhere then across where the DSP meets the Gorgeous Grunge stamped area. While I was looking for the second piece I noticed a strip of 1/4" white ribbon and I wondered if I could lay the silver ribbon on top of this white piece. I decided to give it a try and have to say I'm pleased with the result!

Both the sentiments I've used on this card are from Barnyard Babies. I adhered the top layers to the card base using Dimensionals. Finally I added three Smokey Slate Candy Dots to the top left hand corner and three to the bottom right hand corner of the stamped top section.

That's about it for today. Happy crafting.

JanB.

Sunday, 17 April 2016

What a super day!

Hello, Crafters.

What an absolutely super day we had at Convention yesterday.

I've had a really good look through the new 2016 - 2017 annual catalogue, several times, and it's absolutely gorgeous! I'll be having another read on the way home, planning my wish list! It's such a shame I didn't have my catalogue with me on the way up - I wouldn't have noticed that the journey took a miserable 5 1/2 hours! (After waking up to yesterday's snow, today we have gorgeous sunshine).

In the new catalogue there are so many new products, as well as the new 2016 - 2018 In Colours, I can't wait to start playing with them.

When we arrived at Convention yesterday, we were all given a bag which had some goodies inside: a pencil case, four pens, a Prize Patrol Badge and one of the new stamp sets!

During the course of the day there were five (I think) Prize Patrols and I won a really gorgeous stamp set that would definitely have been on my wish list! Towards the end of the day, we also received an all attendee stamp set. And then something unusual happened!

Just to set the scene..........on each table there was a Really Useful Box containing two new stamp sets, 1 new punch, 1 heart punch, 7-8 ink pads (including four of the new colours, a pack of markers in the new colours, a new product (YAY), Embossing Buddy, Dimensionals, and two new embossing folders. There may have been some other bits and pieces but this is all I can think of at the moment.

As the host (I can't remember the guy's name but he's a great guy from head office) was winding everything up at the end of the day, he said the person on each table who has the first birthday after the event to take the box. There was a loud gasp that went around the room, everyone looking at each other in total disbelief! Surely they weren't being allowed to take all those goodies home with them??

This has never happened before! Then he instructed that person to open the box and choose a product from the box. Then he said now pass the box round the table clockwise and everyone to choose something from the box............and keep going until the box was empty! What a fantastic surprise! We were very lucky on our table as there were just five of us!
 
I'm not allowed to show anything until  Monday evening and then I can show you everything except the inside of the new catalogue. Be prepared to be wowed!

This morning I uploaded my video which shows how I made my swaps which I've called Record Card Key Ring Pad. Unfortunately, the key ring findings I bought for my note pads were really very bad quality and I requested and received a refund. As an alternative, I bought some plain rings.  

They can still be fitted to key rings but they can't be clipped onto anything - disappointing but never mind.

The purpose of swaps is to swap ideas and my pads still include some different card making ideas. I made a total of 134 swaps and came home totally swapped out. It never fails to amaze me how much work some demonstrators put into their swaps. I used the five retiring 2014 - 2016 In Colours for my pads - Blackberry Bliss, Hello Honey, Lost Lagoon (really sorry to see this go!) Mossy Meadow and Tangelo Twist.

I was able to get two packs of coloured record cards which I thought added a nice little touch - I wished I could have bought more but that's all the store had!

That's about it for today. The car is all loaded and we.re ready to make a move - it's 9.30 am. Happy Sunday. Until tomorrow, happy crafting.

JanB.

Sunday, 3 April 2016

Sponging In The Meadow Video

Hello, Crafters.


Happy Sunday.


Today we're off to visit our dear friend who we were planning to visit on Easter Monday but had to abort our plans because of Storm Katie.


Unfortunately, she had a fall at the nursing home that day and broke her hip!


She had a hip replacement the following day and I'm really pleased to say that she's making an excellent recovery.


Although my two classes were a lot quieter than normal yesterday, all the ladies loved the three projects we made.


They were the washi tape wedding card I posted yesterday, the double Z fold card and the three panel card.

This morning I posted my Sponging In The Meadow Video.

As you can see by all the different photographs today, I really had fun trying out different ways of sponging and different colour combos with the stamp set called In The Meadow.

Photograph 1: Sahara Sand, Soft Sky, Mint Macaroon - this is the card I made during the video.

I think this one is perfectly suitable as a masculine card.

Photograph 2: Sahara Sand, Soft Sky, Mint Macaroon - I didn't leave myself enough space at the top for the first part of the sentiment.

I decided to stamp both parts along the bottom and I think it looks fine.

Photograph 3: Blushing Bride, Soft Sky, Mint Macaroon - I was really pleased with the way this card turned out but I'm not sure it's suitable as a masculine card because of the pink.

This is the reason I changed to Sahara Sand. What do you think?

Photograph 4: Hello Honey, Soft Sky, Mint Macaroon - I thought this looked a bit sparse as there weren't any flowers of trees behind the deer but I'm still not sure!

Photograph 5: Crushed Curry, Marina Mist, Old Olive - another card I tried using the hills with the deer but I think I should have done some trees behind the deer.

Photograph 6: Cherry Cobbler, Marina Mist, Old Olive - this was one of the first cards I created.

At this stage I was using one of the round sponges, or at least a quarter of a round sponges and I found I was getting very obvious lines.

I like the colour combo but I think the flowers look rather sparse. 

Photograph 7: Cherry Cobbler, Marina Mist, Old Olive - this was the first card I made and the one I like least.

The lines created by the sponges are very obvious.

I also think the colours look, not just very dark but they also look very "heavy"!

I don't know how to explain what I mean by "heavy".

Photograph 8: Wisteria Wonder, Mint Macaroon and Soft Sky - I was happy with everything about this card!

Unfortunately, I was trying to remove some glue from my card and my hand slipped making me crease the cardstock!

I put it to one side to allow myself time to think what I could do about it!

I decided to use the Ovals Collection Framelits Dies to cut out the centre image of the deer and layered it on larger ovals. 

Then I cut along the top and bottom of the sponge area and adhered to the card behind the oval image.

I'm not sure it worked or not.

For anybody looking at this card without seeing all the others on this post might wonder what the background pieces are all about.

What do you think?

Photograph 9: I was looking for a butterfly card I made a few years ago that had been inspired by Dawn Griffiths using this sponging technique.

I couldn't find it but I did come across this masculine card using The Open Sea Stamp Set.

That's about it for today. Until tomorrow, happy crafting.

JanB.