Showing posts with label Stamp Set - Boys Will Be Boys. Show all posts

Saturday, 23 April 2016

Pictogram Punches Vases

Hello, Crafters.

Yesterday I was up and out early yesterday  to pop into Croydon for some shopping. I needed a 30cm x 30cm box-mount photograph frame so I could frame my Telford Sampler swaps. I found what I needed and came back to Coulsdon, went to the bank and the printers and then I came back home for a really lovely cup of tea!

When I went into my studio, my first job was to set up new folder for the five new 2016-2018 In Colours that will b launched on 1st. June 2016. Each colour card stock has a plastic wallet (the ones that have two open sides, one punched pocket (with the strip of holes cut off) and a Ziplock bag.
 
Then it was time to create today's card. I've used three retiring stamp sets: Boys Will Be Boys, Pictogram Punches and Bordering Blooms - another three sets I'll be sorry to see go. It probably seems that I'll be sorry to see all the stamps sets go!

You may remember when I posted my Baby Wipe Technique Card on Thursday, I said if you keep your baby wipe pad in one of the Stampin' Up! DVD's it'll keep moist so you can use them again. And that's what I've used on yesterday's card for the flowers and butterflies. The "ink pad" is still very moist. I'll keep trying it every couple of days and see how it lasts!

I started with a card base of Very Vanilla Card Stock and then a layer from the Pretty Petals Designer Series Paper (DSP) Stack. I was amazed at how similar the design on this sheet is to the vine I used along the bottom of the top layer of card stock. I stamped the vases in Mint Macaroon on Very Vanilla Card Stock and then cut them out. I cleaned the stamp and stamped the vases onto the top Very Vanilla layer using Cucumber Crush Ink. I adhered the Mint Macaroon vases over the top using Dimensionals. I stamped the flowers using my baby wipe ink pad and selected areas on the pad so I was able to get three Melon Mambo, three Bermuda Bay and three Daffodil Delight Flowers. After I had adhered them to the card frond using Tombow, I put a small drop of Crystal Effects - another product that's going to be retired - in the centre of each.
 
I stamped the sentiment onto a slim strip of Very Vanilla Card Stock. To create the layer, I used the same DSP as the middle layer and punched out a label using the Decorative Label Punch. I cut the top and bottom pieces off  and adhered behind the sentiment, which I then adhered to the card front with Dimensionals. I painted the flowers, butterflies and the strip across the vases using the Clear Wink of Stella Glitter Pen.

I hope you have a great weekend. Until tomorrow, happy crafting.

JanB.

Wednesday, 30 March 2016

Framed Vellum Flower

Hello, Crafters.

I'm pleased to say our friend's hip replacement operation went really well yesterday and she's making an excellent recovery.


Yesterday evening I had a phone call from my sister in Australia, to say she was at the hospital with my Mum, because she'd had a fall at the nursing home and had cut her head badly.


Apparently Mum, aged 92, was in good spirits and taking it in her stride!


This morning I uploaded my latest video to YouTube. I've called it Framed Vellum Flower and shows an easy way of adhering vellum to cards without having to worry about trying to conceal the glue!

It's done by encasing the vellum inside frames made by Thinlits dies.

Obviously this is quite restrictive as it depends on the size of the dies you have.

When I plan a video, I make my first card - the prototype - and whilst I use 99% of Stampin' Up! products, I do sometimes use some of my favourite retired products. 

If you look at the last photograph, you'll see the prototype card for today's video.

The dies I used are retired and called Labels Collection Framelits Dies.

I really liked these and was very disappointed when they were retired but at least they proved my idea for today's card would work!

I thought about heat embossing the flower image as opposed to stamping it but decided against it because heat embossing sometimes causes vellum to warp!

The next step after testing my card idea is to remake my card but only using current products.

As far as the Designer Series Paper (DSP) I used for my second card is concerned, it'll be retiring in two days as it's a Sale-A-Bration (SAB) product but there are other suitable DSP available in Hello Honey that will work equally as well. 

I changed the dies to Lots of Labels Framelits, the ribbon to the White Jute Ribbon, and the sentiment to one from the Party Pants Stamp Set - another SAB product.

The other change I made to card number 2 was that I stamped a background on the Whisper White Cardstock behind the vellum because I felt the plain white looked rather stark.

I used Timeless Textures Stamp Set and I'm really very pleased with the effect.

For the video I changed the colour of my card from Hello Honey to Blackberry Bliss.

The DSP is from the same set as the design I used in card number 2.

Unfortunately, the only Blackberry Bliss ribbon I have is far too thick to make a very small bow so I used some of the White Jute Ribbon.

I cut along the ribbon to separate two strands and tied a very small bunny ears bow.

On the video I forgot to colour my vellum flower with my Clear Wink of Stella Glitter pen, before I photographed it. But it really does add a WOW to the design.

That's it for today. Until tomorrow, happy crafting. 

JanB.

Sunday, 16 August 2015

Glimmer Butterfly Video


Hello, Crafters.

We had a really fabulous day at the British Legion Women's Section Vintage Fair yesterday.

Everybody we met - the organisers, the stallholders and the visitors - were so friendly and chatty, there was music and laughter going on all around us.

The whole atmosphere was so relaxing.

Although it was a relatively small fair, we sold an amazing amount of my cards and 3D products. 

I have just uploaded today's video which I have called Glimmer Butterfly Card.

The main technique I am demonstrating is how to "paint" on Glimmer Paper.

This isn't quite the same as painting Glimmer Paper to change it to another colour.

My thought process started with the fifth card in last week's challenge: Peaceful and Perfect Pines.

On that card, I'd heat embossed the sentiment and punched it out using the small scalloped circle punch.

I also punched out another circle the same size in the Dazzling Diamonds Glimmer Paper.

I wanted to layer them together, offset but the under-layer didn't really show. 

I inked the edges of the Glimmer Paper using a sponge and my ink pad.

It was a great result and I wondered how I could apply that to a butterfly!

On Friday I played and played and played until I found the best way to achieve what I was after - hence this video.

This is the link: Painted Glimmer Butterfly

Needless to say, I finished up with some butterflies that weren't good enough for my card but I'm going to play with them today and see what I can come up with.

I'll photograph as I go along and post them here tomorrow.

In the meantime, happy crafting,

JanB.


Sunday, 21 June 2015

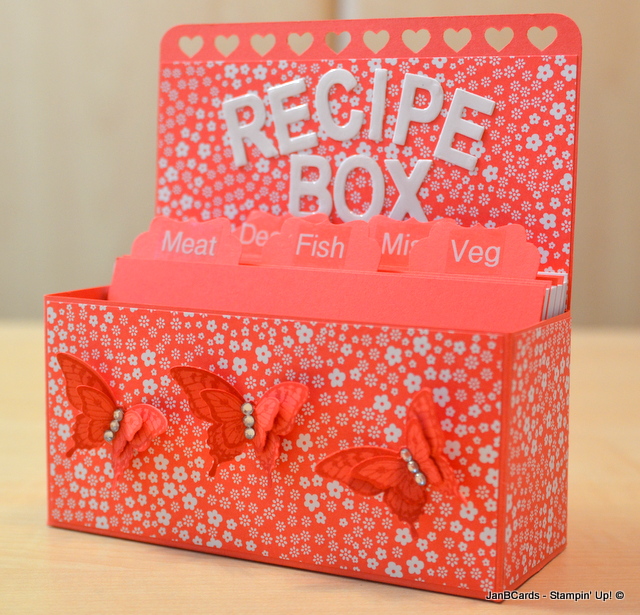
Video: Recipe Box

Hello, Crafters.

Happy Father's Day to
all Dads out there
- have a great day.

I have just uploaded
my latest video
which shows how to
make a very stylish
and practical recipe
box.

This will help to
keep all those
recipes that you
probably have
languishing in a
kitchen drawer
organised and to
hand.

This is the link: Recipe Box

When I was recording
the video I found
that, although I gave
the right measurements,
I had actually cut
two pieces of the
Designer Series Paper
I used the wrong
size.

I said I would finish
it off later and
post a photograph
of the completed
box on my website,
hence photograph 1.

I used my Brother
Labelling Machine
for the index cards.

The Get Well card I
am showing you is a
card I made for
8-year old Edward
who is the son of
one of hubby's
work colleagues.

Unfortunately, last
weekend, Edward
was knocked off his
bike by a dog who
came charging out
of nowhere and
sent him flying. 

His arm was broken
in two places and
Edward was taken to
hospital for
treatment.

I'm pleased to
say that Edward
is making a good
recovery.

The card is called
a screen card and
I've used the Boys
Will Be Boys stamp
set. 

I painted each
stamp using our
marker pens.

The colours are Cajun Craze, Crumb Cake and Marina Mist - it took a lot of patience but very well worth it for the effect it gives.

I hope you're enjoying  great crafty weekend. Until tomorrow, happy crafting.

JanB.