Showing posts with label Stamp Set - Birthday Posies. Show all posts

Wednesday, 4 July 2018

Delicate Lace Vellum Flowers Card Video

Hello, Crafters.

When I shared this card last Saturday, I was overwhelmed with
 all the positive feedback I received - I was really humbled! I was
 asked if I'd make a video showing how I made the card, and
 I'm only too pleased to share.

 I chose Poppy Parade as my colour, but I don't have any Poppy
 Parade Stampin' Blends so I used Dark Cherry Cobbler. It 
isn't great but I think it works OK! When I shared my last
 video - No.386 - Dry-embossing on Vellum, I showed a couple
 of pieces of the Graceful Glass Designer Vellum which I said I'd 
use in future projects
 One of the pieces was the dry embossed irises , which 
are the same design as the painted ones I used in
 Saturday's card. I decided to use the image in the same 
style of card to see what it looked like both ways.

 I found it very fiddly trying to mount the dry embossed image
 for two reasons. Firstly, the dry embossing
 had caused so much dimension, and secondly when the 
four bookmarks are cut into four strips, I was left with two very 
slim sides that need to be used to glue them down.

 The real problem is having to be careful where the adhesive goes 
i.e. enough to adhere it down securely, but without being visible!
 So my conclusion on this design is to stay with the painted image, 
because it's mounted onto a strip of Whisper White Cardstock (CS), 
and then adhered to the card with Tombow. 
You may remember, when I was telling you about the delicate lace
 that I'd adhered inside of my first card? I said I'd adhered it 
horizontally first of all, but very quickly whipped it off
 because my card was vertical card.

 It was only a little while later that I realised I could have left it vertical
 as the lace on the front was vertical! DOH. Never mind, I
 decided to stay with horizontal.
 When I was photographing my card after I'd finished the video, I 
decided to add a small strip of red across the lace on the inside 
of the card. I think it added a nice finishing touch!

 Today, Hubby and I are out shopping for some last minute bits 
and pieces for Alaska! ☺☺☺

That's it from me today. Until tomorrow, happy crafting.

JanB.
 

Tuesday, 3 July 2018

Best Bunny

Hello, Crafters.

I fell in love with the Best Bunny bundle when I first saw it back
 in April, so I'm really surprised that this is the first time I've played
 with it. I have to say that I'm not totally happy with today's
 card although I love the concept.
I would have liked to have changed the flowers I used, but I was 
running out of time and decided I was being overly critical...........as
 I often am! LOL!  I really went out of my comfort zone with
 my colour scheme, but I'm pleased I rose to the challenge! 

There are three different faces to choose from for the bunny, 
which range from normal - which is the one I've used, then there's 
one with him winking, and the last one is with buck teeth! When I 
first started working on the rabbit, I decided that I wasn't goining to
 use the paws, but in the end, I decided the bunny looked
 funny without them!

They are a great addition to this stamp set as they can be used up - as
 I have done - or down so the paws can be put under the present like 
he carrying it! Without the paws, it's easy to make it look as if you're
 looking at the rabbit from the back. 

There's a stamp and die for a fluffy tail, or it'd be just as easy to 
use a small piece of cotton wool or a tiny white pom-pom! The
 more I look at my card, the more ideas keep
 popping into my mind!
  I used three stamp sets for today's card: Best Bunny, Floral
 Frames for the flowers, and Birthday Posies for the sentiment. I
 really seem to be stuck on this stamp set for my sentiment over
the past few days!  I must try and use something a bit different!! 
The die sets I used are the Foliage Frame, which goes with the 
Floral Frames, and the Layering Ovals.

 The Best Bunny Stamp Set is on offer as a bundle with the
 Rabbit Builder Punch, and punches out the head, the body, the
 paws, and the pom-pom tail. Although it doesn't show up in 
the photographs - except possibly the close up of the rabbit, I've
 painted both rabbits, the flowers, the leaves, the carrot and
 the gift with my Clear Wink of Stella Glitter Pen.

The other two products I've used to create today's card is the Basket
 Weave Dynamic Embossing Folder, and the Nature's Poem Designer
 Series Paper. I'm going to play with this set a bit more because I do
 think there are quite a few things that can be done with this bundle.
  I had a thought yesterday morning that made me panic a bit!
 I only have seventeen days to make my swaps for the Alaska Incentive
 Trip, as well as four more videos that I can post while I'm away! I 
think I'd better get a move on, don't you? LOL! 
That's it from me today, until tomorrow, happy crafting. 

JanB.

Sunday, 1 July 2018

Dry-embossing on Vellum Video

Hello, Crafters.

I hope you're enjoying your weekend, and if you're here in the UK,
 that you're also enjoying the fabulous weather 
we have been blessed with! I know the heat doesn't suit 
everyone, and I'm sorry if it causes you suffering.
 
Today's video shows how to do dry-embossing on vellum 
when you have stamped images.

Although I made a video showing this technique quite some time 
ago, I decided it's a great time to re-visit it, and apply it to the 
stunning Graceful Glass Designer Vellum.
 I've worked on four of the designs and converted two of the 
samples into projects. I was hoping to finish off the last two
 before the video goes live today, but it wasn't meant to be!! 

You may remember the deisgns I painted a few weeks ago
 and converted them to book marks. 
One of my unfinished projects is the design I originally
 called yellow flowers because I didn't recognise what
 the flowers were meant to be! 
 The other unfinished project is the the design that looks like a
 Church window decorated with flowers and two butterflies.

 Both designs look fabulous dry-embossed and I'm looking 
forward to having the time to finbish them both off!  
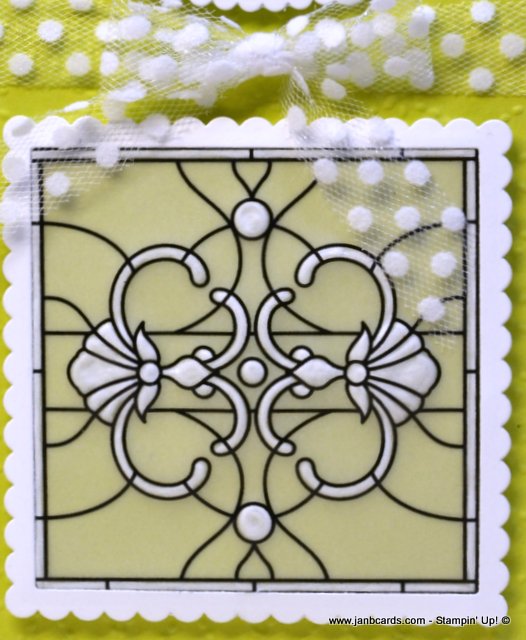
I thought you might also like to see this Lemon Lime Twist 
card I made using one of the square designs from Graceful 
Glass where there are four squares on one sheet.
 I have really enjoyed working with this vellum, and see me
 working my way through more than one packet in 
the course of the year! 
I wish you a very blessed Sunday and I'll be back tomorrow. 
Happy crafting,
 
JanB.

Saturday, 30 June 2018

Graceful Glass meets Delicate Lace

Hello, Crafters.

GOOD NEWS!! The new Stampin' Blends are now available to order. 
The wait has been well worth it and now I need to wait until next month 
to place my order - yippee, that's tomorrow!! LOL!
I thoroughly enjoyed myself yesterday making my video for Sunday!
 I don't want to give too much away but I was using the 
Delicate Lace Edglits dies...................oh my goodness, they
 are gorgeous! After I'd finished my video, I carried on
playing and made the card I'm sharing with you today!

 I wanted to be able to use one of the dies twice, either
 horizontally  or vertically, so I needed a long slim image.
 The "bookmark" design in the Designer Vellum Pack proved
 to be exactly what I was after. Using my Dark Rich
 Razzleberry and Dark Old Olive  Stampin' Blends,
 I coloured the bookmark that features the iris. 
I prepared my top layer of Rich Razzlebery Cardstock (CS) by
 dry-embossing it using my Basket Weave Dynamic Embossing Folder. 
I adhered a piece of Whisper White CS behind the coloured image to 
show it off to its best advantage, and then adhered a lace 
die-cut down either side, but it looked incomplete! 

I added some 1/8" Rich Razzleberry Sheer Ribbon on each side
 between the lace die-cut, and the "bookmark"! I used the 
BIRTHDAY WISHES scroll sentiment from the Birthday Posies 
Stamp Set, and adhered it with Dimensionals across the lowest
 part of the iris stems as possible.

To complete the front of my card, I added one Rich Razzleberry
 Share What You Love Artisan Pearls on the top of each sentiment
 scrolls, and one on each of the iris flower-heads. I find it quite a
 challenge to decorate the inside of my cards when I'm not 
using stamped images for my card, but I thought the most 
logical thing to use would be the lace.

 Without really thinking about what I was doing, I put glue on the lace 
die-cut, and adhered it along the bottom of the card, horizontally. I 
panicked when I realised my card was vertical, not horizontal, and 
quickly yanked the die-cut up beforeTombow had it stuck done 
permanently. I trimmed it shorter and adhered it along the vertical
 bottom, and breathed a sigh of relief!

As I was carefully using my Adhesive Remover, it dawned on me 
that I could have left it on the horizontal bottom because it was
 really the vertical side of my card! LOL!!!
Don't forget, tomorrow sees the start of the Stampin' Up! July 
Promotion for NEW Recruits. The promotion gives all crafters
 who join Stampin' Up! during July 2018 - as a hobbyist or a
 business  builder - a complete set of TEN inkpads from one
 of the Stampin' Up! Colour Families. These retail for €81/£63! 
The Ink Pads are AS WELL AS the €175/£130 worth of products
 you get to choose for your €129/£99 joining fee. (NOTE: the ten InColour Ink Pads will be counted as one family! ☺)

I'd love you to join my team of Super Stars, either as a 
hobbyist so you can enjoy the discount, or as a business builder, like 
me. Please email me for more details janb@janbcards.com 
 (NOTE: Stampin' Up! rules only allow me to recruit crafters 
who live in the UK, the Netherlands, France, Austria, or
 Germany - I really am so sorry).

I hope you have a super weekend. 
That's about it from me today, so until tomorrow, happy crafting.

JanB.