Showing posts with label Stamp Set - Confetti Celebration. Show all posts

Monday, 14 May 2018

Floral Bouquet Birthday Card

Hello, Crafters.

I hope you've had a lovely weekend and are all set for the
 week ahead! Today I fancied doing some fussy cutting and I
think this has to be one of the most fussiest pieces of fussy 
cutting I've ever done! LOL! 
 I found it very relaxing, and I'm sure I could quite happily
 spend an evening just fussy cutting! The flowers are from 
one of the designs from the Share What You Love Designer
 Series Paper (DSP).

Before I adhered the flowers to a Whisper White Stitched Shape
 oval, I stamped the oval with a splattered stamp from The Touches
 of Textures Stamp Set, which I'm really pleased  is being carried
 forward to the next annual catalogue. 

For the splatter I used Rich Razzleberry Ink that I'd stamped off
 three times, and therefore used fourth generation stamping. The
splatter is visible in places and does what I wanted it to do
 i.e. to take the edge off the starkness of the Whisper
 White Cardstock (CS).  
 I dry-embossed the Rich Razzleberry layer behind the the white
 oval using our fabulous Basket Weave Dynamic Embossing 
Folder. This was one of the gifts available during Sale-a-bration
 earlier this year, but I really thrilled that it has been carried
forward to the new Annual Catalogue. 
 I used the Happy Birthday sentiment from the Confetti 
Celebration Stamp Set, and the butterfly from the Flying Home
 Stamp Set. Unfortunately, both these stamp sets will be
retiring on 31st May 2018.
 I finished the front of the card by adding three pearls around the 
flowers and one each end of the sentiment. The other finishing
 touch was a pretty bow made with the luscious new Velvet Rich 
Razzleberry Ribbon, which was just one of the gifts I received 
when I went to CentreStage at the beginning of April! 
 To decorate the inside of the card, I added a layer of Whisper 
White CS, and adhered a small section of the same image I'd
 fussy cut from the Share What You Love DSP. As I've been 
writing this, I've had another idea how I can use this fussy cut floral
 bouquet - maybe I'll do it in time for tomorrow's blog - time will tell!
 That's it from me today. I hope you have a lovely Monday, and
 until tomorrow, happy crafting!

JanB.

Thursday, 5 April 2018

Mini Embroidery Hoops

Hello, Crafters.

Yesterday morning I went to the hairdressers to get my hair done ready for the weekend, and this morning I'm off to get my nails done!
 
It isn't only stamp sets I buy and don't get round to using...............it's also embellishments! 

Yesterday I decided to have a play with the Mini Embroidery Hoops that are in the Spring/Summer Catalogue (page 14). 

The size of the hoops co-ordinate with the A Happy Day Stamp Set, as well as the two New Scallop Circle Punches - 1 1/8" and 1 3/8".  

The only projects I've seen made with the hoops are with stamped images from the stamp set inside the hoops, and (I imagine) popped up on Dimensionals. 

I have made mine a little bit differently, in as much I have tied mine to the smallest Mini Embroidery Hoop, with the little deer suspended on a piece of Linen Thread. 

Without recording a video, the only way I could think of photographing the hoop hanging lose is by tilting the card forward - see the last photograph.

I used three stamp sets for this card:-
A Good Day for the deer
Touches of Textures for the background behind the deer and behind the sentiment
Confetti Celebration for the sentiment.
 
I also used five different punches!

I used::
Banner triple punch to fishtail the end of the banner
Ticket Tear Border Punch for the decorative strips down both sides of the banner
1" circle punch for the deer
1 1/8" Scallop Circle Punch to layer the deer onto
Classic Label Punch for the sentiment, which I stamped with Basic Black Archival Ink. 

The colour scheme of my card is Berry Burst, and I chose the brick wall design from the Painted with Love Designer Series Paper (DSP). 

For the top Whisper White layer, I dry-embossed it using the Brick Wall Embossing Folder but I didn't like the look - it looked crowded.

I dry-embossed another sheet, but this time I used the Simple Stripes Embossing Folder, from the Spring/Summer Catalogue, with the stripes going horizontally.

To finish decorating the front of the card, I added five self-adhesive sequins in Berry Burst, and then popped a small Rhinestone in the center of each - it's amazing how much of a pop they give the sequins!

Inside the card I adhered a layer of Whisper White CS, on a layer of Berry Burst CS. 

When I first started my card, I was going to use a die cut  of the deer, but it was too big for my needs, so I adhered it inside the card instead.

That's about it from me today, so I hope you have a great day, and until tomorrow, happy crafting!

JanB.


Saturday, 3 February 2018

Bird on a Branch

Hello, Crafters.

Yesterday I used my favourite stamp set yet again! 

It's the Petal Palette Stamp Set that's in the Spring/Summer catalogue!

Using Basic Black Archival Ink and Whisper White Cardstock (CS), I started by stamping one of most of the images, but two of the birds, and both sets of flowers on stems, and three of the individual flowers.

I wanted to see what each image looked like when they've been coloured. 

I particularly wanted to see how much green would show through on the branch that I've sat the bird on, and I'm very surprised at how much green shows through - it's lovely.

Next I used the dies in the Petals & More Thinlits Dies, and die cut those images I could, and I fussy cut the rest. 

I started my card with a Pink Pirouette card base, with a layer of Whisper White CS, and a top layer of Pink Pirouette CS. 

I used the Simple Stripes Embossing Folder from the Picture Perfect Party Suite, which is another product I really like in the Spring/Summer catalogue, probably because it suits my favourite stlye of card, which is clean and simple. 

Following on from something I said yesterday, about the dragon card made by Sue  Hookins, that I shared with you, I cut the top layer much smaller than the regular size I use for the top layer.

I adhered the top two layers together and started playing with the die cuts until I came up with an arrangement that I liked. 

The branch and the flowers would also look good if I had stood them upright, without the bird.

I can see so many options with this bundle, that I'd love to see this set carried forward into the next annual catalogue!

I adhered all the images using Mini Dimensionals - that's a product that really comes into it's own for small images like this! 

The sentiment I used is from the Confetti Celebration Stamp Set, and has been stamped in Basic Black Archival Ink on Whisper White CS. 

I punched it out using the Classic Label Punch, and adhered it in the top left hand corner with Dimensionals. 

I added a Basic Rinestone either end of the sentiment, and one for the bird's eye - although I'm not sure I like it!

To finish the card, I adhered a Whisper White CS layer inside the card, and adhered the three individual flowers that had been die cut, but pretty badly..........so I had to trim off the excess white edging! 

Next time I get this set out to play with, I'm going to die cut the shapes that don't have corresponding stamps, and see where that takes me!

I hope you have a great weekend, and until tomorrow, happy crafting.

JanB.

Monday, 27 March 2017

Special Birthday

Hello, Crafters.

I hope you've had a great weekend. ☺

Just a quick note to remind you that there are just four days left before Sale-a-bration (SAB) ends on 31st. March 2017!

In case you missed the notification, last week Stampin' Up! added eight products from the Annual and Spring catalogues as SAB gifts.

I understand that some of these products have already sold out in the US! 

A brief recap for you of the benefits of SAB:

First is a free gift for every €60/£45 you order, excluding delivery

Second is an extra €27/£20 in Stampin' Rewards if your order is €275/£200 or more

Third is an extra two free stamp sets of your choice if you join SU as a hobbyist or demonstrator, as well as the €175/£130 worth of products you choose for yuor €129/£99 Starter Kit. 

If you live in the UK, France, Germany, Austria or the Netherlands, please contact me if you'd like more info: janb@janbcards.com. 

Alternatively, if you're in North America or South Pacific regions, please contact your Stampin' Up! Demonstrator.

Today's card is the first project I've made using the brayered Irresistibly Floral Designer Series Paper, which I shatred here with you last Thursday.
 
One of the suggestions I received - many thanks, Kaye - was to make a special birthday card and I'm sure someone else suggested using Vellum but unfortunately, I can't find it! 

I still had my pre-cut Dazzling Diamonds Glimmer Paper shapes in a box on my desk and had a look to see what I could find. 

I came up with the circle frame and the bow!
 
The bow was from the Wonderful Wreath Framelits Dies and I think I made the circle frame using an earlier set of circle dies we had.

I adhered the circle frame on to the Vellum using Tombow, and then adhered the completed circle to the card base, again, using Tombow.

Lower down this post, there are some photographs showing how you can achieve a similar frame using the Layering Circle Dies.
 
I adhered the die cut heart to the lower rim of the circle frame using glue dots. I wasn't sure what to do about the sentiment.

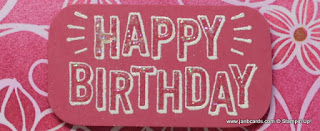
I chose HAPPY BIRTHDAY from the Confetti Celebration Stamp Set, and took a small piece of Rose Wonder cardstock.

I wiped this over with my Embossing buddy, inked the stamp in Versamark, stamped and covered with White Embossing Poder. 

When I had finished heat embossing it, I painted the centres of the block letters, using my Fine Tip Glue Pen. 

Then I sprinkled it with Dazzling Diamonds and allowed it to dry. 

I adhered this to the top of the card using Dimensionals but I can't help feeling that I need some Dazzling Diamonds Glimmer Powder up in the top area. 

Although maybe some Rose Red white heat embossed and punched flowers at the bottom would work better! 

Then I could also do the inside of the card - which I haven't done yet!

If I do this, I'll share another photograph!

Photograph 7 - this is the closest you can get to my size frame. 

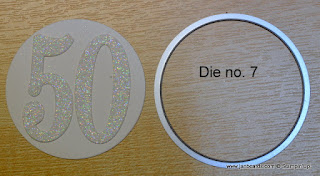
These two dies are both from Layering Circles Framelits Dies and are the largest scallop die, no. 8 and the second to largest straight cut circle die. 

I have placed the two numbers in the frame so you can see the fit!
 
Photograph 8 - the pink circle has been die cut with the largest, straight edge, no 8.

I have laid the pink circle on the white scalloped die cut scalloped circle.  

Photograph 9 - this is the same as photograph 8 except I used die. no 7.

Notice at the difference in the fit of the 50 inside each circle.

Photograph 10 - this shows the largest scalloped circle as well as size 7 die cut sitting inside.

I hope this provides an acceptable alternative to the frame I used! 

That's about it for today. Until tomorrow, happy crafting.

JanB.

Sunday, 19 February 2017

Bleaching Video

Hello, Crafters.

Earlier this morning, I uploaded my Bleaching Beuautiful You video. 

Bleaching is another of those techniques I really enjoy, partly because the result can't really be predicted. 

In the video I show the test I carry out before starting to create a card, even though this is no guarantee of the final result. 

This was demonstrated brilliantly with the Perfect Plum card I shared with you on Wednesday.

The image of the lady was very definitely close to Blushing Bride, although the sentiment, which was also on Perfect Plum resulted in a very bluey colour with just small areas that hinted at Blushing Bride. 

As I explained on Wednesday, I can only imagine this happened because the two pieces of cardstock must have come from different batches - I can't think of any other explanation. 

I'm surprised I allowed myself to be caught out with two doilies stuck to each other because I normally choose to use two at a time, as it makes the white whiter! 

For this project, I only needed a single doily because I was changing the colour of it anyway, but I found that I had two on the Blushing Bride card! 

At least I didn't make the same mistake on the video card, and it'll be relatively easy to go back and adhere the double doilies together! 

In all the 254 videos I've now uploaded onto YouTube, this is the second video where I had a lightbulb moment while I was actually filming. 

(I wish I could remember what the first one was). 

On this video, I said to put some SNAIL on the two ends of the ribbon, and adhere the ends round the back of the card. 

As usual it was a bit of a fiddle and didn't work properly and then the light went on!! 

I did a rewind and suggested that the SNAIL is put onto part of the ribbon that would be sitting on the front of the card.

It was so much easier and, with the aid of my Grid Paper, success was guaranteed!

On the video,I also showed the other two cards I made last Tuesday when I was experimenting with the Beautiful You Stamp Set, with mauve/purple colours and of course, bleach! 

I will explain both card in detail during the coming week.

Yesterday I was working on a lidded box that was big enough to hold ten cards and envelopes, which had been requested by one of my YouTube subscribers.

I was so pleased with the result, that I'll be making a video. 

I was thinking that, as those of you in the US have different size cards to the everywhere else (I believe?),  I could give two sets of measurements and one set of instructions so the video would be beneficial to all cardmakers, wherever they live. 

So that's the plan!

I think that about it until tomorrow. I wish you a happy Sunday and happy crafting.

JanB.

Wednesday, 15 February 2017

Bleach Technique

Hello, Crafters.

On 24th-25th February 2017, I shall be on the Stampin' Up! Stand at the Make It Show, in Farnborough. There will be five of of us, and we will take it in turns in running the Make-n-Take table, and also the Demonstration table. 

I have chosen to demo the Beautiful You Stamp Set as well as our new Watercolour Pencils. I'm currently working on as many different ideas for the stamp set, as possible. Yesterday I was experimenting with the bleach technique which never fails to fascinate me. I decided to use each of the three images and chose three similar colours - Rich Razzleberry, Elegant Eggplant and Perfect Plum.

Please remember bleach is very toxic, and should only be used in a well-ventilated room. Do not breathe in the fumes

I took six pieces of cardstock, two in each colour, and wiped one piece of each colour with my Embossing Buddy. I inked each stamp with Versamark in turn, and stamped each on one of the pieces of cardstock. Then I sprinkled the images with black embossing powder and heat set them. 

I repeated the process using White Embossing Powder, making sure I kept the image on the same colour cardstock as the black embossed images. Please note we no longer sell black embossing powder. 

The two ways I know of painting with bleach are either neat or diluted. For the black embossed images I used an Aqua Painter that I keep just for bleaching and filled it with tap water. I also put a small amount of bleach in a ceramic dish. 

I squeezed the brush gently to make sure the brush head was wet, dipped it in the bleach and painted inside the black embossed lines. The bleach did the rest of the work. 

I finished all three images and put them to one side to dry while I worked on the white embossed images. I washed the brush head I had just been using to make sure I didn't leave any bleach on it. 

I took my other Aqua Painter that I save for bleaching and used the bleach neat. I don't like bleaching like this because diluted bleach works brilliantly and therefore renders this method redundant.

For today's card I chose to use the elegant lady on the Perfect Plum Cardstock (CS). The colour of the bleached image was very close to Blushing Bride. I took one of our doilies and went over it with a Sponge Brayer and Blushing Bride Ink. I put it to one side to dry while I die cut the image using the Stitched Shapes Oval Die no 4.

I took a piece of Perfect Plum CS and stamped the Happy Birthday sentiment from the Confetti Celebration Stamp Set in Versamark and heat emnbossed using black embossing powder.

I used my Aqua Painter with water to bleach inside the letters. The bleaching this time created a bluey colour as opposed to the Blushing Bride of the lady!

I don't know why the two came up differently. I can only imagine the the pieces of cardstock were from different batches but this is one of the beauties of this technique.......you never know what colour you're going to get!

My card base is Perfect Plum CS with a layer of Blushing Bride CS and a top layer of Perfect Plum CS. I dry embossed the top layer using the Falling Petals Embossing Folder. 

I adhered the top two layers together and adhered a piece of Blushing Bride 3/8" Stitched Satin Ribbon around the lower part and adhered the two ends at the back using SNAIL.  

I die cut the sentiment using the Stitched Shapes Oval Die no 2 and adhered it over the ribbon with Dimensionals on the top and bottom but not at the ends. 

Then I used Tombow to adhere the doily in position and used Dimensionals to put the image in the centre of the doily.

For the Blushing Bride CS card insert, I heat embossed a partial image of the lady with black embossing powder and bleached the image. I gave it a little while to dry before I adhered it to the card base. 


The last photograph shows the white embossed image, which has bleached the same as the black image but looks difference because it has a white outline as opposed to black - without a doubt the black is by far the best! Do you agree?

If you're in the Farnborough area on 24-25.02.17, or you're looking for a great day out, come to see the Make It Show, and visit the Stampin' Up! stand. Come and say hello. It'd be lovely to meet you!

Until tomorrow, happy crafting.

JanB.

Tuesday, 9 August 2016

Pretty Kitties!

Hello Crafters.

To create today's card, I used an amazing FIVE stamp sets!

When I began this card, I knew the scene I wanted was these two kitties sitting on a brick wall.

I started my card with a Whisper White Cardstock base, with a layer of Tip Top Taupe, then a layer of Soft Sky with a half layer of Tip Top Taupe. 

I took this half layer and stamped the flowers from the In the Meadow Stamp Set using Always Artichoke Ink. I stamped four images at different heights and then used the grass stamp all along the bottom, several times, to fill in the gaps. Then I ran this piece through the Big Shot with the Brick Wall Embossing Folder. I thought about colouring the flowers but decided against it because I wasn't sure if, whichever colours I chose, they might look odd colours on coloured cardstock

For the background behind the wall, I used the triple tree stamp from the Limited Edition Thoughtful Branches Stamp Set. This stamp set is only available during August 2016 or while stocks last, whichever comes first! I inked the stamp in Always Artichoke Ink, then gently stamped it off once and then stamped onto the Soft Sky Cardstock. I did this three times. I considered stamping the tree tops on the trees but decided against it because I thought it would make the card look too busy.

I adhered all the layers in place using Tombow. 

I stamped the two kitties from the Pretty Kitty Stamp Set using Archival Basic Black Ink on Smokey Slate Cardstock. Then I very patiently fussy cut them both out! I used my Flirty Flamingo Marker pen to colour the bow on the sitting down kitty and my Marina Mist Marker Pen for the singing kitty. I adhered them on the wall using Dimensionals.

I chose the top sentiment from the Picture Perfect Stamp set and stamped it between the two cats using Archival Basic Black Ink. Then I chose the Happy Birthday sentiment from the Confetti Celebration Stamp Set. 

Using Archival Basic Black Ink again, I stamped it on a piece of Tip Top Taupe Cardstock. I punched it out using the Classic Label Punch and adhered it to the brick wall using Dimensionals....and that was it!
 
REMINDER to ALL Stampin' Up! customers: don't forget yo use the Bonus Days Coupon/s you earned during July. They are only valid until 31st August 2016 - use them or lose them! If you know you're not going to be using them, you can pass them onto friends!
 
That's about it for today. I'm off to work now, so until tomorrow, happy crafting.

JanB.