This is the last weekend before Christmas - are you ready? I'm pleased to say I am, sort of!!
I received a Christmas card from one of the ladies who comes to my classes, and just fell in love with it!
I contacted Angela, and asked if she minded if I copied it, and also made a video, too. Unfortunately, Angela hasn't used Stampin' Up! products, so it has been quite a challenge!
The first card I made, I allowed myself to get somewhat carried away with it and finished up with a card, whilst I liked it, there was no way I was going to be able to make it into a video! It was too complicated and would have taken way, way too long!
I'll share a photograph of it on Sunday, along with a photograph of Angela's card.
I started my second card, and that was a lot more video-friendly. Unfortunately, by this time, it was getting really quite late, and I hadn't made a card for today - so I went for the easy option!

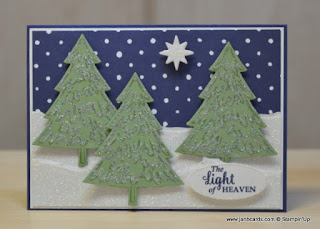
Today's card is based on the card I'm working on for the video but, as I don't want to give too much away about Sunday's video, I won't say any more!
To make today's card I started with a Night of Navy Cardstock (CS) base, with a layer of Shimmery White CS. I used the spotted design from the Floral Boutique Designer Series Paper (DSP) for the top layer.
I took two strips of Dazzling Diamonds Glimmer paper and tore the top edge of each piece, and adhered them, using Tombow, one above the other to look like snow banks.
For the trees, I chose Wild Wasabi CS and stamped the largest tree from the Peaceful Pines Stamp Set, three times in Wild Wasabi Ink. I die cut them using the co-ordinating die in the Perfect Pines Framelits Dies.
Using my now-retired two way glue pen, I painted glue along the stamped lines on the trees and dipped them into my box of Dazzling Diamonds Glitter.
I adhered the trees onto the card front using Dimensionals but I added Glue Dots to the Dimensionals that would be going onto the Glimmer Paper.
The stars are more die cuts I found in my Dazzling Diamonds Glimmer Paper Ziplock bag!
 I adhered them
on top of each other using Dimensionals - plus a Glue Dot on the top one
- and adhered then at the top of the card.
I adhered them
on top of each other using Dimensionals - plus a Glue Dot on the top one
- and adhered then at the top of the card.I used some regular Scotch Tape to cover the three dots that are on the sentiment stamp from the Star of Light Stamp Set.
Using Night of Navy Ink, I inked the stamp, removed the tape and stamped the image on to a piece of Shimmery White CS.
Using the smallest oval straight cut die from the Layering Ovals Framelits Dies, I die cut the sentiment. I put wet glue around the outside of the die cut and dipped it in the box of Dazzling Diamonds Glitter.
 The final touch was
to adhere the sentiment to the snow banks using Dimensionals with Glue
Dots!
The final touch was
to adhere the sentiment to the snow banks using Dimensionals with Glue
Dots!Tomorrow, I shall be out most of the day until the afternoon, so I really don't have much time to make a video, upload it, and edit it ready for 7 am Sunday morning! LOL!
I hope you have a great weekend. Until tomorrow, happy crafting.
JanB.


Absolutely LOVE it ... can hardly wait for tomorrow's video now!
ReplyDeleteHi, Geraldine. I hope you're not disappointed tomorrow!! ☺ Happy crafting, JanB.
DeleteLove, love, love it! Can hardly wait for the video! Beautiful card!
ReplyDeleteHi, JOeytipping. I hope you like the video card as much as this one! ☺ Happy crafting, JanB.
Deletethere is something special about this card scene Jan. it really does say peacefulness. take care look forward to the video. cheers
ReplyDeleteHi, Pearl. Hope you enjoy the video. ☺ Happy crafting, JanB.
Delete