
 Hello, Crafters.
As I thought I would, I had serious problems with Vicki's wedding invitations yesterday!
The two stamps I'm using are non-Stampin' Up!, photopolymer and at least five years old!
The image stamp is fine but the sentiment is disintegrating a tad more every time I clean it, and I have now lost part of one of the letters!
I have chosen another stamp that is the same sentiment and I'm having another go with it today.
 On
a much happier note, yesterday I used my big Carl guillotine, which
cuts through 35 sheets of 80gsm paper (normal computer paper) in one go.
On
a much happier note, yesterday I used my big Carl guillotine, which
cuts through 35 sheets of 80gsm paper (normal computer paper) in one go.I was able to cut 20 sheets of vellum, and then three lots of 15 sheets of cardstock.
This saved me masses of time!
Today's card is my first play with the Star Blast Edgelits Dies.
 I cut a piece of Dazzling Diamonds Glimmer Paper the size of my standard top layer, which is 3 7/8" x 5 1/2".
 I positioned the main die so the top star almost touched the top of the glimmer paper, and ran this through my Big Shot using my new Platform and the Precision Base Plate.
 I
turned the Glimmer Paper round 180° and repeated the process, again
making sure I left a small gap from the bottom of the Glimmer Paper to
the top of the die.
I
turned the Glimmer Paper round 180° and repeated the process, again
making sure I left a small gap from the bottom of the Glimmer Paper to
the top of the die.I also made sure I had the die lined up straight, and I saved the stars that were die cut during this process.
 I
used Sahara Sand Cardstock (CS) for the base of my card, then a layer
of Whisper White CS, and a top layer of Falling in Love Designer Series
Paper.
I
used Sahara Sand Cardstock (CS) for the base of my card, then a layer
of Whisper White CS, and a top layer of Falling in Love Designer Series
Paper. I adhered all three pieces together using Tombow, and then I adhered my Star Blast die cut in the centre.
I took a scrap of Glimmer Paper and punched out some more stars using the Confetti Stars Border Punch.
Using these, as well as the stars from the Star Blast Die Cut, I adhered a smaller star into each "hollow" star.
Then I adhered a smaller star on top of this. I did this to the five hollows on the top and the five at the bottom!
I took the two largest stars and adhered them above and below the sentiment using Dimensionals.
 Then I added two of the next size of stars in the centres.
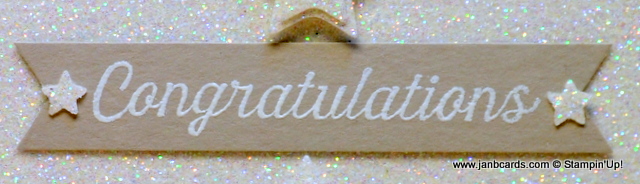
I took a strip of Sahara Sand CS and wiped it over with my Embossing Buddy.
Then I inked the CONGRATULATIONS stamp from the Flourishing Phrases Stamp Set with Versamark, and stamped onto my strip of Sahara Sand CS.
I sprinkled it with White Embossing Powder and heat set it.
I fishtailed both ends using the Triple Banner Punch, and then I added two small stars at either end of the sentiment.
Right! I'm off to see what I can do with these wedding invitations!
Until tomorrow, happy crafting,
JanB.
Hey Jan, another beautiful card! That glimmer paper is gorgeous. Sorry your having troubles with those stamps. When I first started collecting photopolymer stamps I was told to only clean with soap and water because some of the cleansers on the market will cause them to disintegrate over time. I currently use baby wipes to clean my stamps as that is what most of the cardmakers in the states seem to be using. None of my stamps are over two years old ,so time will tell if that works. (my stamps are from several different companies.)
ReplyDeleteHi, Sheron. Many thanks for your feedback. I was told not to use Stazon Cleaner on photopolymer but out Stampin Scrub works for SU photopolymer. I think the problem is partly age - all my non-SU photopolymer stamps are over five years old - but also partly quality. Yesterday, I changed to a different non-SU sentiment stamp for the invitations and it was plain sailing. The image stamp, which has been fine, was from the same set as the sentiment that was disintegrating and both stamps were solid red by the time I'd finished, but the second sentiment stamp only had a slight hint of red to it! I'm not sure what that means - is it quality! ☺ Anyway the good news is, I successfully stamped all 60 invitations and only messed up on one! I'm a much happier bunny today than I was yesterday morning! LOL! ☺ Happy crafting, JanB.
DeleteBeautiful Jan.
ReplyDeleteHi, Jane. I'm glad you like this. I am pleased with how it turned out! ☺ Happy crafting, JanB.
DeleteYour card makes ne want that die, it looks great. I'm sure all will be well with the invitations
ReplyDeleteHi, Kaye. Thanks for your vote of confidence - it's a great motivator ☺ and you're right! Yesterday I successfully stamped 60 invitations using the same image stamp but a different sentiment stamp! ☺ Happy crafting, JanB.
Delete