 Hello, Crafters.
 When I
was writing my blog last week, there were two or three occasions when I
referred to my die cut Ziplock storage bag for my Dazzling Diamonds
Glimmer Paper (DDGP).
 I said that I had quite a lot of die cuts in there, so yesterday, I thought I'd use some for today's card!
The only DDGP die cut on this card that I had to cut "fresh" is PEACE - everything else was in the Ziplock bag!
When I had finished today's card, I spread the remaining die cuts out in an A4 plastic lid and photographed it - see photograph 7!
If I really applied myself, I have enough die cuts to make several more cards!
To make today's card, I started with a Whisper White Cardstock (CS) base, then a layer of Smokey Slate CS and a top layer of Whisper White CS.
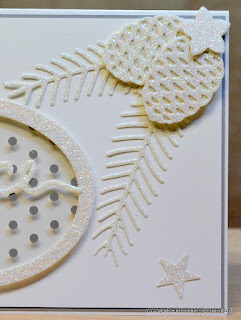
The first pieces I picked out of the Ziplock bag are the two pines branches, four pine cones and the oval frame.

The spotted acetate I used in the frame, is a product that I think has been somewhat over-looked.
It's called the Fabulous Foil Designer Acetate (page 175 in the annual catalogue).
The designs on the acetate are in gold but look like silver on the reverse.
 The acetate
arrives with a protective plastic sheet over it, which keeps it clean and
scratch-free.
 When you're ready to use it, you just remove it!
I played around with various different arrangements until I settled on the design you see.
I die cut the acetate using the largest oval die from the Layering Ovals Framelits Dies but I don't think that was the right size.

I applied Tombow to the back of the DDGP oval frame and adhered it to th acetate.
I found the acetate oval was a bit larger tham the DDGP oval!
I carefully cut off as much off the acetate oval as necessary, so it couldn't be seen sticking out from under the oval frame.
Then I used Tombow to adhere PEACE which fitted across the oval from side to side very neatly!
I attached the image to the card front using Dimensionals.

I used Tombow to adhere the top "holey" pine cone to the solid one underneath and then to adhere the pine branches to the top layer.
I used Glue Dots to attach the pine cone that's underneath the top pine cone, which has been attached using Dimensionals and Glue Dots.
I'm not sure where the flower I've used on the top of the pine cones came from.
I suspect its the Wonderful Wreath Framelits Dies, but it finished off the corner very nicely.
The final touch was to add three stars - again, I'm not sure where they came from!
This is the disadvantage of storing my die cuts in Ziplock bags, but I can live with that.

Just a note about all the die cuts you can see in the box!
I have no idea why I have three hearts from the Bloomin Heart Thinlits dies, another two oval frames, three stocking tops, three decorative strips from Flourish Thinlits Dies, and a selection of stars, bows, and baubles!
Do you hoard like this?
 That's abut it for today. Until tomorrow, happy crafting.
JanB.

No comments:
Post a Comment