 Hello, Crafters.
I think I may have given the wrong impression yesterday when I wrote about my Christmas Day video!
The video will be recorded and uploaded onto YouTube tomorrow, edited on Christmas Eve, and scheduled to publish at 7 am on Christmas morning.
None of this will involve me in working on Christmas Day, and I'm sorry if I gave you the impression that I would be.
 Please rest assured, I will be spending the most special day of the
year going to Church and being with my immedite and extended family. ☺
Please rest assured, I will be spending the most special day of the
year going to Church and being with my immedite and extended family. ☺Hubby and I had a lovely meal out last night at our local Singaporean restaurant. We have been going there for the last twelve years and never tire of the first class food, which is always cooked fresh.
Yesterday, I made two gift card bags using the Mini Treat Bag Framelits Dies. I find these bags are brilliant when made with Designer Series Paper (DSP) - I haven't tried using cardstock but I imagine it's too thick.
 I used the
Candy Cane Lane DSP - the Real Red one for my son and the Crumb Cake one
for Stephen, my eldest grandson. My
son is Leigh Darren but has always been know as LD.
 The heart die is part of the Mini Treat Bag Framelits and I checked it with the new Sweet & Sassy Framelits to see if the shape co-ordinated with the sweetheart style.
 Although the general shape is the same, this one is a
bit taller, slightly slimmer! The design of the heart DSP is the reverse
of the main Real Red design of the bag.
 For the LD, I used the retired Little Letters Thinlits Dies and the main DSP.
 After I had adhered the heart
to the bag and the letters to the heart - all with Tombow - I painted
the LD using my Clear Wink of Stella Glitter Pen.
After I had adhered the heart
to the bag and the letters to the heart - all with Tombow - I painted
the LD using my Clear Wink of Stella Glitter Pen.For the tag, I cut two, two inch strips of Kraft Paper, one for each bag, and punched the end using the Scalloped Tag Topper Punch. Then I rounded the two corners using the Project Life Corner Rounder.
To decorate the tag, I used a reindeer from the Cookie Cutter Christmas Stamp Set and stamped in Soft Suede ink on Crumb Cake Cardstock (CS). To add a bit of sparkle to the antlers, I painted them with the Clear Wink of Stella Glitter Pen.
 I used my Real Red Marker Pen to paint his nose and
added googly eyes.
I used my Real Red Marker Pen to paint his nose and
added googly eyes.I added two Mini Jingle Bells and a holly charm from the Christmas Trinkets Embellishments to a length of last year's Silver Cord to decorate the tag cord, and adhered it in place using Glue Dots. I also used two Glue Dots, one either end, to keep the flap of the bag closed.
 The little peg has been on my desk for quite some time, and I can only
assume it came off a swap I received sometime.
The little peg has been on my desk for quite some time, and I can only
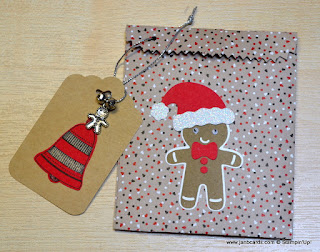
assume it came off a swap I received sometime.To decorate Stephen's bag, I chose the gingerbread man from the Cookie Cutter Christmas Stamp Set and stamped the image onto Whisper White CS using Soft Suede Ink. I added googly eyes, a Real Red Bow Tie and buttons, both punched out from some Real Red CS.
 I used the Jolly Hat
Builder Punch to punch out the Real Red CS Santa hat and some Dazzling
Diamonds Glimmer Paper for the fur trim and the pom-pom. I adhered it
all together, and then oon the bag, using Tombow.
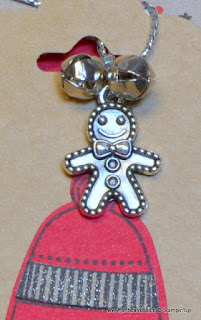
 I decorated Stephen's tag with a bell from the seasonal Bells Stamp Set, stamped on Real Red CS in Archival Basic Black Ink and punched it out using the Bell Punch.
I stamped another bell on some Crumb Cake CS, and cut the two strips out by hand. I adhered them in place using tombow, and then painted both pieces with my Clear Wink of Stella Glitter Pen.
 I
added two Mini Jingle Bells and a gingerbread man charm, from the
Christmas
Trinkets Embellishments, to a length of last year's Silver Cord to
decorate the tag cord, and adhered it in place using Glue Dots. I punched
a hole in the top of the flap to tie the cord through. I also
used two Glue Dots, one either end, to keep the flap of the bag closed.
I
added two Mini Jingle Bells and a gingerbread man charm, from the
Christmas
Trinkets Embellishments, to a length of last year's Silver Cord to
decorate the tag cord, and adhered it in place using Glue Dots. I punched
a hole in the top of the flap to tie the cord through. I also
used two Glue Dots, one either end, to keep the flap of the bag closed.Well done, Stampin' Up! and well done UPS! We were advised that we should place orders that were needed in time for Christmas by the 13th. I placed my last order on the 18th and it's just arrived!
Until tomorrow, happy crafting.
JanB.

No comments:
Post a Comment