 Hello, Crafters.
Although this is card number 3 in my Peace This Christmas series, the sentiment is the first one I stamped.
I can’t quite remember why I chose not to use it for my first card, but it was ideal for card number 3 although I needed it to be a bit longer.
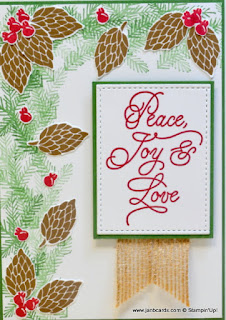
I started my card with a base of Whisper White Cardstock (CS), then a layer of Garden Green CS and a top layer of Whisper White CS.
I adhered the Garden Green layer to the card base using Tombow.
 At this stage, I wasn’t too sure which direction my
design was going to take.
 The only idea I had was to stamp some pine branches along one, or two, or three, or four sides, and then to adhere some fussy-cut pinecones and berries!
I inked the pine branch stamp in Garden Green Ink and stamped the first image in the top right-hand corner.
Without re-inking, I stamped another image nearby.
I repeated this all the way down the right-hand side of my top layer until I reached the bottom of the sheet.
 I spent some
time arranging the fussy-cut pinecones and berries as well as the sentiment in various
ways but I couldn’t come up with any arrangement that looked anything close to pleasing!
 I re-inked the pine branches stamp and carried on stamping along the bottom edge, towards the left-hand corner.
 Again, I
arranged, and rearranged the pinecones and berries, as well as the sentiment.
Again, I
arranged, and rearranged the pinecones and berries, as well as the sentiment.Then I decided to turn the layer round, so the stamping was now in the top left-hand corner instead of the bottom right-hand corner!
Then it all started to fall into place, except for the sentiment which was still too short!
I die cut the sentiment using one of the square Stitched Shapes Framelits.
To get the shape into an oblong, I fitted the framelit back into the stitched holes, with the edge going down he other side that needed stitching/cutting!

When I was happy it was in the correct position, I cranked it back through the Big Shot!
It worked well, except for the little “stitch” lines that are just outside the top of the frame, but it’s so minuscule, I decided it wasn’t enough to worry about. Do you agree?
I layered the sentiment onto a piece of Garden Green CS and needed to lengthen it somehow.
I toyed with several ideas of using different DSP’s that had minimal patterns on, strips of Washi Tape, ribbons and finally our 5/8” Burlap Ribbon.
I decided if I used two strips side by side with the ends fishtailed, it would look like one piece that was 1¼” wide!

I started to adhere the pinecones and berries into position around the stamped border in what I hope is a random pattern!
I adhered the Burlap into position by using Fast Fuse only on the area that would be hidden under the sentiment.
My final step was to adhere the sentiment using Dimensionsals.
I was really chuffed with the result!
The card is a lot busier than I normally do, but I’m very happy with it.
I’d appreciate your feedback, please! ☺
That’s about it for today.
Until tomorrow, happy crafting.

JanB.

Beautiful card. I am not much into fussy cutting but this is so pretty I will have to give it a go.
ReplyDeleteHi, Ina. It really is a shame that this set didn't come with its own set of dies! ☺ Happy crafting, JanB.
DeleteOh my! And I thought it couldn't get any better than Peace #2 card, but now I'm so loving this one! I guess I don't have to pick a favourite though ... this is just beautiful, Jan! Love everything about this one! And I know exactly what I'm going to be doing when I get into my craft room a little later! Thanks so much!!
ReplyDeleteHi, Geraldine. This has been a really easy stamp set to work with! ☺ Happy crafting, JanB.
Delete